Default mouse cursors in Windows are not so fascinating, so users download and change the mouse cursor schemes based on their liking. Many users who have altered the inbuilt cursor with a custom cursor of their choice on their PC are facing an issue. It has been noticed that once the system restarts, the custom cursor has been reset to the Windows default cursor. The problem is that the change to a custom cursor is not permanent as it resets every time the system is rebooted. In this case, the users have to modify the mouse pointer settings repeatedly after every system restart.
Are you facing this issue where the custom cursor on your PC is resetting after a reboot? Then, go ahead and read this article. Here, we have curated some fixes that can help you resolve this problem on your Windows PC.
Fix 1 – Move the Custom Cursor to Windows Cursors Folder
Many users confronting this custom cursor resetting after a reboot issue have noticed that moving the custom mouse cursor files to the Windows cursors folder and then making the changes in the cursor settings has helped them fix this problem. Follow the steps mentioned below.
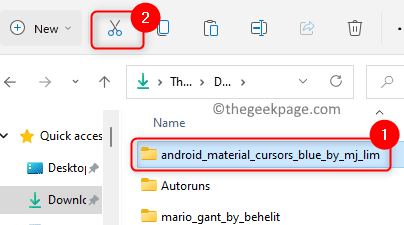
1. Go to the location where you have downloaded and extracted the custom cursor files of your choice.
To move this custom cursor folder click on the Cut icon at the top.
2. Press Windows + E to open the File Explorer.
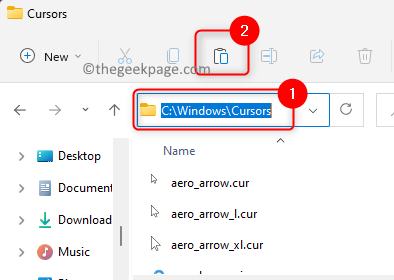
In the File Explorer’s navigation bar, type or copy and paste the location below.
C:\Windows\Cursors
3. Once you are inside the Cursors folder, click on the Paste icon at the top to paste the custom cursor folder which you had copied previously.
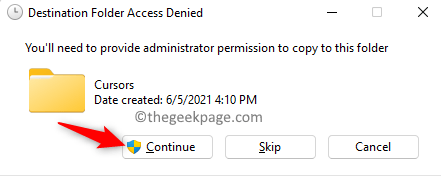
Click on the Continue button when you see a pop-up window that says Destination Folder Access Denied.
4. Click on the Windows Start button (four blue squares) located on your taskbar.
Type mouse settings in the Windows search box.
Click on Mouse settings in the search result to open the Mouse settings in Bluetooth & devices Settings.
5. On this page, scroll down and click on the box labeled Additional mouse settings in the Related settings section.
Now the Mouse Properties window opens up.
6. Select the Pointers tab in the Mouse Properties window.
You will see an Error message that says the custom cursor has changed and is missing. Keep clicking on OK till this error message stops popping up.
Here, in the Customize section choose the type of cursor that needs to be changed. For example, we have selected Normal select to change the cursor.
Then, click on the Browse button.
7. In the window that pops up, go to the C:\Windows\Cursors location.
Open the folder with the custom cursors that you had moved here in the previous steps.
Choose the cursor that is specific for the type selected and click on Open.
8. Repeat above Step 7 to customize the different cursor types in the list in the Customize section.
Once you are done making the changes, click on the Save As… button at the top in the Scheme section.
Give a name to this custom cursor setting that you have done so that it is easily available the next time.
Make sure to select this new cursor scheme. Then, click on Apply and OK to save the changes.
9. Restart your computer and check if the custom cursor resetting after the reboot issue is resolved.
Fix 2 – Make Changes in the Registry
1. Open the Run box using the Windows and R key combination on your keyboard.
Type regedit and click on OK to open the Registry Editor.
You will see the User Account Control prompt asking for permission. Click on Yes.
2. Navigate or copy-paste the path in your Registry’s navigation bar to reach the Install key.
HKEY_LOCAL_MACHINE\SOFTWARE\Synaptics\SynTP\Install
3. Once the Install key is selected, move to the right side and find the entry DeleteUserSettingsOnUpgrade.
Note: If the above entry/key is not found, you need to create a new one following the steps below.
Right-click on the empty place in the right window pane and select New –> DWORD (32-bit Value) in the menu.
Give the key a name as DeleteUserSettingsOnUpgrade.
4. Double-click on the entry DeleteUserSettingsOnUpgrade to modify its value.
In the Edit window for the entry, change the Value Data field from 1 to 0.
Click on OK.
5. Make changes to the mouse cursor as per your liking.
Reboot your PC and check if the custom cursor resetting problem is fixed.
Thanks for reading.
Did you find this article useful in resolving the issue of custom cursor resetting after every system reboot? We hope you are now able to use the custom cursor of your choice on your Windows PC. Please let us know your thoughts and opinions in the comments below.


