Microsoft Teams is a business platform app where it is widely used in organizations for effective communication like meetings, chat, video conferencing, etc. But a few users while using the Teams desktop client are facing the error saying “We’re Sorry – We’ve Run Into an Issue”. Anyways you can use the Teams web since it is similar to the Teams desktop app. But to solve this error, we have different solutions listed in detail here in this article. You can try them and get rid of the problem.
Firstly try out the below mentioned basic options to solve the issue
Close The Teams Application
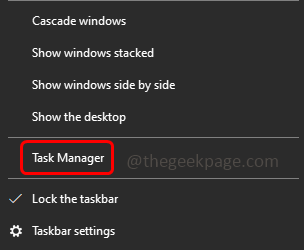
Step 1 – Right click on the taskbar, then click on the task manager
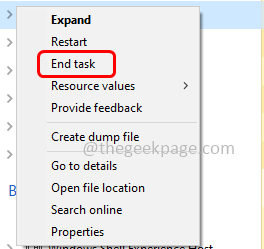
Step 2 – In the task manager, right-click on Microsoft teams, then click on the end task
Sign out And Again Sign in To Microsoft Teams Account
Step 1 – Click on the profile in the Teams app at the top right corner. From the appeared list, click on sign out
Step 2 – There appears a pop up, click on sign out. This will sign you out of the Teams
Step 3 – Now again open the Teams app, choose the account that you were using previously, or you can also use other accounts. To use other accounts click on use another account
Step 4 – Enter the password and click on sign in
Step 5 – Microsoft will send a code to your email. Check your email inbox and copy the code
Step 6 – Enter the code in the Teams login page and click on next
Step 7 – This will open the Teams. Now check if the issue is solved.
If the issue is not solved with the above basic steps, then follow the below methods
Method 1: Delete The Microsoft Teams Cache
Step 1 – Open the run prompt using Windows + R keys together
Step 2 – Copy and paste the following command in the run prompt and hit enter
C:\Users\%username%\AppData\Roaming\Microsoft\Teams
Step 3 – Double click on the blob_storage folder to open it
Step 4 – Delete the folder present inside blob_storage. To delete, right click on the folder and click on delete
Step 5 – Now delete the cache, to do that go back to the Teams folder, then find cache folder and open it
Step 6 – Delete all the files present in it. To do so, select all the files (Ctrl + A) right click on them and click on delete
Step 7 – Also navigate to the Teams folder back and find databases folder
Step 8 – Double click on it to open and delete all files present in it
Step 9 – Now again in the teams folder find two more folders IndexedDB and Service Worker then delete the contents present in them. Now check if the issue is solved.
Method 2: Disconnect The User Account And Then Reconnect
Step 1 – Open windows settings using Windows + I keys together
Step 2 – Click on Accounts
Step 3 – On the left side, click on access work or school
Step 4 – At the right, check the account you are attempting to sign into the Microsoft teams. Click on the linked account then click on disconnect
Step 5 – In the confirmation pop up, click on yes
Step 6 – Then again re-connect it. Now check if the problem is solved
Note – If you are not linked to any account, then first link it and then use to check if the issue is solved.
Method 3: Run The Teams App In Compatibility Mode
Step 1 – Right click on the Teams app and then click on properties
Step 2 – In the opened window go to the compatibility tab
Step 3 – Tick the checkbox beside Run this program in compatibility mode for
Step 4 – Then select Windows 8 from its dropdown
Step 5 – To save the changes click on apply and ok
Method 4: Run the Compatibility Troubleshooter for Microsoft Teams
Step 1 – Right click on the Teams app and then click on properties
Step 2 – In the opened window go to the compatibility tab
Step 3 – Then click on the Run compatibility troubleshooter button
Step 4 – It will take few seconds to and then in the opened window, click on Try recommended settings
Step 5 – Further press the test the program button, then log in to your account within Teams app and check
Step 6 – Click on next
Step 7 – Then select Yes, save these settings, or No, try again depending on the test results. If you select No then it will bring up further troubleshooting options
Step 8 – Once the process is done, check if the Teams app works fine.
Method 5: Run Teams As An Administrator
Step 1 – Right click on Teams icon then click on properties
Step 2 – In the opened window, go to the compatibility tab
Step 3 – In the settings section, choose run this program as an administrator by clicking on the checkbox beside it (a tick mark should be present)
Step 4 – To save the changes click on apply and ok
Method 6: Delete Generic Credentials for Teams App
Step 1 – Open the credential manager. To do that open the run prompt using Windows + R keys together, then type control keymgr.dll and hit enter
Step 2 – Alternatively you can also type credential manager in the windows search bar, then from the search results double click on it and open the credential manager
Step 3 – Choose Windows credentials
Step 4 – In the generic credentials section, find Microsoft Office account credentials and Teams credentials. Click on the drop down beside it
Step 5 – Now click on remove to delete its credentials
Step 6 – Close the credentials window and restart the system. Now use Teams and check if the error is solved.
Method 7: Use The Teams Web Version
Step 1 – Open the browser and go to the Teams web page
Step 2 – Click on sign up for free button at the top right
Step 3 – Enter the email address and click on next
Step 4 – Choose the required option like school account, work, friends account by clicking on the radio button beside it and click on next
Step 5 – Once the account is set up use the Teams app and see if it works as expected.
Method 8: Enable The TLS Feature
Step 1 – Open the run prompt using Windows + R keys together
Step 2 – Type inetcpl.cpl in the run prompt and hit enter
Step 3 – This will open the internet properties, go to the advanced tab
Step 4 – Scroll down and select Use TLS 1.0 , 1.1, 1.2 options by clicking on the checkbox beside them
Step 5 – Click on apply and ok. Now check if the issue is solved.
Method 9: Reinstall The Microsoft Teams App
Step 1 – First uninstall the Teams app, to do that open the windows settings using Windows + I keys together
Step 2 – Click on apps
Step 3 – In the apps & features window, find Microsoft teams and click on it. Then click on uninstall
Step 4 – Now reinstall the Teams app, to do that go to the Microsoft website and click on get in store app
Step 5 – Click on install. Set the Microsoft Teams account and use it. Then check if the issue is resolved.
That’s it! I hope the above provided information is useful. Let us know which of the above methods worked for you. Thank you and happy reading!!


