DirectX is an important component of the Windows operating system that allows the multimedia applications on your PC to work with the audio and video hardware. Mostly, it is useful for playing games that use DirectX, so that they can make efficient use of the multimedia features provided by your hardware and in turn improve the overall gaming experience. However, there is one issue faced by users with the DirectX installation on Windows 11/10 PCs where it fails to install and displays an error to the user. The error message is seen as below
“DirectX Setup Could Not Download File Please Retry Later or check network connection”
This problem is seen with the regular setup file that is used to install the necessary DirectX files into your system. Are you confronting this DirectX setup failed problem while trying to install DirectX to fix some issue with your game on your Windows PC? Then, go ahead and read this article where we have curated a list of troubleshooting methods that can help your fix this problem with DirectX Setup on your Windows 11/10 computer.
Fix 1 – Disable and Enable the Network Adapter
Step 1. Press Windows + R to open the Run box.
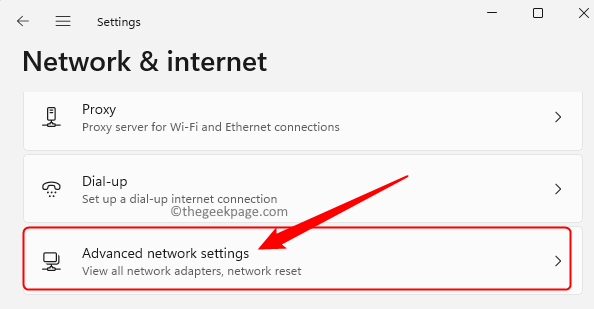
Step 2. Type ms-settings:network and hit Enter to open the Network & internet page in Settings.
Step 3. Scroll down and click on Advanced network settings.
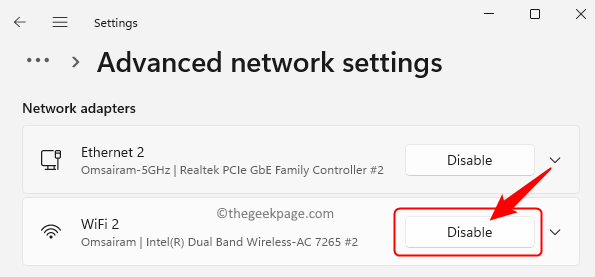
Step 4. On this page, click on the Disable button next to the network adapter you are currently using.
If you are using the WiFi network adapter, then click on Disable next to it.
Step 5. After the network adapter is disabled, then wait for a few seconds and click on Enable to enable the adapter.
Step 6. Restart your computer.
Step 7. Click here to go to the DirectX web installer download page.
Step 8. On this page, click on the Download button to download the DirectX End-User Web Installer onto your PC.
Step 9. After the download is complete, run the dxwebsetup executable to start the installation.
Step 10. Accept the license terms and agreement and then follow the on-screen instructions to complete the installation.
You must be able to install DirectX without facing the error.
Fix 2 – Reset Network Configuration and Flush the DNS Cache
Step 1. Hit the Windows key and type the text command prompt in the search bar.
Step 2. Right-click on Command Prompt in the best match search result and choose Run as administrator.
Step 3. Type the command below and hit Enter to flush the DNS cache.
ipconfig /flushdns
Step 4. After the DNS cache is cleared, execute the command given below.
netsh winsock reset
Step 5. Restart your computer and try to install the setup as mentioned in Steps 7 – 10 in Fix 1 above.
Fix 3 – Disable Firewall and Virus Protection
Step 1. Tap on the Windows key and type firewall and network in the search box.
Step 2. Click on Firewall & network protection in the best match search result displayed.
Step 3. Click on Private network in the network displayed.
Step 4. Then, turn off the toggle below Microsoft Defender Firewall.
Click on Yes when prompted by UAC.
Step 5. Next, click on Virus & threat protection in the left panel.
Step 6. Tap on Manage settings in Virus & threat protection settings.
Step 7. Turn off the toggle associated with Real-time protection, Cloud-delivered protection, Automatic sample submission, and Tamper protection.
Step 8. Now, install DirectX using the steps mentioned in Fix 1.
Step 9. After installing DirectX, make sure to go back and turn on the security settings that you had toggled off in the above steps.
Fix 4 – Install .Net Framework Via Command Prompt
Make sure that you have installed .Net Framework on your system. If it is not present, then follow the steps below to install it.
Step 1. Press Windows + R to open the Run dialog.
Step 2. Type cmd and press Ctrl + Shift + Enter to run the command prompt as administrator.
Step 3. Execute the command given below to install .Net Framework.
DISM /Online /Enable-Feature /Featurename:NetFX3 /All /LimitAccess /Source:D:sourcessxs
Step 4. Wait for the operation to complete successfully.
Step 5. Try to install DirectX and check if the problem is resolved after .Net Framework is installed.
Fix 5 – Repair .Net Framework
If you have .Net Framework already installed on your PC, then there must be some issues with the installation. Perform a repair of the .Net framework following the steps below.
Step 1. Click on this link to go to the Microsoft .NET Framework Repair page.
Step 2. On this page, click on the link .NET Framework Repair Tool.
Step 3. This will download the installer onto your PC.
Step 4. Run the downloaded file to open the Repair tool.
Step 5. Accept the license terms and click on Next.
Step 6. It will check and detect any problems.
Step 7. If there are any issues, it will show a list of recommended changes.
Click on Next to apply the recommended changes.
Step 8. If there is any problem, it will repair the .NET Framework.
Step 9. Once done, click on Next where it will collect the log information.
Finally, click on Finish.
Step 10. After the repair is complete, check if you are able to install DirectX without any errors.
Fix 6 – Download and Use Offline DirectX Installer
Step 1. Click on this link to download the offline setup for DirectX.
On this page, click on Download button to get the offline installer.
Step 2. On your desktop, right-click and choose New –> Folder.
Name this folder DirectX.
Step 3. Go to the location that contains the downloaded offline setup file.
Step 4. Double-click on this installer file to run it.
Accept the terms by clicking on Yes.
Then, click on Browse button to search for the folder.
Now, locate the new folder that was created on the desktop. Select it and click on OK.
Finally, click on OK after the folder is selected.
Step 5. Open the folder containing the extracted setup.
Right-click on DXSETUP.exe and choose Run as administrator.
Step 6. Follow the instructions on the screen and complete the DirectX installation.
Step 7. You must be able to install DirectX without any errors.
That’s it!
You must now be able to download and install DirectX on your Windows 11/10 PC without seeing the error “DirectX Setup Could Not Download File Please Retry Later or check network connection”. Did you find this article helpful and informative in resolving this issue with DirectX installation? Please comment and let us know your thoughts and the fix that worked in your case.


