While downloading new apps from Store, some users have complained of seeing an error message stating – it doesn’t look like you’re connected to the internet. Please check your connection and try again – 0x800704CF’ on your Store window.
Workarounds –
1. Check your internet connection. Disconnect with the WiFi (or Ethernet) and reconnect it again and check it out.
2. Run an antivirus check of the files on your computer. Further, try to install the app.
2. Disable the third-party antivirus on your system.
Try to update/install the app from Store again. If the problem still persists, follow these fixes-

Fix 1 – Reset the Store cache
Corrupted store cache may cause this problem in the first place.
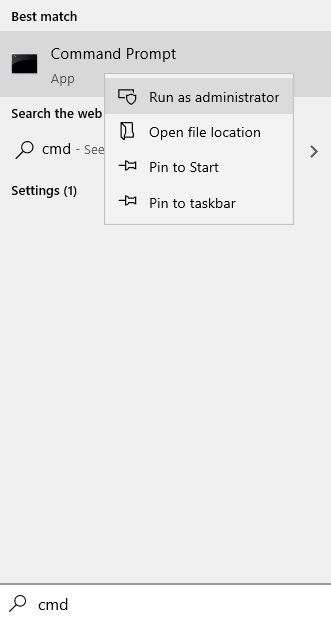
1 – Search cmd in Windows search box. Right click and choose run as administrator

2 – Type wsreset in command prompt window and hit Enter key

When you have clicked on ‘Wsreset‘, a terminal will open up and the Store will be reset within a minute.
Restart the system and then try to update/ install the app from the Store.
Fix 2 – Use modified DNS servers
Sometimes misconfigured DNS settings can cause this issue.
1. At first, you need to press the Windows key+R.
2. Type “ncpa.cpl“. After that, click on “OK“.

3. In the Network Connections screen, you will notice a list of network adapters.
4. Here, just right-click on the adapter and click on the “Properties“.

4. To adjust the IPv4 settings, you should double click on “Internet Protocol Version 4 (TCP/IPv4)“.

5. Then, click on the radio button beside “Use the following DNS server addresses:”
6.Simply, put the below-mentioned settings as the DNS servers settings-
Preferred DNS server: 8.8.8.8
Alternate DNS server: 8.8.4.4
7. Finally, click on “OK” to complete the configuration.

Once you have done changing the settings,
Fix 3 – Re-install the Store from terminal
You have to install the Store app from the
1. Right-click on the Windows icon and then click on “PowerShell (Admin)” to access it.

2. When the PowerShell with administrative access opens up, copy-paste this code.
Get-AppxPackage -allusers Microsoft.WindowsStore | Foreach {Add-AppxPackage -DisableDevelopmentMode -Register "$($_.InstallLocation)\AppXManifest.xml"}
3. Then, hit Enter.

Wait for the process to reinstall the Store on your device.
Close the PowerShell window.
Restart your computer and
Fix 4 – Reset the Store
Resetting the Store should fix it.
1. First of all press Windows key+I to open the Settings window.
2. Then, click on “Apps“.

3. Now, click on “Apps & features” on the left pane of Settings.
4. Scroll down through the right side of the Settings window, type “Store” in the search box.
Microsoft Store will appear in the search result.

5. Click on “Microsoft Store” from the search result.
6. Then click on “Advanced options“.

7. In the Microsoft Store settings window, scroll down and then click on “Reset”
8. You will see a confirmation tab. After that, click on “Reset” to reset Store on your computer.

Restart your computer and after rebooting check if Store is working or not.
Fix 5 – Remove the VPN
Microsoft Store can throw up this error code if it detects a VPN connection from your computer.
1. Open the Settings by pressing the Windows key+I keys together.
2. Then, click on the “Network & Internet” settings to access it.

3. At first, on the left-hand side, click on the “VPN” settings.
4. On the right-hand side, you will notice your VPN connection. Click on the VPN connection and click on “Remove” to remove the VPN connection from your computer.

Close the Settings screen and open the Store app. Try to download the conflicting app again. Check if this is working.
Fix 6 – Run the network troubleshooter
Sometimes the network you are connected to may be misconfigured and causing this problem.
1. First of all and click on the search box and type”Troubleshoot settings“.
2. After that, click on the “Troubleshoot settings” from the search result.

3. On the left-hand side, find out the “Internet Connections” from the list of available troubleshooters.
4. After that, click on the “Run the troubleshooter” to run the troubleshooter.

Now Windows will automatically attempt fixes for your problem.
5. Next, you have to click on “Close“.

Now, try to connect to the internet again.
If the app is still installing and showing up the same error message, there may be something wrong with the network adapter. Try troubleshooting it-
6. Scroll down in the same window and click on “Network Adapter” to select it.
7. Just like the previous one, click on the “Run the troubleshooter” to run the troubleshooter.

Let the troubleshooter troubleshoot the issue on your computer.
Fix 7 – Reset the proxy settings
If you are connected to a proxy connection, resetting it may help.
1. Just type “cmd” in the search bar.
2. Next, right-click on “Command Prompt” on the elevated search result, and then click on “Run as administrator“.

3. As the CMD terminal appears on your computer, paste this code and hit Enter.
netsh winhttp reset proxy

Restart the computer and further test this out.
Fix 8 – Reset the TCP protocols
Resetting the TCP may work out the issue.
1. What you have to do at first is to type “cmd” in the search bar.
2. Next, right-click on “Command Prompt” and click on “Run as administrator“.

3. Then, paste these commands and hit Enter.
netsh int ip reset
netsh winsock reset catalog

Once you have reset the Internet Protocol configuration, close the Command Prompt.
Restart your computer.
Fix 9 – Flush the DNS configuration
1. Just press the Windows key+R keys.
2. Type “cmd” and then hit Ctrl+Shift+Enter keys together.

2. To flush the existing DNS settings, write this command and press the Enter key.
ipconfig /realease
ipconfig /flushdns
ipconfig /renew

Close the Command Prompt screen, reboot your computer.