When you are using several devices running Windows 10, you might want all of those devices to have similar settings. For example, there might be some password that you have stored in a device so that you do not need to type it every single time. There is a good chance that you might want this password to be saved on your other devices as well. This would be safe as this device is yours and convenient as well. Sometimes, we spend a great deal of time to customize and personalize the appearance of a system. Let’s say you like it and want the same appearance settings in all your devices, applying these settings manually on all the devices can be cumbersome and time-consuming. To avoid this, you can simply turn on sync settings, and the same appearance settings will be saved on to all the devices. Below is the list of features that can be synchronized in Windows 10:
- Account
- Passwords – Stores all the passwords stored across the devices. To websites, wifi, etc.
- Theme – This controls Appearance Settings such as Desktop Theme, Taskbar settings
- Language Preferences – This controls Date, Time, Language, and Regional settings
- Ease of Access – This controls Sound, Keyboard, and mouse settings,etc.
- Other Window settings – Command Prompt settings, Browser settings, Typing. Check this link for more details.
In this article, lets us discuss different ways to Synchronize the favorites, appearances, and other Settings between all your devices. Also, let us see how to Turn Off the synchronization settings.
Method 1: From Registry Editor
Through this method, only the individual sync settings can be controlled. Hence make sure, Sync Settings are turned ON (Refer Step 3 in Method 1)
Step 1: Open the run window. Hold the buttons Windows+r from your keyboard simultaneously
Step 2: Type regedit and press OK. If UAC shows up, click on Yes

NOTE:
- Please try this option if the above method doesn’t work.
- Registry editing can have an adverse effect on the system even with the slightest mistake. It is advised to take the backup of the registry before proceeding. To take a backup, In the Registry Editor window –> Go to File –> Export –> Save your Backup file.
Step 3: In the Editor window, copy-paste or navigate to the following location,
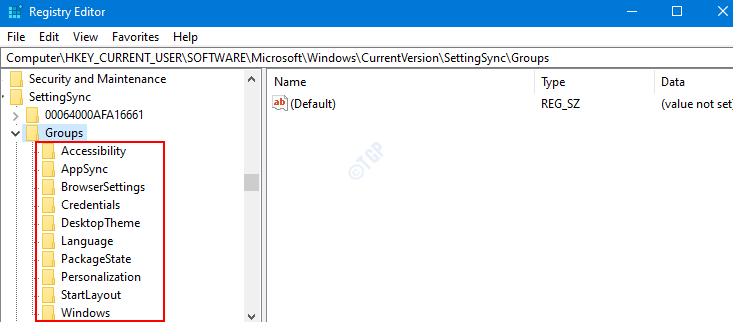
HKEY_CURRENT_USER\SOFTWARE\Microsoft\Windows\CurrentVersion\SettingSync\Groups

Step 4: Under Groups, you can see several subkeys(subfolders) namely, Accessibility, Appsync, Credentials, etc. These are the individual sync settings available in the system and can be enabled or disabled.

Refer to the below list to understand which subkey needs to be accessed for a particular individual sync setting
- To make changes to Theme Sync Settings, access the Personalization subkey
- To make changes to Passwords Sync Settings, access the Credentials subkey
- To make changes to Language preferences Sync Settings, access the Language subkey
- To make changes to Other Windows settings Sync Settings, access the Windows subkey
- To make changes to Microsoft Edge and Internet Explorer settings Sync Settings, access the BrowserSettings subkey
- To make changes to Start Menu layout Sync Settings, access the StartLayout subkey
- To make changes to Ease of Access Sync Settings, access the Accessibility subkey
Step 5: In the Registry Editor Window,
- Choose the sync setting that you want to enable or disable and click on it. For example, if you want to modify the Language preferences sync settings, click on the Language subkey or folder
- From the right-hand side menu, Double click on Enabled DWORD to edit it.

Step 6: The Edit DWORD window opens, under the Value data section,
- Set the value as 0 to Turn OFF and hit Enter
- Set the value as 1 to Turn ON and hit Enter

That’s All. We hope this article was informative. Thank you for Reading. Kindly comment and let us know which of the above methods helped.
Method 2: From Settings
Step 1: Open the Run command window holding the keys Windows+r at the same time.
Step 2: In the window that opens, type the run command, ms-settings:sync, and hit Enter.

Step 3: In the appearing window, To Turn ON synchronization,
1. Toggle the button under Sync Settings to TURN ON

2. Only after that, you can control the Individual sync settings by turning the feature ON or OFF based on your preference.
NOTE :
- When the buttons are turned ON, they are displayed in blue color.
- When the buttons are turned OFF, they are shown in white color.
For Example, if you want to turn ON Syncing of all the features between your devices, toggle the buttons to turn ON all the features as shown below.

Let us say, you want to turn ON sync settings for Theme and Passwords only, then you can do it as follows:

Step 4: In order to stop synchronization, Toggle the button to TURN OFF the Sync Settings.

NOTE:
If you notice that the Sync Settings option is greyed out, that is because you are not signed in through the Microsoft account. To sign-in through the Microsoft account
- Click on Your info tab
- Choose Sign-in with a Microsoft Account instead

Sign-in and finish the formalities. Now go to Sync your settings tab and do the required changes.