Windows 11 have come with some changes in the features which will take a while for you to get accustomed to. Making file extensions visible or invisible on your Windows 11 PC is one such change that needs your attention. The new OS has come up with different ways to show or hide the file extensions, especially for known file types, that’s useful for the Windows users.
File extensions are the file types or format that you see at the end of a file name, for example, .exe, .png, .docx, etc. However, you may not see the extensions for the known file types sometimes and that’s because the extensions are invisible by default. Given that most users are not so tech savvy and may not need to know what is the file format, Windows chooses not to show the file extensions.
However, it’s always better to be sure of the file type you may be downloading, because some file extensions like .pdf or other image formats may come along with malware or virus that may be harmful for your PC. Therefore, make sure you check the file type before you download, however, for that, you would need to unhide the file extension.
Here’s how to make file extensions visible or invisible on Windows 11.
Method 1: Using Folder Options
This method is applicable when you want to uncover the file extensions for multiple known file types at one go. Follow the below instructions to modify multiple settings at one time:
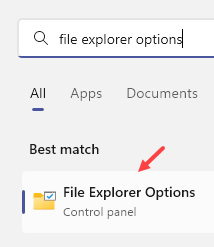
Step 1: Search File Explorer Options in windows search.
Step 2: Click on search result.

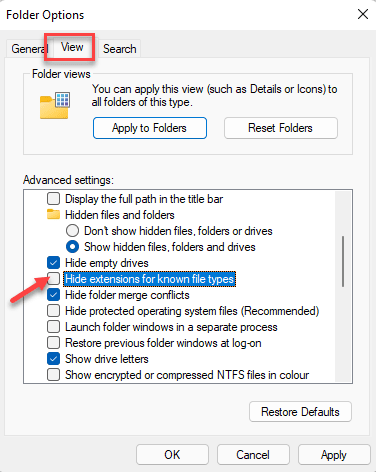
Step 3: In the Folder Options dialogue box that opens, select the View tab and in the Advanced settings field, scroll down and uncheck the box next to Hide extensions for known file types.
Press Apply and then OK to apply the changes and exit.

Method 2: Using File Explorer Command Bar
This method helps you to make the file extensions visible through the File Explore command bar. This option is introduced in Windows 11 and is one of the quickest methods to show the file extensions. Here’s how to enable the option:
Step 1: Press the Win + E keys together on your keyboard to open the File Explorer window.
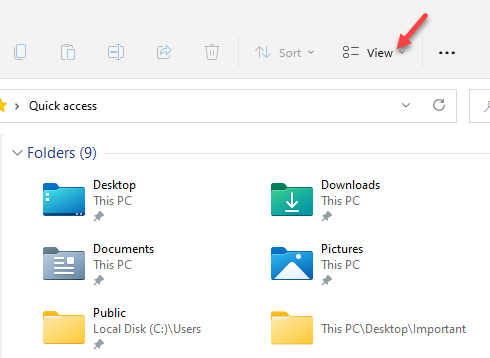
Step 2: In the File Explorer window, go to the top of the window and click on View drop-down (Layout and view options).

Step 3: Click on Show in the list and select File name extensions.

Method 3: Adding the File Type
This method allows you to show the file type in a separate column altogether, making it easier for people to view the file extension instead of seeing the file extension along with the file name. This method works differently and hence, follow the below steps to add a column header or file type column:
Step 1: Press the Win + E keys simultaneously on your keyboard to launch the File Explorer window.
Step 2: In the File Explorer window, go to the desired folder, for example, we selected the Downloads folder.
Now, go to the top of the File Explorer and click to expand the Sort drop-down (Sort and group options) and click on Type.

Now, you should see the file type for each file in a separate column:

*Note – Some file types may be seen as types instead of extensions, for example, the .exe file types may show as “Application” type.
Method 4: Using The Registry Editor
Editing the registry editor is one of the sure shot methods to modify settings of your PC and get things done. However, it should be used only when none of the other methods work. In this case too, if the above methods fail to show the file extensions, then editing the registry settings is the best option. Here’s how:
Step 1: Press the Win + R shortcut keys to open the Run command window.
Step 2: In the Run command search field, type regedit and press Enter to open the Registry Editor window.

Step 3: In the Registry Editor window, navigate to the below path:
HKEY_CURRENT_USER\Software\Microsoft\Windows\CurrentVersion\Explorer\Advanced
Locate the DWORD value – HideFileExt and double-click on it.

Step 4: In the Edit DWORD (32-bit) Value dialogue box, change the Value data to 0 to show the file extensions and press OK to save the changes and exit.

You can change the Value data field to 1 to hide the file extensions if you want.
*Note – Before you make any changes to the registry editor, make sure that you create a backup of the registry settings, so that, in case you lose any data during the process, you can recover the same, easily.
Method 5: Using a Batch File
Alternatively, you can also create a batch file when you want to show file extensions on multiple systems or for someone who is not so tech savvy but needs an easy way out. Let’s see how to create a batch file to unhide file extensions:
Step 1: Right click on an empty area on the Desktop, select New and then click on Text Document.

Step 2: Now, rename the new document using a desired name, for instance, we renamed it as Show File Type.
Now, double-click to open the file.

Step 3: Next, copy and paste the below command in the new text document (Show File Type) to show the file extensions:
reg add HKCU\Software\Microsoft\Windows\CurrentVersion\Explorer\Advanced /v HideFileExt /t REG_DWORD /d 0 /f

Step 4: To hide the file extensions, copy and paste the below command in the new text document instead:
reg add HKCU\Software\Microsoft\Windows\CurrentVersion\Explorer\Advanced /v HideFileExt /t REG_DWORD /d 1 /f

Step 5: Now, go to the File tab at the upper left side of the text document and click on Save As.

Step 6: In the Save As window, go to the File name field and change the file extension to .bat.
next, set the Save as type field to All Files.
Click on Save to save the changes.

Close the Show File Type document and the batch file is now ready.
You can transfer this file to another PC and double-click on it to run the file whenever you want to show or hide the file extensions.
You can now show or hide the file extensions on your Windows 11 PC easily.