Microsoft Excel throws up this error message “File Format and Extensions don’t match” when you try to open a file that you have got from elsewhere. Usually, when a spreadsheet is created by a non-Excel application. Usually, this is just a compatibility issue and there are some solutions that may help your cause.
Fix 1 – Rename the file including the extension
Usually, if the spreadsheet has another extension in its name, Excel will show you this error message. Don’t worry. Renaming the file won’t corrupt the file.
Step 1 – Open the File Explorer. Go to the location of the spreadsheet file that you are trying to open.
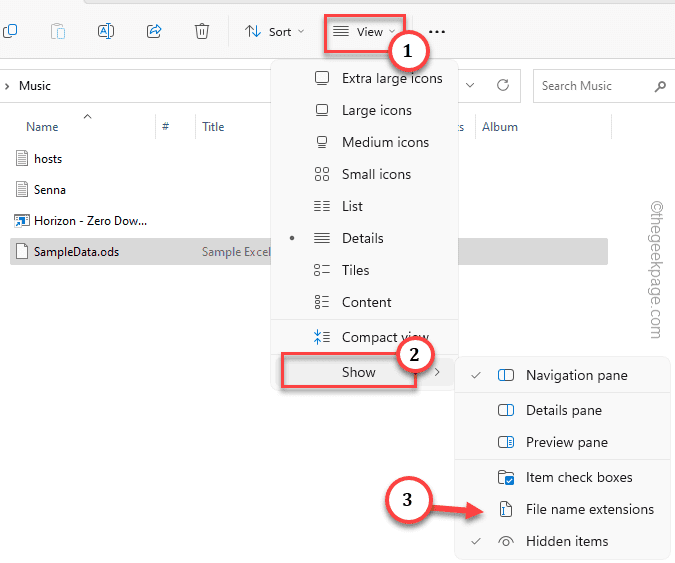
Step 2 – Go to the View bar. There, make sure to check the “File name extensions” box.
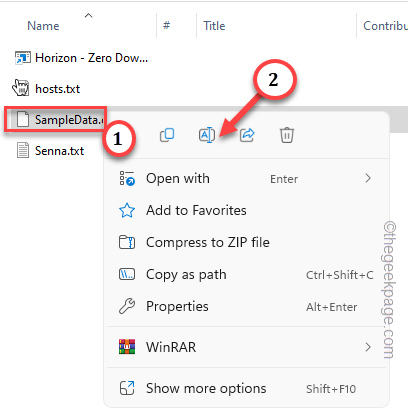
Step 3 – Then, right-tap that file and click the rename icon to rename it.
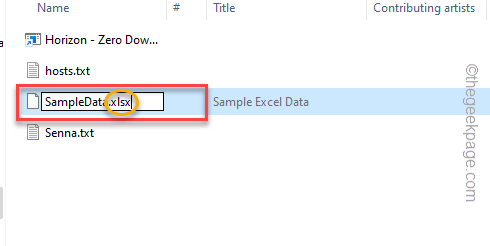
Step 4 – Now, make sure to add any one of these “.xls“, “.xlsx“, or “.xlsm” extensions at the end of the file name. Make sure to rename the file properly with the extension.
Step 5 – Windows will send a warning message. Ignore it and click “Yes” to change the file name.
After renaming the file, you can easily open it in Excel. It should load up without any error messages and any incompatibility issues.
Fix 2 – Stop the error message using regedit
You can tweak the Excel security/warning key so that it stops showing you the error message. This can be done only through the Registry Editor.
Step 1 – Write down “regedit” in the search box beside the Start menu.
Step 2 – There, click “Registry Editor” to open it.

Warning – You are going to alter a particular value in the Registry Editor. It usually works well and doesn’t go wrong. But sometimes, it may lead to other issues, like part of the system not working properly. So, we suggest you create a registry backup before you make any changes.
a. Once you have opened the Registry Editor screen, tap on “File” from the menu bar.
b. From that context menu, tap “Export” to make a new registry backup.

Just store this backup in a discrete location on your computer. You can restore the system back to normal again if this goes wrong.
Step 3 – Go straight to this point following the left-hand pane –
HKEY_CURRENT_USER\Software\Microsoft\Office\Office version\Excel\Security
NOTE – You have to replace “Office version” with the number of MS Office installed on your computer. Like, if you have MS Office 2016, then you have the address will be like this –
HKEY_CURRENT_USER\Software\Microsoft\Office\16.0\Excel\Security
Step 4 – Once you reach that location, go to the right-hand pane.
Step 5 – Now, right-click on the space there and click “New>” and tap “DWORD (32-bit) Value” to create a new value.
Step 5 – Rename this new value as “Extension Hardening“.
Step 6 – After creating this value, double-tap it so that you can change it.
Step 7 – Set the ‘Base Value:’ to “Hexadecimal” type. Then, set the value to “0“.
Step 8 – After this, click “OK” to save this value change.
After creating the Extension Hardening value, exit Registry Editor.
Registry edits doesn’t take effect unless you restart the system. So, reboot it. Once it is back online, try to open the file again.
That error message won’t bother you again.
Fix 3 – Open & Repair the excel file
There is an option in Excel called the “Open & Repair” option which actually opens the file and repairs it automatically, keeping everything intact.
Step 1 – Open Microsoft Excel.
Step 2 – Once it opens up, click the “File” menu and tap “Open” from the context menu.
Step 3 – There, click “Browse” to open the context page.
Step 4 – On to browse context page, head on to the location of the disputed file.
Step 5 – Upon reaching that location, select the file. Then, besides “Tools“, select “Open and Repair…” to open and repair the file.
Excel will now fix the file accordingly and load it up when it’s ready. All you have to do is to wait for this process to be complete.
See to that whether any error message loads up.
Fix 4 – Unblock that particular file
Some files are sent in the blocked condition. So, you should unblock that particular file to open it up.
Step 1 – Open the File Explorer again and head on to the location of the problematic file.
Step 2 – Upon reaching that file location, right-click that file and tap “Properties“.
Step 3 – Inside the properties of that file, go to the “General” section.
Step 4 – If you look carefully, you will notice the “Unblock” box at the bottom. Make sure that it is checked.
[You can find this option only with the files that come along an email, i.e. files that come as an attachment or you have downloaded on the system.]
Step 5 – Then, tap the “Apply” button to apply the settings. Then, finally, click “OK” to exit the properties panel.
After this, open Excel and try to open the same file from Excel and check.
This should fix the issue of “excel file, format not supported” on your system.
Fix 5 – Turn off the protected view settings
The Protected View setting allows you to open files in a read-only mode, cocooned form. But, sometimes this can cause this incompatibility issue.
Step 1 – Launch Microsoft Excel, if you have closed it.
Step 2 – Then, click on the “File” menu and tap “Options” to open it up.
Step 3 – On the Excel Options settings, head on to the “Trust Center Settings…” to open that.
Step 4 – Then, click “Trust Center Settings“.
Step 5 – On the next step, choose “Protected View” setting on the left-hand pane.
Step 6 – Now, if you look on the right-hand pane, you shall see the Protected View zone. There, uncheck these boxes one-by-one –
Enable Protected View for files originating from the Internet
Enable Protected View for files located in potentially unsafe locations
Enabled Protected View for Outlook attachments
Step 7 – Click “OK” to save the change.
Close the Trust Center settings page.
After this, close Excel once and reopen it. Then, try to load the disputed file once more.
Check if this solves the issue.
Fix 6 – Disable the add-ins of Excel
If you are using Excel with external add-ins, disable those and retry opening the file.
Step 1 – Launch Excel.
Step 2 – After this, open “File” and click “Options” to open the Excel Options.
Step 3 – Go to the “Trust Center” on the left. Then, on the opposite side, tap “Trust Center settings”.
Step 3 – Go ahead to the “Add-ins” which you shall find on the left-hand pane.
Step 4 – Make sure to set the “Manage:” to “Excel Add-ins” from the drop-down point. Then, tap “Go…” to open it up.
A small Add-Ins panel will show up.
Step 5 – There, uncheck each and every add-ins one-by-one.
Step 6 – To save the change, tap “OK“.
After disabling the add-ins, try to load up the problematic document once again and check.
This should have fixed the issue for you.
Fix 7 – Use Excel on web
Try to open the spreadsheet on the web version of Excel. This way, you can identify whether there are any issues with the Excel on your system.
Step 1 – Open a browser and head on to the Microsoft 365.
Step 2 – Once you reach there, tap “Sign in“. Now, using your Microsoft credentials, sign in to it.
Step 3 – Now, when the Office Online loads up, select “Excel” from the extreme left-hand column.
Step 4 – When it loads up, click on the “Upload” icon.
Step 5 – Now, go ahead and locate the disputed file in your system directory. After selecting the file, tap “Open“.
Wait until Excel loads up in the website. Depending upon the complexion, data and file size, it may take a few seconds more. Now, there are two deductions you can make here –
- If the file loads up correctly without showing you error message, there is some problem with the Excel installed on your system. Follow the steps of Fix 6 to repair Office.
- If the file doesn’t load up, there is a chance that this file is corrupted.
Fix 8 – Repair Office
Repairing the Office should help you solve the problem.
Step 1 – You can find the Office inside the Apps & Feature page. So, press the Win key and the R keys together.
Step 2 – Then, write this and tap “OK“.
appwiz.cpl

Step 3 – Look for the “Office 365” application. Then, right-tap the application and tap “Change“.
Step 4 – Now, there are two options. Select “Quick Repair“. Then, click “Repair” to start the repair process.
Once Excel is repaired, you can continue to use it and try to load the document using it.
This should help you resolve the issue.
Fix 9 – Use a third-party spreadsheet solution (free)
If nothing works so far, try downloading a free spreadsheet solution (like LibreOffice Calc) to load up disputed spreadsheets.
Step 1 – Go to the LibreOffice website.
Step 2 – Set the OS you are using currently (like – Windows 32-bit or Windows 64-bit). So, tap “Download” to download the LibreOffice setup file.
Step 3 – Then, double-tap the setup file to run it.
Step 4 – When the Installer opens up, click “Next” to go forward. Follow the on-screen steps and complete the LibreOffice installation.
Step 5 – Once you have installed it, head on to the location of the problematic file.
Step 6 – Then, right-tap that file and tap “Open with>“. Then, click “LibreOffice Calc” to open that using the app.
Apart from LibreOffice Calc, there are other options that you can try out. These are –


