Some words might not make much sense to the world, definitely Outlook is included in the world, but those words might make perfect sense to you as you are very well aware of their contexts. In our article How to Add Words to Custom Dictionary to Avoid Spelling Errors in MS Outlook, we thus learned how we can easily add our custom words to custom dictionaries in Outlook so that Outlook would consider those words as proper words and would not throw a spelling error whenever those words are encountered.
However, the custom dictionaries might not be applicable to every email and some emails need thorough spell checks before they get sent out. In such cases, it becomes mandatory that the spell checks are limited to the main dictionary only. Well, now you know what we are going to talk about today!
Solution
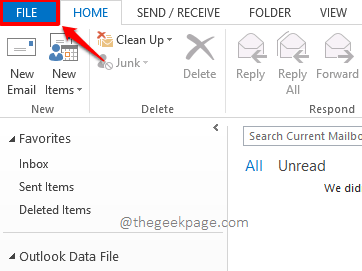
Step 1: Click on the FILE tab from the top ribbon.
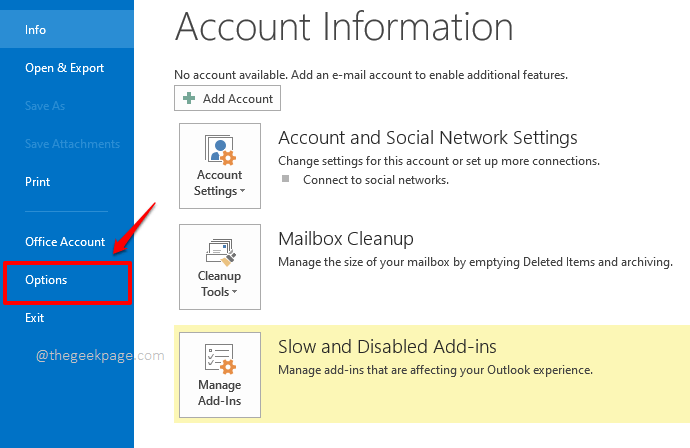
Step 2: On the left pane of the window, click on the tab named Options.
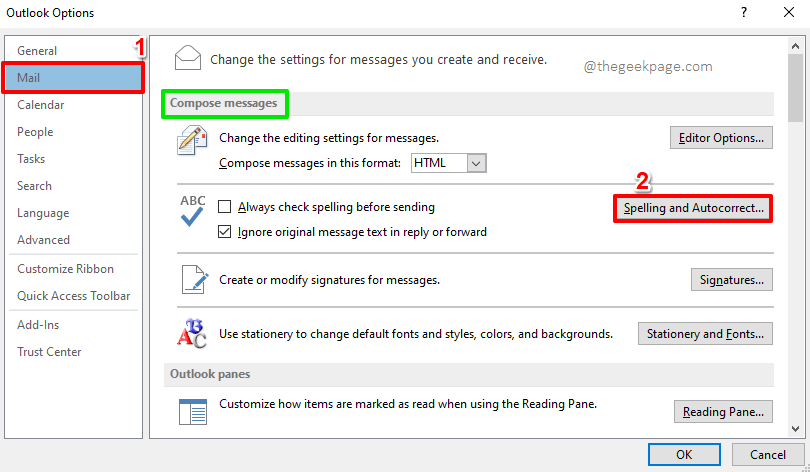
Step 3: When the Outlook Options window opens up, click on the Mail tab from the left window pane.
Now on the right window pane, under the section Compose messages, click on the button named Spelling and Autocorrect.
Step 4: On the left pane of Editor Options, click on the Proofing tab.
Now on the right side, under the section When correcting spelling in Microsoft Office programs, tick the checkbox corresponding to the option Suggest from main dictionary only. This will ensure that only the main dictionary will be considered for your spell checks.
However, if you would like to be more sure, you can temporarily disable the custom dictionaries as well. For that, click on the button named Custom Dictionaries.
Step 5: On the Custom Dictionaries window, you can disable the dictionaries by unticking the checkboxes corresponding to each dictionary.
Step 6: If you untick the checkbox corresponding to the dictionary named RoamingCustom.dic (Default) under the All Languages section, then you will the following warning message.
The message simply says that if you remove the RoamingCustom.dic (Default) custom dictionary from Outlook, it will be disabled across all the Microsoft Office programs. Simply hit the Yes button to proceed if you’re ok with that.
Note: If you want to enable the custom dictionary that you remove here, you can simply come back to the Custom Dictionaries window in the future and then tick the checkbox corresponding to the custom dictionary that you removed.
Step 7: Once you are done disabling all the custom dictionaries that you do not temporarily want, you can hit the OK button at the bottom.
Step 8: Hit the OK button when you are back at the Editor Options window.
Step 9: Hit the OK button on the Outlook Options window as well.
That’s it. From now on, Outlook will consider only the main dictionary for spell checks.
If you would like to revert this, simply untick the checkbox corresponding to the option Suggest from main dictionary only in Step 4. Also, enable all the custom dictionaries you disabled in Step 7.


