When you are at work, you might not have access to your personal emails. Likewise, when you are on vacation, you might not want to access your work profile. In both cases, it would be exceptionally helpful if you can find a way using which your emails can be automatically forwarded from one of your mailboxes to the other. Yes, we are talking about some magic mechanism that would automatically forward the email from one of your inboxes to the other the moment it lands on the former. Sounds too complex? Well, we would say otherwise!
This article is all about how you can easily enable the automatic forwarding of emails from Outlook to Gmail and from Gmail to Outlook. Read on, to learn how you can easily master this amazing tip.
Section 1: How to Automatically Forward Emails from Outlook to Gmail
In this section, we explain in detail how emails can be forwarded automatically from Outlook to Gmail with the help of some simple steps.
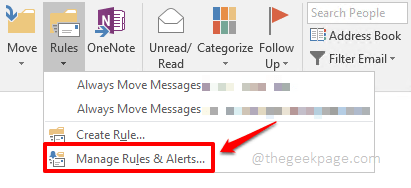
Step 1: Launch Outlook. Click on the HOME tab from the top ribbon. As next, click on the Rules dropdown button located under the group named Move.
Step 2: From the list of options available under Rules, click on the one that says Manage Rules & Alerts.
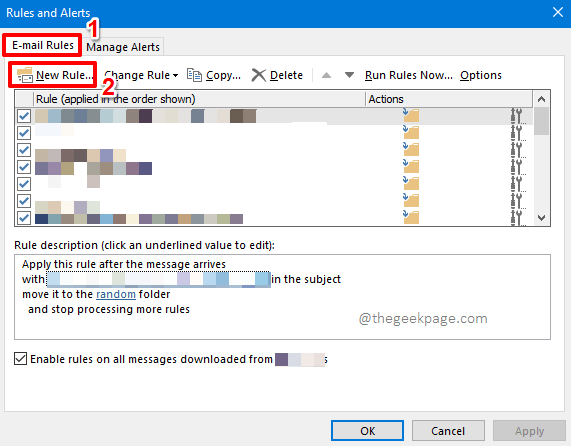
Step 3: On the Rules and Alerts window, click on the E-mail Rules tab at the top.
As next, under E-mail Rules tab, click on the New Rule button.
Step 4: On the Rules Wizard window, under the section Start from a blank rule, click on the option Apply rule on messages I receive.
Click on the Next button at the bottom.
Step 5: The next page lets you choose some conditions for the rule you set. Since you want to forward all the emails automatically to Gmail from Outlook, just leave all the checkboxes unticked.
Now click on the Next button at the bottom of the window.
Outlook will now give you a warning message saying that the rule will be applied to every message you receive. Hit the Yes button to proceed.
Step 6: Now we are going to set the forward rule. Under the section Step 1: Select action(s), tick the checkbox corresponding to the option forward it to people or public group.
Now under the section Step 2: Edit the rule description (click an underlined value), click on the link people or public group.
Step 7: The Rule Address window would now be open before you. At the bottom of the window, you will find a text field named To. Here you can specify the email address to which you want your Outlook emails to be forwarded to. You can add multiple email addresses. Also, you can search for email addresses from your Outlook address directory.
Hit the OK button to proceed.
Step 8: When you are back at the Rules Wizard window, click on the Next button.
Step 9: If you have some exceptions that you want to be applied to your forward rule, now is the time to specify them. For example, if the mail that gets forwarded is from a particular person, and in that case if you do not want it to be forwarded, then you can tick the tickbox corresponding to the checkbox except if from people or public group. Likewise, you can set any of the exceptions available in this window.
Once the exception is selected, you can edit it under Step 2: Edit the rule description (click an underlined value).
If there are no exceptions, then you can leave all the checkboxes unticked.
Once all done, hit the Next button at the bottom.
Step 10: On the window that follows, type in a name for your rule under the section Step 1: Specify a name for this rule field.
Under the section Step 2: Setup rule options, tick the tickbox corresponding to the option Turn on this rule. Also, if you would like to apply the rule to the emails that are already in the inbox, you need to tick the checkbox corresponding to the option Run this rule now on messages already in “inbox”.
That’s it. Hit the Finish button at the bottom.
Step 11: You will now be back at the Rules and Alerts window. Under the tab Email Rules, you will be able to see your newly created forward rule. Against it, you will see a checkbox, ticking which will enable the rule, and unticking which will disable your rule.
Hit the Apply button and the OK button. That’s it. Enjoy!
Section 2: How to Automatically Forward Emails from Gmail to Outlook
In the previous section, we saw how we can enable the automatic forwarding of Outlook emails to any other email client including Gmail. In this section, let’s explore how emails can be automatically forwarded from Gmail to Outlook. We will also see how we can create a filter on the forwarding rule and also find out how we can disable the forwarding rule.
Section 2.1: How to Automatically Forward Emails from Gmail Client
Step 1: Open your Gmail account in a web browser.
On the top right corner of the window, click on the gear icon for settings. From the options available, under the label Quick settings, click on the See all settings link.
Step 2: Now under the Settings options, click on the tab Forwarding and POP/IMAP.
As next, click on the Add a forwarding address button against the Forwarding field.
Step 3: Now under the Add a forwarding address window, type in the address that you want the emails to be forwarded to. You can give any email address including an Outlook email, but I have typed in a Gmail address as an example.
Once the email id is typed in, click on the Next button.
Step 4: A small window with the name Confirm forwarding address will pop open now. Simply click on the Proceed button to approve the forwarding rule.
Step 5: Now you have to open the email account that you specified as the forwarding address and get the verification code that you received in it.
Type the verification code in the Verify text field and then hit the Verify button under it.
Step 6: When you are back at the Settings window, you can see that the radio button against the forward rule is chosen. By default, all the emails arriving in your Gmail inbox will now be forwarded to your forwarding mail address, but Gmail’s copy will be kept in Gmail itself, untouched.
Step 7: The other options are as follows:
- Keep Gmail’s copy in the inbox – The mail will be forwarded, but the copy in Gmail will not be opened or deleted. It will remain there itself, safe and sound.
- Mark Gmail’s copy as read – The mail will be forwarded, also Gmail’s copy of the email will be marked as read.
- Archive Gmail’s copy – The mail will be forwarded to the forwarding address, and Gmail’s copy of the mail will be moved to the archive folder.
- Delete Gmail’s copy – Along with the mail being forwarded to the forwarding address, Gmail’s copy of the mail will be deleted.
Step 8: Now that your forward rule settings are well in place, scroll down and hit the Save Changes button to save the changes.
Section 2.2: How to Set a Filter on the Mails Being Forwarded
Let’s say you don’t want all the emails that hit your inbox to be forwarded. In that case, we need to set a filter. Let’s see how this can be done.
Step 1: Once again, click on the Gear icon from the top right corner of the window and then click on the See all settings link.
Step 2: Now, again, look under the Forwarding and POP/IMAP tab for the Forwarding section.
Your forwarding will already be in place.
Under it, click on the link that says creating a filter!.
Step 3: Here, you can mention all your filters.
Once all the filters are in place, click on the Create filter button at the bottom.
Step 4: Now on the window that follows, tick the checkbox corresponding to the option Forward it to: and then choose the email address. If it’s already an approved email address, it will be available in the dropdown. If it’s not available, you can add the address by clicking on the Add forwarding address button.
Once you are all done, hit the Create filter button at the bottom.
Section 2.3: How to Disable the Mail Forwarding Rule
In this section, let’s find out how we can disable a forwarding rule that’s already in place.
Step 1: Click on the Settings icon once again from the top right corner of the window. And then click on the See all settings link to view all the settings.
Step 2: Under the Forwarding and POP/IMAP tab, choose the radio button corresponding to the Disable forwarding option agianst the Forwarding section.
Step 3: Once again, scroll down and hit the Save Changes button to save your changes. That’s it!
Please tell us in the comments section if you have any concerns regarding any of the steps, we are always here to help. Hope you found the article helpful.
Stay tuned for more amazing and mind-boggling technical tricks, tips, how-tos, and hacks.


