It is very difficult to find an fps gamer who hasn’t laid their hands on Counter-Strike: Global Offensive at least once. The main attraction of CSGO is its custom servers which you can connect in-game. But, sometimes, due to some reasons, you may see the “Connecting to CSGO network” message while connecting to a particular custom server. Well, this issue seems to be happening for the custom servers, but sometimes this also appears in the regular servers as well.
Initial Solutions –
1. The first and foremost thing you should do is check whether your system is connected to a stable and high-speed network. Though CS doesn’t require high bandwidth to run, having a good bandwidth connection is always good for connecting to the custom servers.
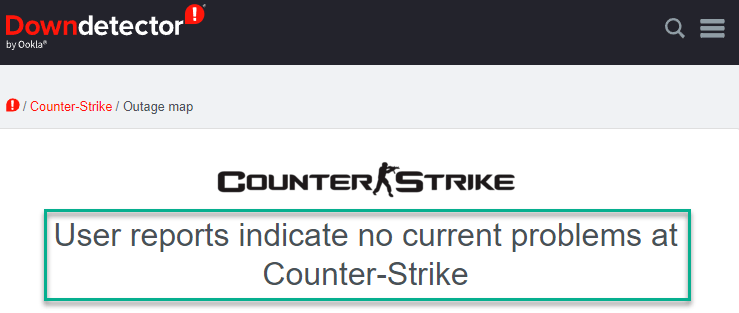
Additionally, you can open the downdetector to check whether the CSGO is down or not.
2. Sometimes these custom servers can be down. So, if you can’t connect to a particular server due to this reason, try connecting to another one. If you are seeing the same error message on every server, go down to main solutions.
Fix 1 – Try to reach the server
There is a nice trick that you can try to reach the server.
1. Launch the Counter Strike Global Offensive, if you haven’t done already.
2. Then, join the match-making (MM) in any game mode that you prefer.
3. Now, try to search after a minute of delay.
4. Then, try to match make again.
This time you will be connected to the server and you should be back online.
Now, just cancel the match-making search and connect to the particular custom server once again.
This time you’ll be connected. Enjoy the game!
Fix 2 – Turn on the DEP
Data Execution Prevention or DEP is another thing that seems to affect this issue. Turning DEP on has fixed this problem for many CSGO gamers.
1. At first, right-tap on the Windows icon and click on “Run“.
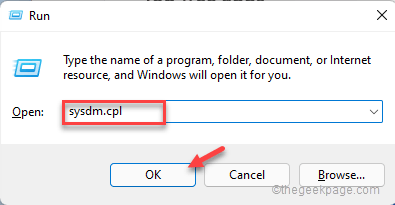
2. Then, write this in the Run box and hit Enter.
sysdm.cpl
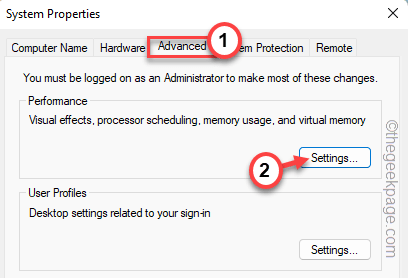
3. Go ahead to the “Advanced” section.
4. You can find three distinct sections. Then, click on the Performance section, and tap “Settings“.
5. On the Performance Options window, visit the “Data Execution Prevention” section.
6. Next, choose the “Turn on DEP for essential Windows programs and services only” option to switch on the Data Execution Prevention protocol.
7. Finally, tap “OK” to save these changes.
8. After that, click “Apply” and “OK“.
This change will be applied to your system.
After this, launch Steam and run CSGO.
Try to connect to the server once again.
Fix 3 – Restart the router
You can restart the router to fix the connection issue.
1. At first, turn off the router. Detach the network adapter from your device. If you are using a LAN cable, unplug it.
2. Now, wait for 1 minute.
3. Then, switch on the router. For LAN cable users, replug in the cable.
4. Next, plug in the network adapter and reconnect to the network again.
Now, launch the CSGO and test if this works.
Fix 4 – Opt out of Beta participation
Steam Beta participation can cause this problem as well.
1. Open the Steam app.
2. When the Steam app opens up, tap the first menu “Steam” and tap “Settings” to open it.
3. When the Steam Settings, tap “Account” settings.
4. On the right-hand pane, if you look carefully, you can see the ‘Beta participation:’ status.
5. If you see the ‘participaiting’ status, click “CHANGE…” to alter the status.
5. Now, choose “NONE – Opt out of all beta programs” from the drop-down list to opt out
6. Finally, tap “OK“.
7. The change that you have made won’t take effect until you restart the Steam client. So, tap “RESTART STEAM” to restart the Steam app.
Steam app restarts after this. Then, it downloads the package for the stable version of Steam and updates the app accordingly.
Once it is done, it will launch automatically. Then, launch Counter-Strike and try to match make in that server once again. Test whether this works.
Go for the next solution, if the problem still persists.
Fix 5 – Verify the CSGO game files
You have to verify the CSGO files on your system. Follow these steps –
1. Open the Steam client on your computer.
2. Once the Steam client opens up, go to the “LIBRARY“.
3. Here, you can find all your purchased games on the left-hand pane. Just right-click the “Counter-Strike: Global Offensive” game and click “Properties“.
4. Coming to the CSGO properties page, go to the “LOCAL FILES” pane on the left-hand side.
5. After that, click on “Verify integrity of game files…” to verify the game files.
Steam now scans the game files on your system and looks for any corrupted files/ folders. If it can detect any such problem, it will automatically download and install the files.
Once it is done, launch the CSGO on the system. Test if this works.
Fix 6 – Allow the game through the firewall
Check whether CSGO is allowed through the firewall.
1. You can press the Windows key+R keys at once.
2. This should open up the Run box. Then, write”firewall.cpl” and hit Enter to access the Firewall settings.
3. Once the Windows Defender Firewall opens up, on the left-hand side, tap on “Allow an app or feature through Windows Defender Firewall“.
4. Then, click “Change settings” so that you can allow the CSGO through the firewall.
5. Now, scroll down to the list of apps. This list contains all the applications that you’ve installed on the system.
6. Look for the “Counter-Strike: Global Offensive” game. Once you have found that, make sure to check the “Public” and “Private” boxes*.
7. To save this change, click “OK“.
Now, you have just allowed CSGO to connect to the servers through Windows Defender Firewall.
Close th Control Panel window and launch the game.
*NOTE – Allowing CSGO to go through the firewall in the Public network is risky. If you don’t want to allow CSGO the Public network access, you can just uncheck the ‘Public’ box in Control Panel.
Fix 7 – Stop using a proxy server
Many gamers use a proxy server to connect to custom servers. So, if you are using a proxy server, try disconnecting/removing the proxy server.
1. Open the Settings window by tapping the Win key+I keys together.
2. Then, click on the “Network & Internet” settings on the left-hand pane.
3. So, tap “Proxy” on the right-hand section.
4. On the right-hand pane, look for the ‘Manual proxy setup’ and click “Setup” beside ‘Use a proxy server’.
5. In the Edit proxy server window, set the “Use a proxy server” to “Off“.
6. Then, click “OK” to save the changes.
After that, close the Settings page. Launch Counter-Strike and try to connect to the network server once again.
Hope this solves.
Fix 8 – Use the Google DNS
Altering the DNS settings may help you reconnect to the CSGO server.
1. Open the Run box. You can do that by holding the Win key and R keys together.
2. Then, write in the box this word there and hit Enter.
ncpa.cpl
3. This should lead you to the Network Connections window.
4. Here, you shall find several network connections.
5. When you have found the network adapter, right-click the network connection you are using and click “Properties“.
5. When the network adapter properties page, double-tap the “Internet Protocol Version 4 (TCP/IPv4)” to open that.
6. Do not touch the IP settings. Make sure the “Obtain an IP address automatically” option is selected.
7. After this, choose the “Use the following DNS server addresses:” option.
8. You have to edit two DNS servers. So, input these data in the correct places.
Preferred DNS server: 8.8.8.8
Alternate DNS server: 8.8.4.4
9. Then, tap “OK” to save the changes.
Now, that you have changed the DNS settings, launch CSGO, and check whether the error message is appearing or not.
Fix 9 – Reset the network
If nothing else has worked, try resetting the network.
1. Open Windows Settings. You can find it on the Start Menu or on the taskbar.
2. Once you have opened it, tap “Network & Internet“.
3. Now, if you scroll down through the right-hand pane, tap “Advanced network settings“.
4. In the same section, click on “Network reset“.
5. On the Network reset page, tap “Reset now” to reset all the network configurations.
Resetting the network means reinstalling the network adapters and restarting all the components.
6. Now, click “Yes” to reset the network.
After that, close the Settings.
Now, you have to manually connect to the network and try to reach the CSGO servers again.
Fix 10 – Uninstall CSGO and reinstall it
If none of the other methods work out, uninstall Counter-Strike: Global Offensive and reinstall it.
1. Launch the Steam client.
2. Now, go ahead to the “LIBRARY” section.
3. On the left-hand pane, look for the “Countre-Strike: Global Offensive” game.
4. Then, right-click on the game and tap “Manage>” and click on “Uninstall“.
5. When you see a warning message, click “Uninstall“.
6. Once CSGO is uninstalled, you can reinstall the game from the same place.
Once the game is installed, launch it and try to connect to the main server.
Your problem should be solved.


