If you are a Windows user and the mouse and keyboard you are using do not work when you turn on the computer from sleep mode, then do not get disturbed here is the article that explains the different methods to solve this issue which is simpler and easy. Let us start!
Method 1: Change Power Management Settings
Step 1: Open the Run prompt using Windows + R keys together.
Step 2: Type devmgmt.msc in the run prompt and hit enter
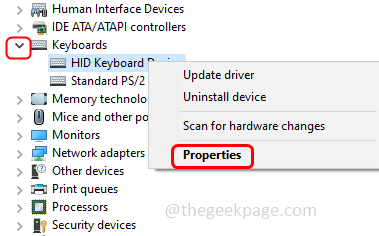
Step 3: This will open the Device Manager window. Expand the Keyboards option by clicking on the drop-down beside it.
Step 4: Right-click on the name of your keyboard device driver and select properties
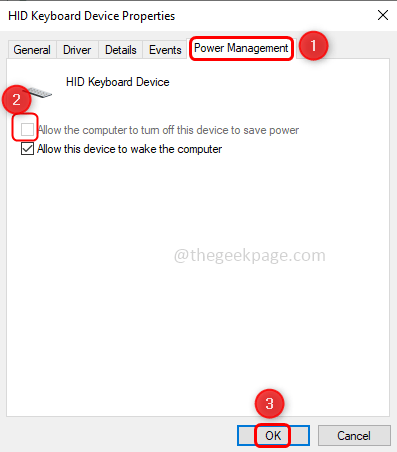
Step 5: From the properties window, click on the Power Management tab and make sure to uncheck the checkbox beside Allow the computer to turn off this device to save power option.
Step 6: Click on OK.
Step 7: Expand the Mice and other pointing devices option by clicking on the drop-down beside it.
Step 8: Right-click on the name of the mouse device driver you are using and select properties
Step 9: From the properties window, click on the Power Management tab and make sure to uncheck the checkbox beside Allow the computer to turn off this device to save power option. Click on OK.
Step 10: Restart your computer and the problem must be resolved.
Method 2: Disable Automatic Driver Updates
Step 1: Open the Run prompt using Windows + R keys together.
Step 2: Type control in the run prompt and hit enter. This opens the Control Panel.
Step 3: On the right, from the View by dropdown select Category.
Step 4: Click on System and Security.
Step 5: On the right, click on System.
Step 6: Then click on Advanced system settings
Step 7: From the System Properties window click on the Hardware tab.
Step 8: Click on the Device Installation Settings button.
Step 9: From the appeared window choose No by clicking on the radio button beside No and to save the changes made click on the Save Changes button.
Step 10: Done! Now restart your system and your problem must be resolved.
That’s it! Hope this article is helpful, do comment and let us know which of the above methods worked for you.


