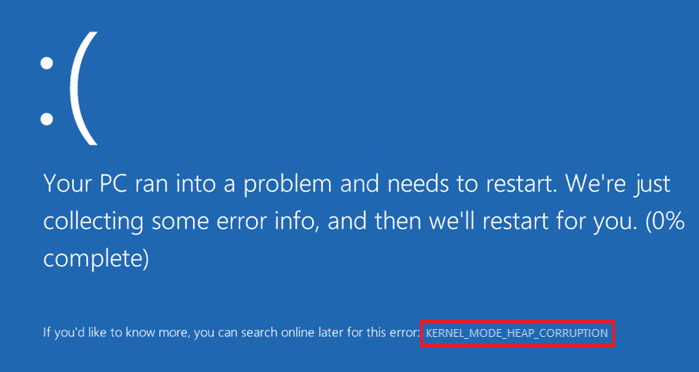
Sometimes when your system performs some intense CPU activities, like gaming, you might get the Blue Screen of Death error Kernel Mode Heap Corruption. Sometimes even when the system is performing normal tasks, it might crash giving out the blue screen, giving this error message.
The reasons for this BSOD error are various and are mostly related to corrupt system files, outdated or corrupt graphics drivers, software conflicts, hardware issues etc. Even though Blue Screen of Death errors are frustrating, they are most often easily solvable.
Please try out the methods listed below one by one to solve this issue on your own without having to pay a visit to a technician.
Safe Mode Booting Up Of Windows
Most Blue Screen of Death Errors give users with no choice other than restarting the machine. When the machine restarts, it will be forced to be restarted again showing the same message. In cases like this one, booting into windows through safe mode might be the only option left. Following steps detail how you can safe boot into your machine and try to fix the BSOD errors from safe mode.
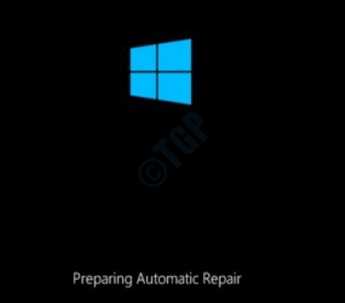
1. The very first step would be to shut down your machine completely. Once it is completely shut down, turn the system on by pressing the power button. Now you will be able to see the normal booting up screen where the manufacturer’s logo appears. The moment this happens, long press power button to shut it down again. You have to repeat this shutting down process till the following screen appears instead of the normal booting up screen.
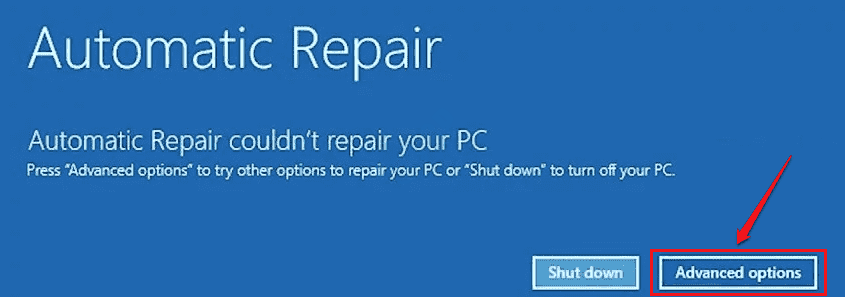
2. After Preparing Automatic Repair screen, Diagnosing your PC screen will be visible to you and it will only take a moment for the Automatic Repair screen to show. Advanced options button is the next to click.
3. Now you will have 2 options to choose from: Continue and Troubleshoot. Click on Troubleshoot.
4. Click on Advanced options next.
5. There are multiple options available in the Advanced options screen.
6. Click on startup Repair option and see if it fixes your issue or not. If not proceed with next step.
What we have to click on is the Startup Settings option.
6. To proceed to the safe mode restart option, click on the Restart button as shown below:
7. Finally, safe mode can be entered by pressing either the number 4 or the number 5 as per your requirement.
Safe mode boot up will now happen. To fix the Kernel Mode Heap Corruption Blue Screen of Death problem, you can now try out the methods we have listed below one by one.
Method 1: Check Windows Event Viewer
Windows Event Viewer is very helpful when troubleshooting Windows related problems. When you get a BSOD error, checking Event Viewer can be helpful as it might tell you what the exact reason for the problem is. For example, it may inform you which hardware driver crashed or whether a particular corrupt system driver is the reason for the trouble or not. Following steps can be used to check the Event Viewer logs.
1. Press the keys WIN + R together and bring up the Run window. Type in eventvwr and hit Enter key.
2. In the left window pane, expand the section Windows Logs and then expand System. In the right window pane, you will be able to see all the events.
Select the event that you want to view the details of. In this case, I have chosen the first event as an example. You can use the Date and Time column or you can scroll down and find the Kernel Mode Heap event in your machine.
Now under the General tab, you can see event description which can give you enough information about what exactly is the cause for your problem.
Also, you can search online with the Source filed and Event ID field data to gather more information about the issue.
Please head on to the next method if Event Viewer couldn’t provide you with much information related to your Kernel Mode Heap Corruption BSOD issue.
If you want to know more on analyzing windows logs through Event Viewer, please refer How to use Event Viewer to analyse errors in Windows 10.
Method 2: Update Graphics Card Driver
The most common reason why the Kernel Mode Heap Corruption BSOD error happens is because of corrupt Graphics card drivers. Follow the steps below to update your graphics card driver.
1. Press WIN and R keys together to open up the Run window. devmgmt.msc has to be typed in. When done, press Enter.
2. As next, expand the section Display adapters and right click on your graphics card listing. As next, hit on the option Update driver.
3. In the window that follows, choose Search automatically for updated driver software and follow the on screen instructions to complete the update process.
Once the driver is updated, restart your machine and check if the issue is resolved.
Method 3: Rollback Graphics Card Driver
If there were no updates available in the previous method, problem could be that the version of the graphics card driver that you have in your machine is an unstable one. Rolling back the latest update might very well fix your issue.
1. Press WIN + R keys together and open the Run window. Type in devmgmt.msc and press Enter key.
2. As next, expand the Display adapters section and right click on your graphics card listing. As next, click on the Properties option.
3. Click on Driver tab. Then click on the Roll Back Driver button if it is active. Once done, click on OK button.
Once the driver rolls back to the previously installed version, restart your PC and check if the Kernel Mode Heap Corruption BSOD Error is gone or not.
Method 4: Reinstall Graphics Card Driver
If updating and rolling back the graphics card driver methods didn’t work for you, try re-installing the driver. For that, follow the steps below:
1. Open Run window by pressing the WIN and R keys together. Type devmgmt.msc and press Enter key.
2. As next, expand the Display adapters section and right click on your graphics card listing. As next, click on the Uninstall device option.
3. When prompted for uninstallation confirmation, click on the Uninstall button.
4. Restart your machine. Upon restart, windows will automatically install all the missing drivers in your machine.
If for some reason it doesn’t happen, then you can visit the manufacturer’s website and download the required driver for your PC. If you are confused about how to find the correct driver that is compatible, then please refer our article Find the right driver compatible to windows 10 laptop model?
Once you have the executable file for the driver, you just need to execute it by double clicking on it to get it installed.
Method 5: Run Driver Verifier Manager
If Graphics Card Driver is not the problematic one, then you can run the Driver Verifier tool to find whether there are issues with any other drivers.
1. Type in powershell to windows start menu search bar. Right click on Windows PowerShell and choose Run as administrator option.
2. When Windows PowerShell opens up, type in verifier and hit the Enter key to open Driver Verifier Manager.
3. Select the radio button associated with the task Create standard settings. Click Next button at the bottom.
4. As next, select Automatically select all drivers installed on this computer option and then hit the Finish button.
Once the system restarts, all the drivers with issues will be displayed by Driver Verifier Manager. You can then update or rollback or reinstall these drivers as detailed in methods 2, 3 and 4 respectively.
Method 6: Check for Graphics Card Hardware Issues
If you have mistakenly inserted the graphics card in the wrong PCIe lane, then that can cause Kernel Mode Heap Corruption BSOD error. Make sure the graphics card is in the correct slot. For proper instructions on how to do this, please check your motherboard manual.
Method 7: Check for Conflicting Software
If you have recently installed any new applications or video games, try opening them one by one and check if one of them is causing the issue. If you get the issue when one of the apps/games is opened, then that means that your system specifications do not support the running of that particular software. In that case, uninstall that software and check if the issue persists.
Method 8: Check for RAM Issues
Memory problems are often the cause for Kernel Mode Heap Corruption BSOD error. Hence checking whether there are any issues present with your RAM is one important step in troubleshooting this error.
1. Type in memory diagnostic in windows start menu search bar. Choose Windows Memory Diagnostic from the results.
2. As next, click on Restart now and check for problems option. This will restart your machine.
3. Once the machine restarts, open Windows Event Viewer. For that press WIN + R keys together and type in eventvwr in the Run dialog box.
4. Navigate to Windows Logs –> System. There will be section called Actions. Under it, click on the Filter Current Log option.
5. Click on the Filter tab. As next, enable the checkbox associated with the option MemoryDiagnostics-Results for Event Sources dropdown as shown in the screenshot below. Hit OK button for the filter to list all the memory test logs.
6. Clicking on the latest event will give you information regarding the test you just ran. If the test was a failure, then you can refer to the event description field to fix the memory problems that were found during the test.
Method 9: Run System File Checker
Another reason why you might get the Kernel Mode Heap Corruption BSOD error is a corrupted PC registry. One powerful utility that Windows has is the System File Checker command line utility. This tool can be used to locate and fix the corrupt system files in your PC.
1. As shown in the screenshot below, open Command Prompt in elevated mode from Windows start menu search bar.
2. The command sfc /scannow has to be executed next as shown below:
sfc /scannow
When the scan finishes, restart your machine. Once the system boots back up, all the corrupted registry files will be replaced. Check if you are still getting the BSOD error.
Method 10: Run DISM Tool
DISM (Deployment Image Servicing and Management) tool is another useful tool in fixing the corrupt system files. Please follow the steps below to run the DISM tool.
1. Open command prompt in administrator mode as shown below. Start menu search bar can be used for this.
2. In the Command Prompt, copy paste the following command and press Enter key.
DISM /Online /Cleanup-Image /RestoreHealth
Restart your machine once the scan finishes. Check if the BSOD error is resolved.
Method 11: Perform Windows System Restore
If system restore feature is already enabled in your machine and there are restore points created already by your machine, then it is possible to go back to a time where your machine was free of the Kernel Mode Heap Corruption BSOD problem. Please follow the steps below to learn how:
1. Type in control panel to windows start search bar and then open control panel. In the control panel search option, type in recovery and then launch the Recovery options window.
2. As next, click on the link Open System Restore.
3. Click on Next button.
4. Firstly, enable Show more restore points checkbox.
You have to now think of the time that the Kernel Mode Heap Corruption Blue Screen of Death issue happened initially. If you can recall the approximate time, choose a restore point before this time. Once you have chosen the restore point, you can hit the Next button.
5. To initiate system restore, click on finish button.
When the restoration process is done, try restarting your machine to verify whether the issue persists.
Please leave in comments which method worked for you.


