Is your computer crashing while you are trying to play your favorite game? Crashes in games is not a rarity at all. Sometimes the corrupted game files can cause this. But if your computer is crashing or freezing while you try to play any game, then that’s a matter you should not neglect further. This may be a case of a corrupted graphics driver or a bad sector in the memory drive that is causing this problem on your computer.
Workarounds –
1. Before we proceed, check if there are any Windows Update pending on your system.
2. Disable any third-party antivirus on your system. Check if this works out for you.
Fix 1 – Run Memory Diagnostics
At first, we are going to test if there is any corruption in the memory drive.
1. Simply just press the Windows key+R keys together.
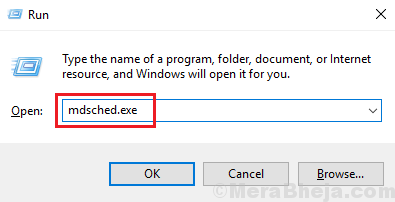
2. In the Run window, type “mdsched.exe” and hit Enter.

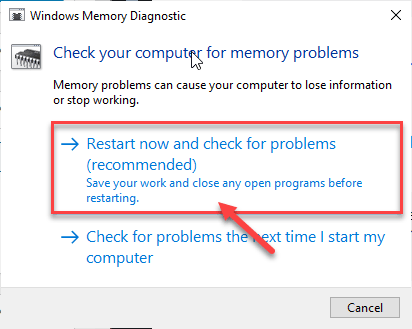
3. Now, you have to choose an option among the available two options.
If you want to restart your machine and start the check click on the “Restart now and check for problems (recommended)” option.
Otherwise, to check the system while your system restarts next time, click on the “Check for problems the next time I start my computer” option.

Wait for the checking process to complete as your computer boots up.
Fix 2 – Install the latest graphics driver
If there is no corruption in the memory drive, maybe there is some corruption in the graphics driver.
STAGE 1 – Download the DDU ZIP
1. Just click on this link to download the DDU.zip on your computer
2. After downloading the zip file. extract the contents on your device.

3. Then, right-click on the Windows icon and click on the “Run“.
4. After that, type “control printers” and click on “OK” to access the Device and Printers.

5. Then, right-click on your computer device and click on “Device installation settings“.

6. After that, you need to check the “No (your device might not work as“ expected)” option.
7. Next, you have to click on “Save Changes“.

Close the window.
8. At first, go to the NVIDIA driver website.
8. Put particular specifications of the driver in the appropriate section (like ‘Product type’, your ‘Operating System’, etc).
9. Finally you need to click on the “Search“.

10. To download the driver on your system, click on the “Download“.

Close the browser window after downloading the driver.
STAGE 2 – Boot into Safe Mode and uninstall the graphics driver
1. Press the Windows key+I keys together and click on “Update and Security“.

2. Then, click on “Recovery“.
3. After that, under ‘Advanced Startup’, click on “Restart Now“.

4. Your device will boot into the Windows Recovery Environment.
5. Once Windows RE appears, click on the “Troubleshoot“.

6. Simply click on “Advanced options“.

7. Then you have to click on the “Startup Settings“.

8. Then, click on “Restart“.

9. Once you are in the Startup settings, press the F4 key to “Enable Safe Mode“.

10. Go to the location where you have extracted the DDU.zip.
11. You have to go to the extracted folder, and then double click on the “Display Driver Installer“.

12. When the Display Driver Uninstaller screen opens up, on the left-hand side, click on the drop-down beside “Select device type” and click “GPU”
13. Here you have to finally click on “Clean and Restart“.

DDU will uninstall the existing NVIDIA driver from your system. Your computer will reboot.
STAGE 3 – Install the graphics driver manually
Once your computer restarts once DDU uninstalls the driver, follow these steps.
1. Go to the location where you have downloaded the graphics driver earlier.
2. Then, you need to double click on the offline installer to launch it.

3. When the NVIDIA Graphics Driver window appears, click on “NVIDIA Graphics Driver and GeForce Experience”
4. After that, Click on “Agree and continue“.
5. Here, select the “Custom (Advanced)” option to try it out.
6. Click on “Next“.

7. Finally, click on the “Perform a clean installation” box.
8. A click on “Next” and the installation process will start.

Once the installation is done, click on “Close” to close the NVIDIA Graphics Driver Installer window.
Restart your computer to let the installation process complete.
LEVEL 4 – ENABLE AUTOMATIC UPDATES
All that is left is to re-enable the automatic update of your devices.
1. Once you have rebooted your device, right-click on the Windows icon and click on “Run“.
2. Type this code and click on “OK“.
control printers

3. Here, you need to right-click on your computer and click on “Device installation settings“.

4. Simply tick the “Yes (recommended)” option and then click on “Save Changes“.

Once you have done this, try to play the game again. This should have fixed your problem.
Fix 3 – Modify game properties
You can modify the game properties of the game where you are facing this issue.
1. Open the Steam client on your system.
2. After that, on the left-hand side you will see the list of games.
3. Right-click on the problematic game and further click on the “Properties“.

4. After that, click on the “LOCAL FILES“.
5. On the same window, on the right-hand side, click on the “BROWSE…“.

The file location will open up.
6. Now, right-click on the game executable (the .exe file) and click on the “Properties“.

7. Then, just go to the “Compatibility” tab.
8. After that, click on the “Run this program in compatibility mode for:” and choose the “Windows 8” or “Windows 7“.

9. Finally, tick the box beside “Run this program as an administrator“.
10. After all these, click on “Apply” and “OK“.

Launch the game and test.
Fix 4 – Disable the Link Power State
According to some users, disabling the link power state mode has stopped the issue on their computer.
1. To launch a Run terminal, press Windows key+R together.
2. After that, type or copy-paste this run command and then hit Enter.
powercfg.cpl

3. Choose the “High Performance” settings.
4. Then, click on the “Change plan settings“.

5. Set the ‘Turn off the display:’ to “Never“.
6. After that, choose the ‘Put the computer to sleep:’ to “Never“.
7. Click on the “Change advanced power settings“.

8. Just click on the “PCI Express“.
4. Then, click on the “Link State Power Management” to expand it.

5. Simply, click on the ‘Settings:’, and toggle it to “Off” from the listed options.

6. Finallly it is time to change the settings. Click on “Apply” and “OK“.

Restart the system, if required. After that, launch the game.
Fix 5 – Clean boot your device
Clean booting the device allows your computer to boot your device without third-party devices.
1. Press the Windows key+R keys together.
2. Write this code in the Run terminal. Click on “OK“.
msconfig

3. Simply go to the “General” tab.
4. In the second step, choose the radio button beside the “Selective startup” option.
5. After that step you have to tick the box beside the “Load system services.

6. After doing that, go to the “Services” section.
7. Next what you have to do is check the “Hide all Microsoft services“.
8. Finally, click on the “Disable all“.

This will disable all the third-party services on your computer.
9. Just, click on “Apply” and then on “OK“.

If you see a prompt for restart, click on “Restart now” to restart your computer in clean mode.
NOTE –
1. Sometimes some external third party applications like the Extreme gaming Engine, Game Plus has caused the problem. You can disable it from your computer. Test the games out.
2. You can uninstall the GeForce Experience from your computer.
a. Press the Windows key+R.
b. Type “appwiz.cpl” and click on “OK“.
c. Find out the “Geforce Experience” from the lists of apps. Right-click on it and click on “Uninstall“.
Once it is uninstalled, restart the system.
Your problem should be solved.