While installing Java on some Windows machines, some users have complained about an error message “Error 1721:There is a problem with this Windows Installer package.” on respective forums. The problem has appeared while installing Java, while it may appear at any time while installing/running a Java-based application. After doing thorough research, we’ve found that there are multiple reasons behind this problem. Just follow these solutions so that you can install Java on your computer.
Workarounds –
1. You can restart your computer. After restarting the system, run the installer. Test if this works.
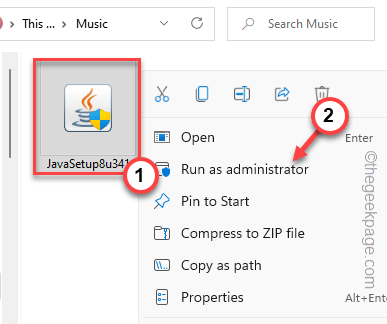
2. Run the installer as an administrator. Just, reach the location of the installer file, right-tap that, and click on “Run as administrator” to run it as an administrator.
Complete the installation process.
Fix 1 – Restart the Windows Installer service and install Visual files
Step 1
Windows Installer service is an essential component of installing process.
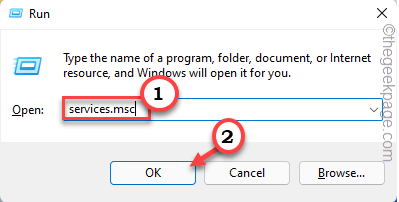
1. At first, press the Win key and the R keys together at once.
2. Then, type this command and click “OK“.
services.msc
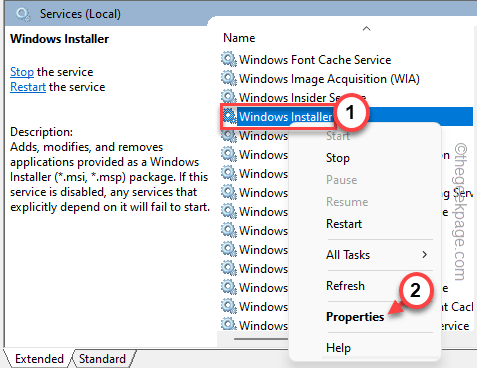
3. Services utility page pops up on your screen. Now, go down through the full list of services and look for the “Windows Installer” service.
4. Then, right-tap that and click “Properties“.
5. Coming to the Windows Installer properties page, take a look at the ‘Service status:’ condition.
6. If it says “Running“, click “Stop” to terminate the service immediately.
Just wait for Windows to stop the service.
7. Then, click on “Start” to start the service.
If you notice the ‘Service status:’ is showing “Stopped“, you can click “Start” to start the service.
Minimize the Services window. Then, launch the installer and complete the installation process.
Step 2
Download and install the Visual C++ Redistributable service package on your computer.
1. Go to the Microsoft Visual C++ 2005 Service Pack 1 Redistributable package.
2. Once you are there, click “Download“.
3. Now, check the “vcredist_x64.exe” package file.
4. Then, click “Next“.
Once you have downloaded the package, minimize or close the browser.
5. Go to the download location.
6. Then, double-tap the package to start the installation.
Just follow the on-screen instructions and finish the installation. Once the installation has finished, restart your computer.
Once you have restarted the system follow these steps to install the Visual C++ 2008 Redistributable package.
1. Download the Visual C++ 2008 package.
2. Now, go to the location of the downloaded file. Then, double-tap the “subinacl“.
3. Follow the steps that appear, and choose in which drive you to want to install the package file.
4. Then, coming on to the final step, click “Install Now” to install the package.
Once it is installed, just like before, restart your computer.
After restarting the system, try to run the installer again.
You won’t face the “Error Code 1721” on your computer.
Fix 2 – Try to install it in compatibility mode
If you are running an old installer, you can run it in compatibility mode for older Windows.
1. Open the File Explorer and reach the location of the installer.
2. Once you reach there, right-tap the installer and click on “Properties“.
3. In the installer properties page, navigate to the “Compatibility” section.
4. Next, tick mark the “Run this program in compatibility mode for:” box and set it to “Windows Vista” from the drop-down list.
5. After that, tap the “Apply” and “OK” option to save the changes.
Now, once you have applied the new compatibility changes, you can run the installer.
Test if this works, otherwise, run the program installing and uninstalling the troubleshooter.
Fix 3 – Pause the antivirus
The antivirus program may cause this problem in the Java installation issue.
1. Close the error message, if you haven’t done it already.
2. Now, look on the taskbar and you can see an arrow icon there. Just, click on it.
3. Once you have clicked the icon, you can see the antivirus, minimized on the system tray.
4. Next, right-click the antivirus and tap “Pause protection” to pause the antivirus activity briefly.
Once you have paused the antivirus program, run the installer and complete installing the Java application.
Check if this works.
Fix 4 – Run the specific troubleshooter
There is a Program Install and Uninstall troubleshooter that can help you identify and fix the problem.
1. At first, visit the MicrosoftProgram_Install_and_Uninstall.meta.
2. Next, tap “Download” to download the tool on your computer.
3. Once you have downloaded the tool, close the browser.
4. Then, double-click the “MicrosoftProgram_Install_and_Uninstall.meta” installer to run the troubleshooter on your computer.
4. When the Program Installer and Uninstaller page opens up, tap “Next” to go to the next page.
5. Once you are asked, “Are you having a problem installing or uninstalling a program?“, choose the “Installing” option to troubleshoot it.
Let Windows check the registry for patch-related issues.
6. Now, you can see the list of apps there.
7. Just, select the app in which you are facing this problem with.
If you can’t see the app in there, choose “Not listed” and click “Next“.
Allow Windows a moment to detect and prescribe a fix for the issue.
Fix 5 – Unregister and register MSI
You should unregister and re-register the MSI executable.
1. At first press the Win key from your keyboard and write “powershell” in the search box.
2. Once you can see the “Windows Powershell” has appeared in the search result. Just, right-click that and tap “Run as administrator” to open the terminal as an administrator.
3. Coming to the main PowerShell screen, write this code one by one and hit Enter.
msiexec /unreg
msiexec /regserver
This way, you have unregistered and re-registered the Windows Installer service.
Now, try to launch the installer and test it out.
Fix 6 – Lower the UAC settings
Try lowering the User Account Control and try to install the Java application once again.
1. Just press the Windows key and search for “User Account Control“.
2. Then, tap “Change User Account Control settings” to access the settings.
3. This will open up the User Account Control Settings pane.
4. Set the slider all the way down to the “Never notify“.
5. Then, click “OK” to save the changes.
This way, the User Account Control interference gets eliminated when you do this. After that, run the installer once more.
The installation won’t be interrupted by the “Error Code 1721” message.


