The Java Runtime Environment (JRE) is used by all the Java applications on your Windows 11, 10 machine. But, when the Java application cannot detect the JRE, it shows up this prompt “Unable to locate the Java Runtime“. Though this error may affect almost any Java-based application, there are prominent cases in Minecraft. Thankfully, there are certain resolutions available to fix this issue.
Fix 1 – Update the Java Runtime
You must make sure the Java Runtime installed on your computer is the latest one. So, perform a search for the Java version and check for updates.
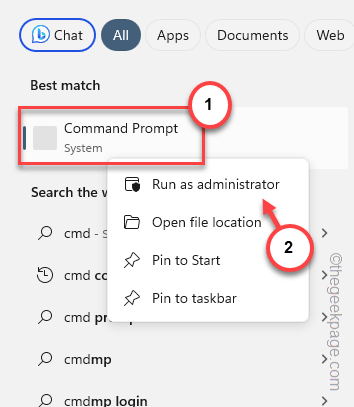
Step 1 – Type “cmd” in the search box.
Step 2 – Later, right-tap the “Command Prompt” in the search results and choose “Run as administrator“.
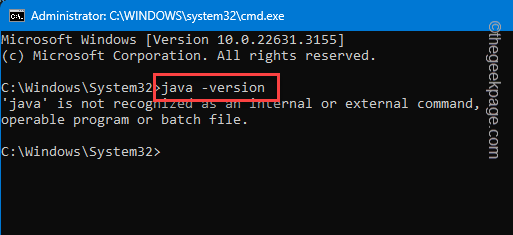
Step 3 – Simply, type this and press the Enter key to inquire about the version of the Java application installed on your system.
java -version
This way, you can know the version of the installed Java application.
If you get an error message in the terminal, then there is some problem with the Java.
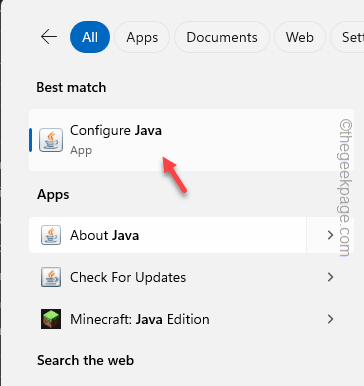
Step 1 – Search for “Java” from the search box.
Step 2 – Next, open the “Configure java” to open that up from the search results.
Step 3 – Wait until it loads up. Then, go to the “Update” section.
Step 4 – In there, choose the “Update now” button to update the Java platform on your system.
This will update the Java application to the latest version. Run the Java-based application and check.
If the problem persists, go to the next solution.
Fix 2 – Repair the Java application
Having this problem with a Java-based app on your device? Repair that specific application.
Step 1 – Begin by hitting the Win+R buttons together.
Step 2 – Later, write this down and click “OK“.
appwiz.cpl
Step 3 – Find that specific application from the list of applications.
Step 4 – Once you have located it, right-click that specific app and click “Change” to open that up.
Go through the steps on the app setup page and complete the repair process.
Run that app one more time. You won’t get any more of Java errors.
Fix 3 – Uninstall and reinstall the Java app
You can’t repair the Java application unless you remove the package from your computer and reinstall the whole thing.
Step 1 – Hit the Start icon and type “appwiz.cpl“.
Step 2 – Hit Enter, later to get access to the Programs & Features tab.
Step 3 – Locate the “Java” application package in there.
Step 4 – Next, you can right-tap the Java app and click “Uninstall“.
Follow the rest of the steps to get rid of the Java app.
Now, you can download and install the latest version of Java on your system.
Step 1 – Go to Java for Windows.
Step 2 – Click “Download Java” to download the latest version of Java setup.
Step 3 – Visit the File Explorer and find the Java setup file.
Step 4 – Run this Java setup file.
Step 5 – Tap “Install” to start the Java installation process.
Breeze through the rest of the steps and complete the Java installation process.
You won’t get the Java Runtime error message any more.
Fix 4 – Allow Java through the firewall
Permit the Java application through the system firewall. Check if this works.
[NOTE – If you are using a dedicated firewall on your system, you have to let the Java through that firewall.]
Step 1 – Hit the Windows key and the R key at the same time.
Step 2 – Next, write this one and click “OK“.
firewall.cpl
Step 3 – On the left-hand tab, you will find the “Allow an app or feature through Windows Defender Firewall” feature. Use that to open the firewall settings.
Step 4 – Next, tap “Change settings” to open that up.
Step 5 – Now, tap “Allow another app“.
Step 6 – You have to reach the Java root directory, in this address –
C:\ProgramData\Microsoft\Windows\Start Menu\Programs\Java
Step 7 – Select the “Configure Java” file there and click “OK“. to add that to the list of apps that are controlled by the firewall rules.
Step 8 – You will see the Java Control Panel in the box. Further, click “Add“.
Step 9 – Now, set the Java application to “Allow” mode for both the ‘Public‘ and ‘Private‘ criteria.
Step 10 – Tap “OK” to save the changes.
This way, allow the Java app to pass through the firewall on your computer.
Try this out by running that app once again.
Fix 5 – Get rid of unwanted Java apps
There might be a Java-based application that may conflict with the
Step 1 – You should start by pressing the Win+R keys together.
Step 2 – Later, type this and click “OK“.
appwiz.cpl
Step 3 – Look at the list of the apps in there. Find any old Java-based applications and uninstall any such from your computer.
This way, you can remove any contradiction between the Java-based apps on your computer.
Fix 6 – Uninstall and reinstall the application
Uninstall the problematic application from your computer and reinstall the same afterwards. It is possible that you are using an older iteration of the software, and so, you must upgrade to the latest version.
Troubleshooting tips for Minecraft users –
If you are facing this error while playing Minecraft, you can use the following steps to fix the issue.
Fix 1 – Repair the Minecraft
Repairing the Minecraft game on your system.
NOTE – Resetting the Minecraft game will remove all the locally saved profiles or any other settings or modifications. But, there is nothing to worry about as the game saves are stored in the cloud.
Step 1 – Hit the Windows button and the I keys at once.
Step 2 – Later, go to the “Apps” bar.
Step 3 – On the opposite side, click “Installed apps” to open the complete list of apps installed on your computer.
Step 4 – Locate the search box at the top. Type “Minecraft” inbox.
Step 5 – Wait till you see the Minecraft Java Edition in there.
Step 6 – Next, just tap the dot button next to the Minecraft game and tap “Advanced options“.
Step 7 – In the Advanced Options page, scroll down to find the Reset section.
Step 8 – Tap “Repair” to initiate the repairing operation.
Step 9 – When this repairing process is finished, click “Reset“.
Step 10 – For the warning message, later, tap “Reset” once more to complete the reset process.
The next time you launch the Minecraft game, you have to log in using your Microsoft account.
You won’t get the “Unable to locate the Java Runtime” message again.
Fix 2 – Remove the Java arguments
The misconfigured Java arguments can cause this issue. So, remove all the Java arguments from the Minecraft launcher and test that.
Step 1 – Don’t launch the Minecraft app. Instead, launch the Minecraft Launcher.
Step 2 – On the left tab, choose the “Minecraft Java Edition” from the left tab.
Step 3 – Now, on the opposite tab, go to the “Installations” tab. Open the “Latest release” to open that.
Step 4 – In the Edit installation tab, tap “More options” to expand further list of menus.
Step 5 – Later, clear the entire entry of the “JVM Arguments” box from your computer.
Step 6 – Finally, tap “Save” to save the changes.
After saving these changes, relaunch the Minecraft Java Edition and test it. You won’t get any further Java error messages.


