Is the Minecraft client on your system showing “Internal Exception :java.net SocketException” message while you are trying to load your own world? This is nothing but a connection error in Minecraft and you can manually fix the issue following these easy solutions at your end.
Workarounds –
1. Before you do anything, check the internet connection on your system.
2. Try to play any other multiplayer games (like Valorant, COD, etc.) and test the network status.
Fix 1 – Make some changes in DNS server
Change the DNS server for the network configuration you are using.
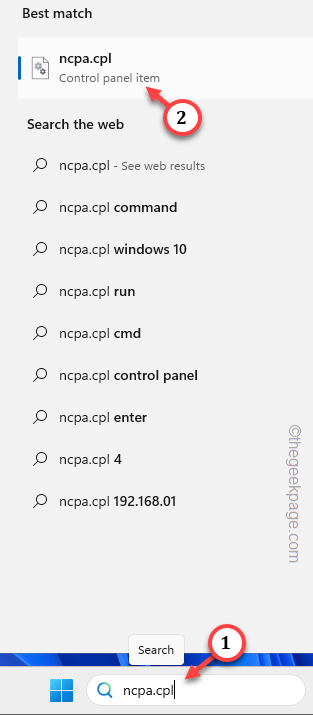
Step 1 – Tap the Windows key once to open the search box. Type “ncpa.cpl” in there.
Step 2 – When you see the same thing in the search result, hit it.
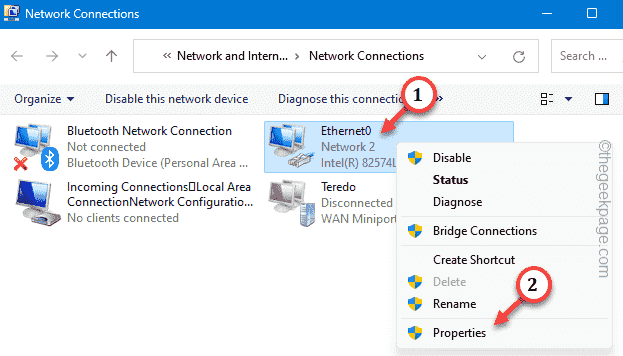
Step 3 – This leads you to the Network Connections window. Select the network adapter you are using.
Step 4 – Next, right-tap the network adapter your system is using currently and tap “Properties“.
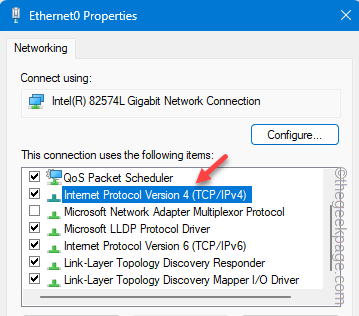
Step 5 – On the Networking pane, double-click the “Internet Protocol Version 4(TCP/IPv4)” to edit that.
Step 6 – Do not change the IP settings. Leave it be.
Step 7 – Now you have to select the “Use the following DNS server addresses:” option.
This way, you can input the DNS address you prefer.
Step 8 – Configure the DNS server address the following way –
Preferred DNS server: 8.8.8.8
Alternate DNS server: 8.8.4.4
Step 9 – Click “OK“. This way, you have to configure the DNS configuration for that network adapter.
Quit the Network Connections page. Restart your computer after this.
When the system comes back up, launch Minecraft and test.
Fix 2 – Check the Minecraft server status
If alternating the DNS configuration doesn’t fix the issue, check whether the Minecraft servers are online or not.
Step 1 – There are several ways to check this. If you want to check the status of a particular server, go to this Minecraft server.
Step 2 – Paste the Minecraft server and click “Get server status“.
Step 3 – Apart from this check the Mojang Twitter feed to check the Minecraft server status.
If the servers of a particular region is down due to maintenance purposes, you have to wait for it to come back online.
Fix 3 – Update the Java
Update the Java to the latest version.
Step 1 – Just type “Java” in the box.
Step 2 – Next, open the “Configure Java” app to open it.
Step 3 – When the Java Control Panel opens up, go to the “Update” pane.
Step 4 – Here you can find the “Update Now” to update the Java app.
The latest version of the Java files will be downloaded and installed.
Fix 4 – Run some network reset codes
You can run these flush the IP configuration settings.
Step 1 – Begin the search for “cmd” from the search bar.
Step 2 – As you need a terminal to open as an administrator, right-click the “Command Prompt” and tap “Run as administrator“.
Step 3 – These are the three commands to flush, release and renew the DNS sockets. Execute these one after another.
ipconfig /flushdns
ipconfig /release
ipconfig /renew
After renewing the DNS configurations, exit the CMD shell and reboot the machine.
Open Minecraft and try to play the game.
Fix 5 – Uninstall LogMein Hamachi
Are you using the LogMein Hamachi vpn on your computer? Uninstalling it should help you resolve the Minecraft error.
Step 1 – Right-click the Windows icon and open the “Installed apps“.
Step 2 – After getting into the Installed apps section in Settings, use the search box to find the “Hamachi“.
Step 3 – Now, tap the “Logmein Hamachi” and use the “Uninstall” to uninstall it.
Follow the required steps on your system to get rid of the Logmein Hamachi app.
You may have to reboot your computer. Check the status of the Minecraft app.
Fix 6 – Unblock Minecraft from your firewall
Unblock the Minecraft game from your system firewall.
Step 1 –Using the Windows key+R keys together, open a Run box.
Step 2 – Then, type this in that box. Hit Enter to open the Control Panel.
firewall.cpl
Step 3 – There, you shall find an option called “Allow an app through Windows Defender Firewall” on the same page. Open that.
Step 6 – In the next screen, you will notice all the installed apps with their permissions of both Private and Public network types.
Step 7 – You can modify the settings using the “Change settings“.
Step 8 – After this, “Java(TM) Platform SE Binary” or “OpenJDK Platform binary” app.
Step 9 – Just tick the both the boxes for the “Public” and “Private” options.
Minecraft is allowed through your system firewall.
Step 10 – Look for the Minecraft Launcher, Minecraft Java Edition whichever you has or facing this problem with.
Step 11 – Simply, check the “Allow” box under the “Public” and “Private” options.
Run the Minecraft once more.
Check if this offers any help in the “Internal Exception : java.net SocketException” case.


