If you are on a limited data plan, it is very important that you track your Internet data usage so that you don’t end up paying more to your telecom provider for exceeding the data limit. In Windows 11, you can easily view the data used by your system so far, reset the data usage counter, set a data usage limit and much more. Using the default Windows 11 data usage settings, you can set a data limit and get reminders to limit your data usage if your usage closes up to the limit.
In this article, we explain in detail how you can view and configure the Data Usage feature in Windows 11 to efficiently control your Internet usage to avoid paying extra charges for over-usage of data.
How to View the Internet Data Usage
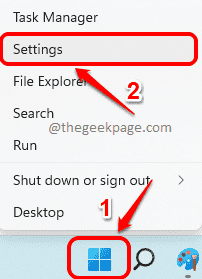
Step 1: Right click on the Windows Start menu icon and click on the Settings option.
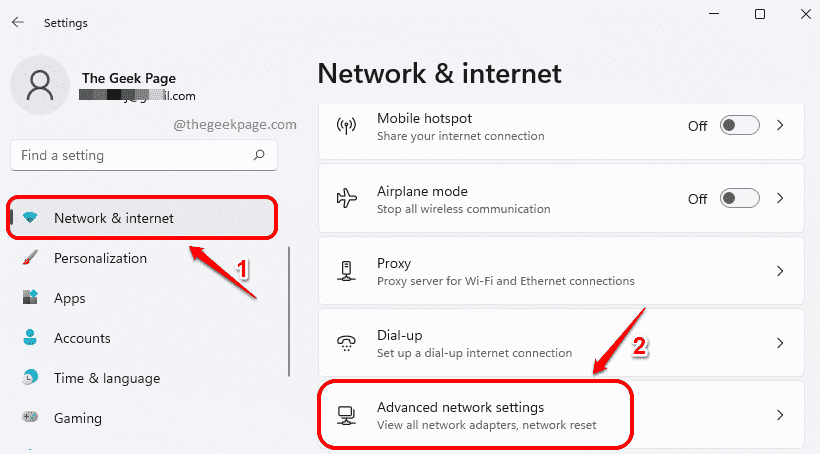
Step 2: In the left pane of the Settings window, click on the Network & internet section and in the right window pane, click on the tab Advanced network settings.
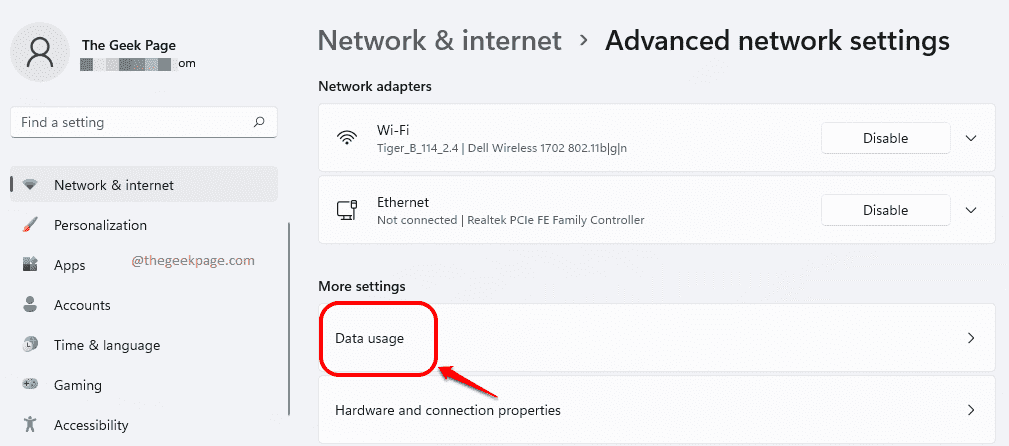
Step 3: Now scroll down and find the section named More settings. Under More settings, click on the tile named Data usage.
Step 4: Now in the Data usage window, you can view the data usage for the past 30 days. You can also view the data consumed by each application as shown in the screenshot below.
How to Reset the Data Usage Counter
If you want to reset the data usage counter, in the same Data Usage settings window, scroll all the way down and find the section Reset usage stats. Click on the Reset button against this option. If a confirmation window comes up, give confirmation to proceed.
Note: Clicking on the Reset button will remove the data usage history for all the networks available.
How to Set a Limit on Data Usage
If you would like to set a limit to your data usage and be reminded upon reaching that limit, get to the Data usage window just like in the previous steps listed in this article and then follow the steps below.
Step 1: Once you are at the Data usage window, click on the button Enter limit at the top.
Step 2: In the Set data limit window, give a Limit type. Here I have chosen the Monthly option to set the limit on a monthly basis.
As next, choose the date on which data usage is to be reset.
Finally, give the Data limit and then the Unit as either GB or MB.
Once you are all done, hit the Save button to apply the limit rule.
How to View the Remaining Data in the Limit Set
To view the remaining data in your limit plan, go to the Data usage window once again.
The following screenshot and points explain what all data usage options you can find out in this step.
- You can see how much data, in percentage, in your data usage plan is already used.
- You can see on what date the data usage will be reset
- You can see how much data is used in GB/MB as well.
- You can also see how much data in GB/MB is remaining from the plan.
- If you would like to edit your usage limit, you can do so by clicking on the Edit limit button.
How to Remove the Data Usage Limit
If you would like to remove the data usage limit completely, you can click on the Remove limit button as shown below. If a confirmation window comes up, give confirmation to proceed with the data usage limit removal.
You can now easily keep a tab on your Internet usage just like that.
Please tell us in the comments section whether you found the article useful or not.


