In Windows, every user of the system may not have access permissions for the files and folders. Only the file/folder owner has permission to change the access rights. It has been noticed that whenever a user tries to change the ownership of a file/folder an error message stating Unable to Display Current Owner is seen against the Owner name in the Advanced Security Settings window.
Possible reasons for this error are
- Locked file/folder
- Files are corrupted without any owner
- No access rights for the user
- Disabled administrator account
If you are confronting this issue for a particular file/folder then you are in the correct post. In this article, you will find some strategies that can be used to resolve this error on your Windows PC.
Fix 1 – Check for File System Errors Using chkdsk
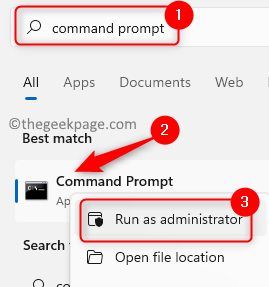
1. Press the Windows key and type Command Prompt in the search box.
2. Right-click on Command Prompt in the search result and select Run as administrator.
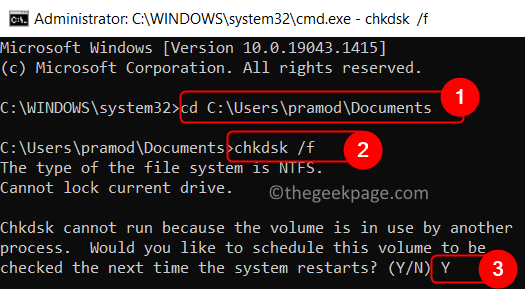
3. Here, type the cd command below with the path of the problematic file or folder and execute it.
cd path of the problematic folder or file
Note: Give exact path of the issue causing folder , For example C:\Users\pramod\Documents
4. Now you will be in the folder that is causing this issue. Run the command below.
chkdsk /f
5. If the location of the folder is in the C drive, then you will see a message asking whether to perform the disk checkup at the startup. Press the Y key and hit Enter.
6. Exit the command prompt and restart the computer.
7. At startup, it starts a scan to check and remove any files that are corrupted.
8. Now check if the problem with the file/folder is resolved.
Fix 2 – Boot PC in Diagnostic Startup
1. Open Run dialog using the Windows and R key combination.
2. Type msconfig to view the System Configuration window.
3. Select the General tab and choose the option Diagnostic Startup.
4. Click on Apply to confirm the changes.
5. When you are prompted to restart your system to apply the changes, click on Restart to reboot the system immediately. If you want to restart it later manually, then click on Exit without restart.
6. Once you boot up again, open Run just hold the Windows and R keys together.
7. Type cmd and press Ctrl + Shift + Enter to open Command Prompt as administrator.
8. Type the command below and execute it to enable the hidden admin account.
net user administrator /active:yes
9. Also, copy and paste the command given below to set password for hidden admin account
net user "Administrator" "NewPassword"
10. Check if you are able to modify the file/folder with the permission problem. Your problem will be solved
11. After the changes are done, open Command prompt as administrator and disable the hidden admin account using the command below
net user administrator /active:no
12. Press Windows + R and open System Configuration by typing in msconfig.
13. Click on the option Normal startup in the General tab.
14. Click on Apply.
15. You will be prompted to restart, click on Restart. Now your system will start-up in the normal mode again.
Fix 3 – Allow Access to Authenticated Users
1. Go to the file or folder that is raising this issue for you.
2. Right-click on it and choose Properties.
3. Go to the Security tab.
4. Click on the Advanced button at the bottom.
5. You will see the Advanced Security Settings window for the folder. Here, click on the Change link next to the Owner name.
6. In the Select User or Group window, click on Advanced.
7. In the window that appears now, click on Find now.
8. You will see a set of search results at the bottom. Select the currently logged-in user account from the list.
9. Click on OK.

10. In the Select User or Group window, you will see the selected user. Click on OK.

11. In the Advanced Security Settings, you will see the name of the user selected next to Owner.
12. Here, check the box with the option Replace owner on subcontainers and objects.
13. Click on Apply to save the changes.
14. In the security warning window that appears asking whether you want to replace the permissions, click on Yes.
15. Click on OK in the Windows Security information message saying that you need to close and reopen the object to view or change permissions.
16. Close the Advanced Security window by clicking on OK.
17. Again open the Advanced Security Settings window for the file/folder using Steps 1 – 4 above.
18. You will see the current owner has changed and the error message will not be there.
Fix 4 – Uninstall Folder Lock Software (if applicable)
It has been reported that users who had this issue were able to resolve it after uninstalling the folder lock software that they were using to protect the files and folders. This software works in such a way that any other accounts using the PC will not be able to access the files or folders protected/encrypted using it.
Note: If you are not using any such software, then move over to Fix 3.
1. Press Windows + R to open Run.
2. Type ms-settings:appsfeatures to go to Apps & features.
3. Click on the three vertical dots associated with the folder lock or any such software installed and choose Uninstall.
4. Wait for the uninstallation process to complete.
5. Restart your PC and check if you are able to take ownership of the folder or file that was raising this issue.
Fix 5 – Enable Built-in Admin Account
1. To open Run just hold the Windows and R keys together.
2. Type cmd and press Ctrl + Shift + Enter to open Command Prompt as administrator.
3. Type the command below and execute it to enable the hidden admin account.
net user administrator /active:yes
4. Once the command executes, press the Windows key.
5. Click on your account profile icon and choose the option Sign out to log off.
6. Once you log off the current user, click on the new user Administrator at the bottom left on the login screen.
7. Check if the problem is fixed with the file/folder.
Note: If this fix cleared the issue for you, then open Command prompt as admin again and disable the built-in admin account using the command below
net user administrator /active:no
Restart your PC or log off and return to your regular user account.
If the command doesn’t resolve the issue, do not make use of the above command to disable the admin account as you need it for the next fix.
Fix 6 – Grant All Administrators the File/Folder Ownership
Note: Perform the steps in this fix if enabling the built-in admin account did not work for you. Make sure that you have not disabled the built-in admin account before moving ahead.
After logging into the Administrator account, perform the steps mentioned.
1. Press the Windows and R keys simultaneously to open the Run dialog.
2. Type cmd and press Ctrl + Shift + Enter to open Command Prompt as administrator.
Note: In the commands that we will be executing in Steps 3 and 4, replace path_of_folder with path of the problematic folder such as C:\Users\pramod\Documents with the complete path of the file or folder causing the error for you.
3. Enter the command below and execute it.
takeown /F path_of_folder /a /r /d y
Note: If there is no error in the command execution, you will see a message SUCCESS. In case you see an error stating that the file cannot be found, then check the path entered in the command.
4. Type the command below and press Enter.
icacls path_of_folder /grant administrators:F /t
5. It will display a message Successfully processed 1 (or more) files; Failed processing 0 files if the operation is executed without errors. Any other message indicates the operation failure.
6. Check if the problem is fixed if you see a successful message after executing the command.
That’s it.
This article must have helped to clear the error message and access the files and folders on your Windows PC. Comment and let us know the fix that worked for you.

