SSH is an important command-line utility that is used by network admins across the globe. And OpenSSH is an open-source version of SSH. In windows 10, we had a built-in Open SSH Client. In Windows 11, we have a built-in Open SSH Server as well as an Open SSH Client. You can Install both of them in your system with a few clicks. Also, the basic configuration is quite straightforward.
If you are eager to install and enable OpenSSH in your Windows 11 system, follow this simple guide.
How to Install Open SSH in Windows 11
Step 1: Double-click on the search box on the ribbon
Step 2: Click on the Settings icon
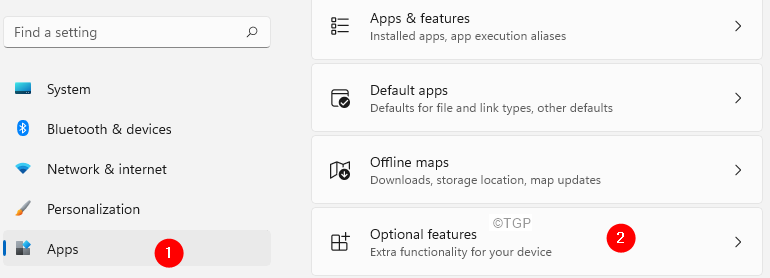
Step 3: From the left-hand side pane, click on Apps
Step 4: Choose Optional Features from the right-hand side.
Step 5: In the Optional features panel that opens, click on View features
Step 6: You will see a Add an optional feature window popping up
Step 7: In the search bar, type Open SSH
Step 8: Tick on the OpenSSH Server option as shown below
Step 9: Click on the Next button
Step 10: Click on the Install button
Step 11: Open SSH Server would start installing in your system. Wait till the installation completes.
Note that, the OpenSSH Server will be Disabled by default. We have to manually enable it in our system.
How to Enable OpenSSH Server in Windows 11
In order to enable Open SSH Server in your system, follow the below steps :
Step 1: Use the keys Windows+R from your keyboard, and open the Run Terminal window.
Step 2: Enter the below command and hit Enter
services.msc
Step 3: In the services window, scroll down and locate OpenSSH Server
Step 4: Click on the OpenSSH Server.
Step 5: Then, click on Start the service
How can one connect to this OpenSSH Server?
Now that we have installed OpenSSH Server and enabled it, let us look at how one can connect to this server. Any client willing to connect to this server should know the IP address of this server. Also, should have an SSH Client installed in the system. Any SSH Client can be used to connect to the server.
Step 1: Open your SSH Client and enter the below command,
ssh <username>@<IPAddress>
For example, let us say, the username is admin and the IP Address of the server is 10.0.1.1, the ssh command to be used is
ssh [email protected]
Step 2: You will be asked to establish your authenticity, enter yes
Step 3: Enter the password when prompted
Step 4: You will be connected to the server and can access the files and folders
That’s All. We hope this article has been informative.
Kindly comment and let us know if you found this helpful. Also, comment and let us know if you run into any issues. We will be glad to assist
Thank you for Reading.


