Slow internet is the most frustrating thing to experience while browsing the web. Windows 10 users complain a lot about slow internet speed after upgrading to windows 10. By digging deeper we found out that by tweaking just a few settings, you can increase internet speed to a great extent on window 10 computer. Here are some killer tips to fix slow internet speed on windows 10.
Tip 1 – Change DNS settings
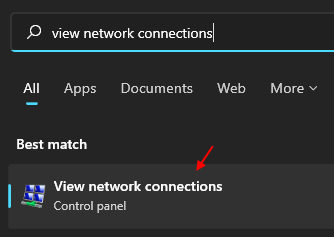
1 – Search View network connections in Windows search box.

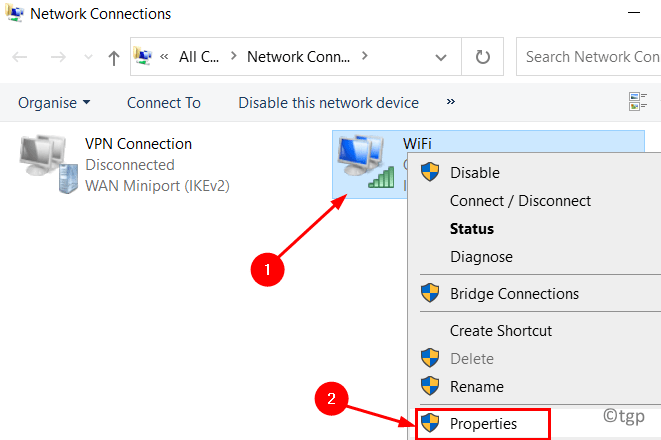
2 -Right click on your network adapter and click properties

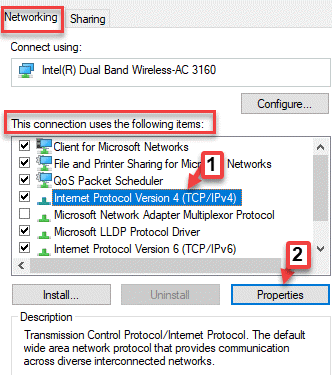
3 – Now, select Internet protocol version 4 and click on properties.

4 – Now, select use the following DNS server and enter google dns
For using Google DNS, Type:
8.8.8.8
8.8.4.4
Alternatively , if you want to use OpenDNS, Type:
208.67.222.222
208.67.220.22

5 –Click on Apply and OK.
Tip 2 – Delivery optimization
1 – Search delivery Optimization Advanced Settings in Windows search box.

2 – Now, select percentage of measured bandwidth option.
3 – Now, Check both Limit bandwidth options for download and upload and drag the sliders to 5%.

Tip 3 – Clear Windows 10 Temp files and Cached files
1 – Search Disk cleanup in Windows search box.
2 – Now, click on disk cleanup.
3 -Select C Drive
4 -Now, select all files and click Ok to delete all non useful files present on your PC.

3 – Again click on clean up system files.
4 – Now, again select all non useful files and click on OK to delete them
5 -Also, Go and clear your recycle bin
Also Clear all Kind of Windows Cache to clear Cache and Improve Internet speed.
Tip 4 – Disable metered Connections
1 – Press Windows key + I key together to open settings.
2 – Now, click Windows update from the left menu.
3 -Now, click on Advanced options from the right side.
4 – Now, Turn off Download Over metered connections

Tip 5 – Disable Windows update service
Although disabling windows update service is not recommended, as it’s always good to keep your PC updated to the latest version of Windows 10 OS, but if you are really struggling with your internet speeds and you want high download speed for a particular file for few days, then you can definitely disable windows 10 update service. You always have the option of turning it on anytime in future.
Step 1 – Search services in windows 10 taskbar search.
Step 2 – Click on services.

Step 3 -Now, Once the services manager window opens up, just find windows update from the list.
Step 4 – Just Click on stop to stop it.
Step 5 – Now, change startup option to disabled from the dropdown.

Step 6 – Now, reboot your PC.
Tip 6 – Disable / Enable ethernet or Wifi in Network and sharing centre
Step 1 – Go to network and sharing centre.
![]()
Step 2 – Now, click on change adapter settings from left menu.

Step 3 – Now, right click on Ethernet or wifi (Whichever you are currently using for the internet) and disable it. Do a right click again and enable it. Just resets the internet.

Tip 7 – In case you are Using a Router
If you are on Wifi and using a router, just do this. Turn off the router by disconnecting it from electricity. Wait for 10 seconds and then turn it on again. This fixes the slow internet issue most of the time for all version of windows.
Tip 8 – Uninstall Onenote app
If you do not use OneNote anyway, you need to uninstall it to save bandwidth spent on syncing files and folders. It also makes your windows 10 system slow and lagging.
To uninstall OneNote just search OneNote , just search OneNote in the search box of windows 10, do a right click and uninstall, it.

Tip 9 – Turn off Background apps
This is the second most important step of fixing your slow internet on windows 10. Many apps run in Background to update to eat your bandwidth and in turn slowing your internet speed. You must turn off background apps to save yourself from data leakage.
Case 1 – For Windows 11
1 – Press Windows key + I key together to open settings
2 – Now, Click on System from the left menu.
3 – Now, click on Power & Battery from the right side.
4 – Click on Battery usage to expand it.
5 -Now, Sort by Overall usage to find out high power consuming apps.

6 -Now, click on 3 vertical dots to the right of the apps and see if you can find Manage Background activity option there.

7 – In next screen, set the background permission option to never.

Case 2 – For Windows 10
Step 1 – Open settings panel again.
Step 2 – Now, click on privacy.

Step 3 – Now, scroll down the left menu and choose background apps.
Step 4 – Now, turn off Background apps.
