Microphone Volume can make or break your gaming experience or video call in an instant. Is everyone complaining about the low microphone volume at your end? Don’t worry. Nothing is wrong with the microphone itself. There is a Windows feature that you may use to boost the microphone volume easily. Apart from that built-in feature, we have also described a few additional resolutions and tips & tricks on how to get the most out of the mic.
Fix 1 – Boost the microphone volume
You can boost the microphone volume easily from the Sounds panel.
Step 1 – Use the keyboard shortcut of Windows key+R to bring up the Run box.
Step 2 – Next, copy-put this in the box and click “OK“.
mmsys.cpl
Step 3 – Go straight to the “Recording” tab.
Step 4 – Now, you have to just right-click the microphone device you are using and tap “Properties“.
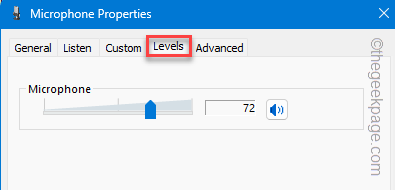
Step 5 – After opening the Mic properties, switch to the “Levels” tab.
Step 6 – You will find an option called Microphone Boost. This is usually set to 0 by default. Set this to “40” dB.
Step 7 – You can save the change by clicking “Apply” and “OK” simultaneously.
Check the microphone now. You can just record your voice and test the output yourself. You will notice a massive improvement in the mic output.
If you can’t see Microphone Boost for the recording device, follow the next solution.
Fix 2 – Disallow exclusive control of the mic
When multiple apps try to take exclusive control over the microphone, the mic output volume in your meeting may go downhill.
Step 1 – Utilize the key combination of Windows key+R to bring up the Run box.
Step 2 – Transfer this UTR to the box and select “OK“.
mmsys.cpl
Step 3 – Point to the “Recording” tab. All the recording devices that you have connected to the system show up here.
Step 4 – Find out which microphone device you are using. Right-click that and tap “Properties“.
Step 5 – Go to the last tab, which is “Advanced“.
Step 6 – Deselect this option –
Allow application to take executive control of this device
Step 7 – Later, tap “Apply” and “OK” to apply the change to the microphone.
This will improve the microphone volume significantly.
Fix 3 – Run a few tests on the mic
Troubleshoot the mic directly if still the microphone sounds lower than usual.
Step 1 – Directly right-click the sound icon and tap “Sound settings” to open that.
Step 2 – Then, tap the Microphone to open that.
Step 3 – Just speak something and check the Input Volume getting auto-adjusted.
Step 4 – If that doesn’t auto-adjust itself, tap “Start test” beside the Test your microphone option.
Just follow the steps on the microphone troubleshooter so that Windows recognize and fix the problem.
Fix 4 – Use the noise canceling feature (if applicable)
Some of the new high-end microphones have a noise-canceling feature that filters out all the noises from the background and boosts your microphone volume. So, if your microphone supports something like that, turning it off may help improve the overall quality of the microphone volume.
Fix 5 – Tweak the game/app settings
Check the game/app settings. Sometimes in-game settings may hamper the microphone volume. So, check the in-game settings and adjust the microphone volume from there. Games like Call of Duty or video conferencing solutions like Teams, and Cisco Webex has in-game microphone settings. So, try to tweak the microphone volume in there.

