If you are using Microsoft Outlook on a daily basis and suddenly you see the inbox view has been changed, isn’t it uncomfortable and frustrating? Sometimes this may be due to accidental setting changes or fewer times it just happens and the reason is unknown. In this article let us see the possible solutions in detail that can help to bring back the default settings of the inbox view. Let us start!
Method 1 – Use The Change View Option
Step 1 – Open the Outlook app
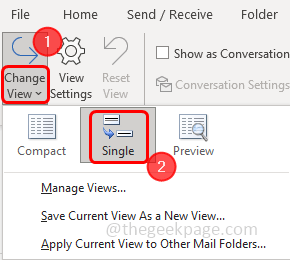
Step 2 – Go to the view tab at the top
Step 3 – Then click on the change view drop down
Step 4 – Select the option Single
Step 4 – Again click on change view dropdown and now select Compact and then check if the inbox view is changed. The default inbox view is the compact view
Note: If you need other view types you can also click on single or preview according to your requirement.
Method 2 – Restore The Settings To Default View
Note: In this method all the custom view settings will be deleted. Before proceeding further you can take a backup if needed.
Step 1 – Open the run prompt using Windows + R keys together
Step 2 – Type outlook /cleanviews in the run prompt and hit enter. This command will delete all custom view settings and the default inbox view will be back.
Method 3 – Use The Reset View Option
Step 1 – Open the Outlook app
Step 2 – Go to the view tab at the top
Step 3 – Then click on the change view drop down
Step 4 – Select the option Compact
Step 5 – Then click on reset view. This will reset all current view settings to the default view settings for this folder
Step 6 – A confirmation pop up will appear click on yes. Then check if the inbox view is appropriate.
Alternatively, you can also try to skip Step 4 and directly click on reset view [Step 5] and check if the issue is solved.
Method 4 – Use The Compact View And Reading Pane Options
Step 1 – Open the Outlook app
Step 2 – Go to the view tab at the top
Step 3 – Then click on the change view drop down
Step 4 – Select the option Compact
Step 5 – In the layout section click on reading pane drop down
Step 6 – Select the right option
Method 5 – Enable Use Compact Layout Option
Step 1 – Open the Outlook app
Step 2 – Go to the view tab
Step 3 – Click on change view dropdown and select manage views
Step 4 – Under view name column select compact then click on modify button
Step 5 – In the opened window click on other settings
Step 6 – In the other options section enable the checkbox Use compact layout with widths smaller than by clicking on the checkbox beside it (a tick mark should be present in the checkbox)
Step 7 – Give the character as 200 instead of 125
Step 8 – Or you can skip (Step 6 – Step 7) and enable always use compact layout option by clicking on the radio button beside it
Step 9 – To save the changes click on ok
That’s it! I hope the above provided information is helpful and easy to follow. Let us know which method you applied to get the default inbox view back. Thank you and happy reading!!

