Microsoft Outlook is a very good email app no doubt but a few users face different issues regarding it. One such error is ‘The message cannot be sent right now’ where when you try to send any emails to the recipients it gives the error and the email is not sent. The reasons could be cache issues, the number of recipients is more which exceed the limit, the daily limit of emails being exceeded, your account is not verified, your antivirus is blocking the process to be successful, etc. But the error can be solved and in this article, we will discuss in detail the different methods that can be tried to get the error resolved. Before starting with the solutions, make sure you have the latest updates of Outlook installed and also restart the computer. Many issues can just be resolved by restarting so give it a try. Now let us start with the different methods!
Method 1 – Clear The Browsing Data, Cookies, And Cached Data
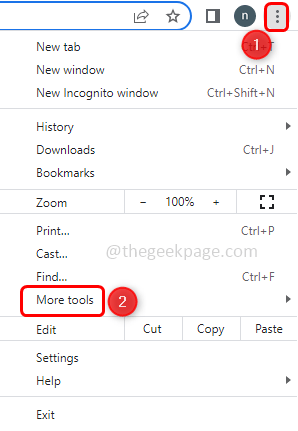
Step 1 – Open the Chrome browser and click on the three dots at the top right corner
Step 2 – From the appeared list, click on More tools
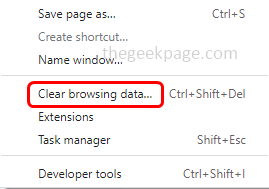
Step 3 – From the fly out list, select clear browsing data
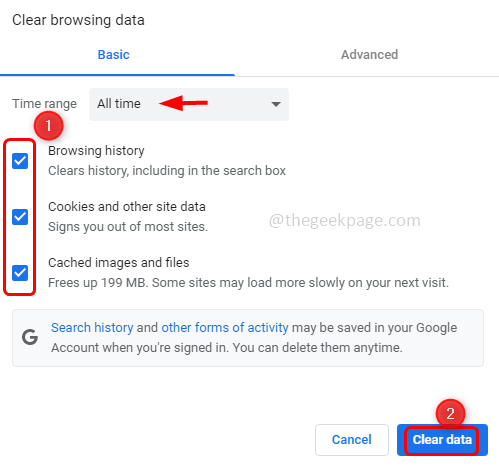
Step 4 – Choose the time range as all time
Step 5 – Click on the checkbox beside browsing history, cookies, and other site and cached images and files
Step 6 – Then click on the Clear data button
Step 7 – Restart the system and check if the issue is solved.
Method 2 – Check If Your Outlook Storage In Full
Step 1 – If your Outlook storage is full then you may get the error ‘The Message Cannot Be Sent Right Now’ so try to delete unimportant emails or attachments etc
Step 2 – Once you have deleted the emails those will be stored in deleted items folder. So right click on the deleted items folder that is at the left side and click on empty folder from the appeared list
Step 3 – Also delete items from junk folder, drafts, spam, trash etc that are no longer needed. Now try to send the email and check if the issue is resolved.
Method 3 – Check Your Antivirus
Step 1 – Click on the show hidden icons ( up arrow mark symbol) that is at the bottom right corner of the task bar
Step 2 – If you have installed any anti virus its icon will be seen there. Right click on it and in the appeared list click on disable or shut down protection or something similar option
Step 3 – A confirmation pop up will appear click on yes
Step 4 – Restart the computer and then check if the issue is solved. If the error is solved then problem is with your antivirus. So try switching to other antivirus that is good to your system.
Method 4 – Make Sure Your Browser Is Up To Date
Step 1 – I will take an example of chrome browser. Open the Chrome browser and click on three dots at the top right corner
Step 2 – From the appeared list, click on help and then in the fly out option choose about google chrome
Step 3 – It will check for updates and if there are any available updates it will get updated and once done it will show up to date.
Method 5 – Check If You Have Exceeded The Daily Sending Limit
Yes you heard it right. There are few limitations set by Microsoft on the number of emails that can be sent daily in Outlook. You can check the limitations in Microsoft website. Then see if you have exceeded the limit. If yes then check how to increase the limit and also other solutions regarding the limitations.
Method 6 – Ensure Your Contacts Have An Email Address
Make sure the contact to which you are sending the email should have email address associated to their name. If this is not the case then you might end up sending email to someone else. Once the contacts are associated to email and you are sure about the email try sending the email again.
Method 7 – Try To Use Different Email Client
If you are a Microsoft user it is obvious to use Outlook as an email client and it is also most effective app. But when you get such errors it is worth trying to use different email clients like Windows Mail app or eM client etc. Give it a try and check if it serves the purpose.
Method 8 – Ensure You Are Not Using As Email Alias
Check if you are using your alias account for sending emails. According to few resources the issue occurs even if you are using another account to send emails. Follow the below steps to check if you are using appropriate email account.
Step 1 – Open the Outlook app
Step 2 – To send the new email click on New Email
Step 3 – Click on From dropdown and select the account that you want to use then send the emails
Set the account as default
Step 1 – Open the Outlook app
Step 2 – Go to the file tab at the top left corner of the window
Step 3 – By default info tab will open click on account settings drop down then select account settings
Step 4 – Go to the email tab and select the email account you want to as default and then click on set as default
Steps to always use the default email account for sending new email
Step 1 – Open the Outlook app and go to the File tab at the top left corner
Step 2 – At the bottom left click on Options
Step 3 – In the opened window select Mail
Step 4 – Scroll down and under send messages section enable the option Always use the default account when composing new messages by clicking on the checkbox beside it (a tick mark should be present in the checkbox)
Step 5 – To save the changes click on ok. Now check if the emails are being able to send.
Method 9 – Reduce Or Change The Number Of Recipients
If you are sending emails to a group where there are more number of recipients then there is possibility of getting the error ‘The Message Cannot Be Sent Right Now’. In the Cc field check if all the names (email address) you have entered can be seen. If not then remove few email addresses until you can see the full list. Then try sending the email and check if the error is solved.
Method 10 – Ensure That Your Microsoft Account And Outlook Account Are Verified
Verify Microsoft account
Step 1 – Go to the Microsoft link and click on Manage how you sign in to Microsoft link. In the opened link click on your account
Step 2 – The code will be sent to your email
Step 3 – Enter the code and click on verify button
Verify Outlook.com account
Step 1 – Click on the Outlook link
Step 2 – Enter the characters you see in the page
Step 3 – Click on verify button
Once verified restart the computer and now check if the issue is resolved.
That’s it! I hope the above provided information is helpful and easy to follow. Let us know which method you applied to get the issue resolved. Thank you and happy reading!!


