Hypervisor (or in short, Hyper-V) lets you create and manage virtual machines from your Windows 10 devices. But while using the Hypervisor feature of Windows 10 you may notice that the service is sometimes has stopped running. There is no need to worry if you are facing this issue on your computer. Follow these easy fixes and the problem will be fixed in no time at all.
Fix 1 – Re-enable Hyper-V
Hyper-V is an optional feature on your Windows 10 device. Try re-enabling it on your computer.
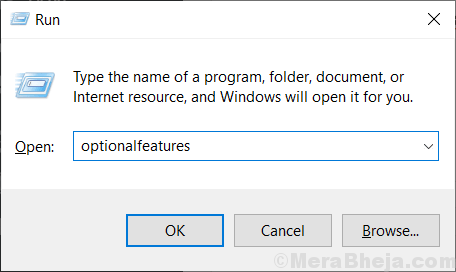
1. Just right-click on the Windows key and then click on “Run“.
2. Then, type this code and hit Enter.
optionalfeatures

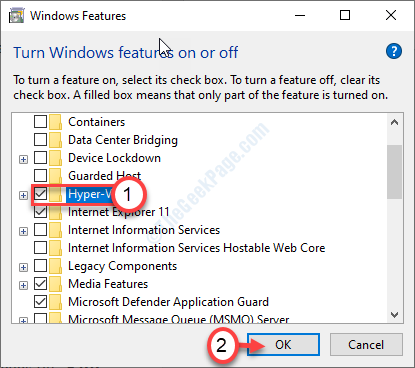
3. When the Windows Feature appears, check the box beside the option “Hyper-V“.
4. After that, click on “OK“.

Windows will search for required files and activate the feature on your computer.
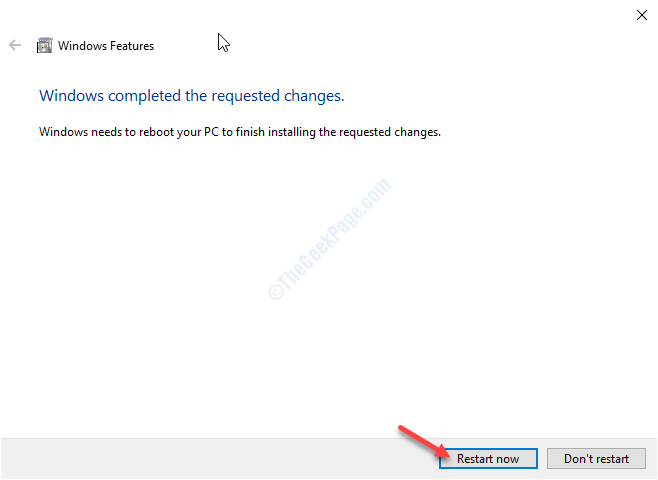
5. Then, click on “Restart now“.

Hyper-V will be enabled on your computer.
You need to restart your computer to solve the problem.
Fix 2 – Set Hyper-V to launch automatically
You can set the Hyper-V to launch automatically.
1. Press the Windows key+R.
2. After that, type “cmd“. Right-click on the “Command Prompt” and click on “Run as administrator“.

3. When the terminal appears, type this command and then hit Enter.
bcdedit /set hypervisorlaunchtype auto

This will add a new entity to Boot Configuration Data to allow Hyper-V to startup automatically at the time of start-up.
Fix 3 – Restart Hyper-V VMM service
Restarting a particular Hyper-V Virtual Memory service on your computer should fix the issue on your computer.
1. Type “services” in the search box.
2. Then, click on the “Services“.

3. In the Services window look for the “Hyper-V Virtual Memory Management” service.
4. Right-click on the service and click on “Stop“.

5. Then, click on “Start” to start the service.

This will restart the Hyper-V Virtual Memory Management service.
Your problem should be solved.
Fix 3 – Change BIOS mode
You need to enable the Hyper-V VMM mode in the BIOS section of your computer.
1. Shutdown your computer.
2. Again start it up. But while starting it up, you need to press the “Delete“* key from your keyboard to open the bios setup on your computer.
* NOTE-This key varies from manufacturer to manufacturer. These are the variety of keys-
Esc, F1, F2, F10, F11, F12 or Delete

9. When the BIOS setup opens up, go to the “Advanced” settings.
10. Then check there are any options called, “SVM mode“.
11. Click on the drop-down and set it to “Enabled“.
12. Again, press the key that is associated with to save the settings.
[It is the “F10” key for this computer.]

13. After that, select “Yes” to finally save and exit the bios settings on your computer.

Your device will restart to normal mode again.
Your problem should be solved.
Fix 4 – Check if your computer is compatible with Hyper V
Some systems are not compatible to run Hyper-V.
1. Download Coreinfo from the official Microsoft website.

2. Unzip the downloaded package in a location of your choice.
3. After that, go to the location where you have just extracted the file.
4. Click on the address bar and type “cmd“. Then, hit Enter. This will launch a Command Prompt from the directory itself.

5. After opening the terminal, type “coreinfo.exe” and press the ‘Enter‘ key.

Here, not the ‘HYPERVISOR’ status. If the message is ‘HyperVisor is not present‘ then it is yet to activated on your system or the system is not suited for this.