Windows has released Windows Update 1903 with many new features on May 21, 2019. But many of the users are yet to receive the update, and when they are trying to update their Windows they are getting stuck at 60-70%. If you are facing the same problem and finding a solution to your problem, you are in the right place. There are many reasons for which this problem can happen to the user, but for the majority of the users, it is a Windows Update bug. Follow these easy solutions if you cannot install Windows Update 1903 normally from Windows settings application.
Though this post is written considering the problem related to Windows Update 1903, these fixes will also work for the future Windows 10 Updates also. But before moving ahead for the fixes, first, attempt these initial workarounds.
Initial Workarounds-
1. Check for Windows Update from Settings application. You can access the Settings application just by pressing Windows Key+I.
2. Check for the Windows Update settings.
If any of these attempts haven’t fixed your problem, go for these solutions.
Fix-1 Delete contents of MachineKey Folder-
Some users have reported solving their problem by altering some changes in their C: drive in Safe Mode. Follow these steps minutely and try updating your windows after executing all of these steps-
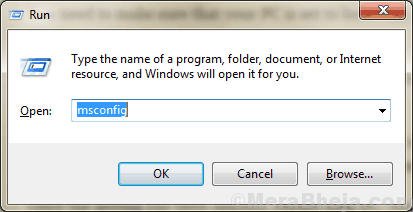
1. First, press the Windows key and ‘R‘ key together. This will open up the Run window.
2. In the Run window, type “msconfig” and then press the ‘Enter’ key from your keyboard.

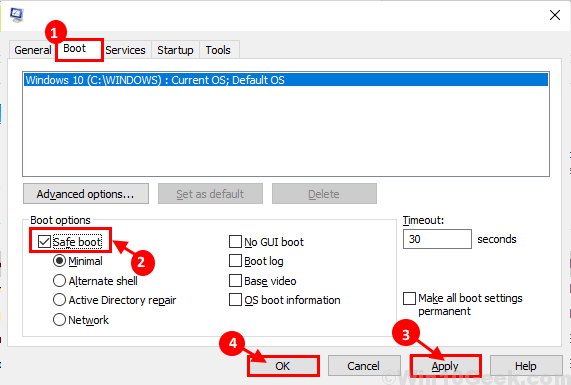
3. Now, go to the “Boot” tab and check the “Safe mode” option.
4. Then, click on “Apply” and “OK” to restart your computer in Safe Mode.

5. Now, when you have booted in, press Windows Key+E to open File Explorer window, navigate to this location-
C:\ProgramData\Microsoft\Crypto\RSA\MachineKeys
6. Now, press Ctrl+A to select all the contents of the MachineKeys folder and press ‘Delete‘ to delete all of the contents.

If in case you can’t delete the contents of the MachineKey folder, follow these following steps to move the folder and create another empty folder in its place.
a. Navigate to this location in your File Explorer–
C:\ProgramData\Microsoft\Crypto\RSA
Now, select the “MachineKeys” folder and press Ctrl+X to cut it and then go to Desktop (or any of your favorite location on your disk) and press Ctrl+V to paste it there.

b. Now, navigate to the same location i.e. –
C:\ProgramData\Microsoft\Crypto\RSA
Now, right-click on “New” and click on “Folder“.

c. Now, right-click on “New Folder” and click on “Rename” and name the folder as “MachineKeys“.
This will create an empty MachineKeys folder.
7. Now navigate to this location in the File Explorer–
C:\Windows\System32
Now, scroll down to find the “Inetsrv” folder. Right-click on it and click on “Rename” to name it as “inetsrv.old“.

Reboot your computer back to normal Windows again.
8. Now, press Windows key+R to launch Run and type “optionalfeatures” and hit Enter.
Windows Features window will be opened.

9. Now, Windows Features window, scroll down and uncheck “Internet Information Services“.
10. Click on “OK” to disable the optional feature.

Reboot your computer.
After rebooting try updating Windows following any of the processes described in Fix 1 or Fix 2 or try updating directly from Settings application.
Your Windows should be upgraded to Windows 10 1903 build without any error.
Fix-2 Use Windows Media Creation Tool-
You can use the Windows Media Creation Tool (MCT) to update your Windows 10. It is a very easy process, just follow these steps to update your Windows with MCT.
1. Download the MediaCreationTool1903.exe.
2. Now, double click “MediaCreationTool1903” to run it.

3. Now, click on “Accept” to accept the Microsoft terms and conditions for using the software.

4. Now, choose “Upgrade this PC now” and click on “Next” to start the up-gradation process.

You should have gone through the up-gradation process without any error.
Go for the next fix if the up-gradation process still stuck at 60-70% again.
Fix-3 Windows 10 Update from Microsoft website directly-
You can update your Windows 10 directly from the Microsoft website just by downloading WindowsUpdate.exe from the website and running it on your computer.
[NOTE- This fix will require an active internet connection to your Windows 10 device]
1. Download Windows10Update.exe .
2. Click on “Update Now“.

2. Now, double click on “Windows10Upgrade9252” to start the Windows Update Assistant.

You should be going through the up-gradation process without facing any error.