If you are also among a few who is facing this situation where when a presentation is exported as a video file, the audio or the video has some glitches or issues in playing the presentation smoothly? Follow the steps from this article to get rid of this problem. Firstly when the slideshow of the presentation is played all goes well but the same when exported as a video file, there is a lag or skip of the audio or video. One of the best solutions for this is to export the video in WMV format. Let us see in detail how to do it and get rid of the issue.
Export The Media In WMV (Windows Media Video) Format
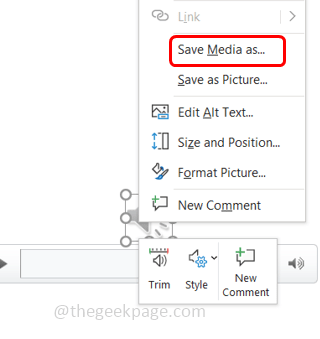
Step 1: The first step is to convert the audio file into WMA audio file. So open the PowerPoint you are working on, click on the speaker symbol then right-click on it.
Step 2: There appears a list, click on Save Media as option.
Step 3: Browse the location where you want to save the file and click on the Save button.
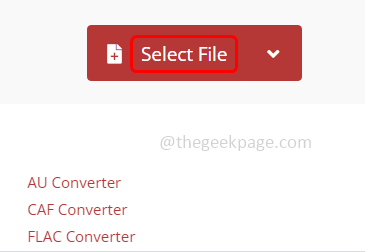
Step 4: Now open the browser and type the online audio converter in the search bar and hit enter. There are many online audio converters, you can use any. Here is the online converter which I used.
Step 5: Select the file that needs to be converted by clicking on the Select button.
Step 6: From the dropdown which is beside convert, choose the destination file type to be in WMA format.
Step 7: Wait for a few seconds for the file to convert. When the conversion process is completed it will show the status as Finished.
Step 8: Click on the Download button to download the media file in WMA format.
Step 9: Browse the location where you need to save the downloaded file. Click on Save
Step 10: Now you need to insert the downloaded WMA format audio into your presentation. So open the PowerPoint presentation file.
Step 11: Click on the Insert option from the top.
Step 12: Click on the Audio option which is at the top right and from the dropdown select Audio on My PC.
Step 13: From the window that appeared browse the location of the WMA file which you just saved and select it then click on the Insert button.
Step 14: The audio file is applied to your presentation and now export the presentation as a video file.
Step 15: To do so, from the presentation click on the File tab which is at the top right corner.
Step 16: Click on Export
Step 17: Select create a video option then click on create video.
Step 18: Browse the location to save the video file and now select the save type as Windows Media Video (WMV) from the save as type dropdown.
Step 19: Click on the Save button. So the video file is of type .wmv format.
Step 20: Now when you play the exported video on your desktop, there will not be any audio delays or video skip issues and the presentation will be perfect. Therefore the issue will be resolved.
That’s it! Hope this article is easy and helpful. Thank you!!


