Some Windows users have reported seeing the same error message on the Windows Update screen. According to these users, this error code is “0x80072ee7“. If you are also seeing this error code, there is something wrong with the Windows Update and you have to take the manner into your own hands to find a quick resolution. Usually, this problem is associated with the Windows Update service.
Fix 1 – Run the Windows Update service
There is a chance that the Windows Update service is stopped/disabled on your system.
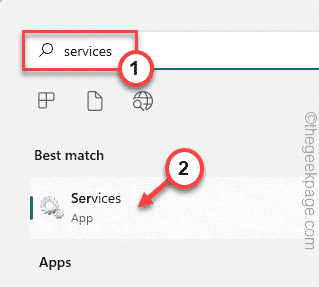
1. Write “services” in the search box beside your Windows icon.
2. Then, tap “Services” from the search result.
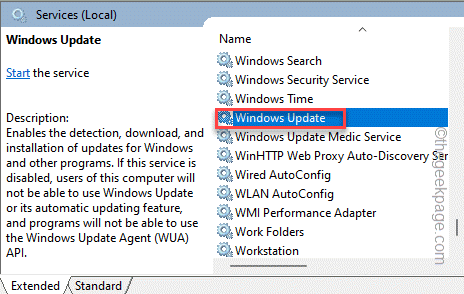
3. When the Services page appears on the screen, you will notice a complete list of services.
4. Slide down through these services all the way down to the “Windows Update” service. Just double-tap it.
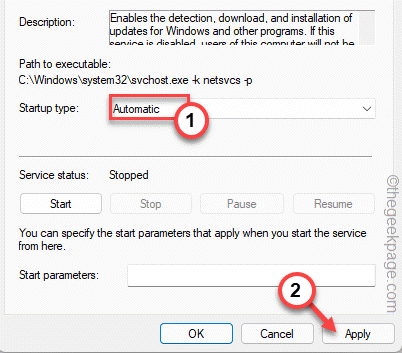
5. Before you do anything, tap ‘Startup type:’ and set it to “Automatic“.
6. Now, tap on “Apply” to apply the change.
7. Then, click on “Start” to start up the service manually.
8. Next, just click “OK” to save and close the window.
After this, close the Services window. Later, just try to check for the newer Windows Updates.
Fix 2 – Change the Registry Permissions
You can alter the registry permission of a certain key.
1. At first, press the Windows key and type “regedit“.
2. Then, tap “Registry Editor” to access it.
3. When the Registry Editor screen appears, go to this key –
HKEY_LOCAL_MACHINE\SYSTEM\CurrentControlSet\Services\Tcpip
4. Just, right-click the “Tcpip” key and then click the “Permissions…” option.
5. Now, click on the “Advanced” tab.
6. Just check the bottom-most option “Replace all child object permission entries with inheritable permission entries from this object” box.
7. After that, click “Apply” and “OK” to proceed.
Once you have done that, close the Registry Editor window and restart the PC once.
You won’t face the issue again.
Fix 3 – Change the DNS address
1. You need to press the ⊞ Win key+R keys combination.
2. Once the Run box opens up, write this and hit “OK“.
ncpa.cpl
3. Once you have found the network adapter on this page, right-click the network adapter and tap “Properties“.
5. On this properties page, identify the “Internet Protocol Version 4 (TCP/IPv4)” item. Just, double-tap it to access it.
6. Choose the “Use the following DNS server addresses:” option.
9. Now, write the “Preferred DNS server:” and “Alternate DNS server:” in the following way –
8.8.8.8
8.8.4.4
10. Finally, tap “OK” to save this.
After that, close every window. Now, check whether the Windows Update works or not.
Fix 4 – Run Windows Update Reset the script file
Just run this batch file to reset the Windows Update process.
1. Download this Windows Update reset file on your system.
2. Once you have downloaded the file, just extract it.
3. After extracting the files, go to the extraction location.
4. You will find a folder named as “Reset Windows Update“. Just double-tap the folder.
5. Once you are into the folder, right-tap the “WUReset” file and tap “Run as administrator” to run the batch file in administrative control.
This batch file will completely reset the Windows Update process.
Fix 5 – Repair with SFC scan
Repair the system by running some easy scans.
1. You can press the Win key and the R key combination.
2. Then, type “cmd” in the Run panel. Now, you can press the Ctrl+Shift+Enter key combinations.

3. Now, just paste this line and hit the Enter key on your keyboard to initiate an SFC scan.
sfc /scannow
Windows will verify the system files and you can track the progression directly on the terminal.
4. Once you have finished running the SFC scan, you can run these additional SFC codes to check and verify a particular file.
Paste these lines one by one and hit Enter to execute these both.
sfc /scanfile=c:\windows\system32\ieframe.dll
sfc /verifyfile=c:\windows\system32\ieframe.dll
Close the Command Prompt window.
Then, restart the system. Then, try to update Windows once more.


