If you are thinking about how can you quickly record your computer screen and make a video, then Microsoft Powerpoint can help you with it. Yeah, you heard it right it’s PowerPoint which has a screen recording feature, and also you can give some beautiful effects for the video as well. To know about it, go through this article and create a beautiful presentation by yourself. Let us start!
How To Record The Computer Screen In Powerpoint
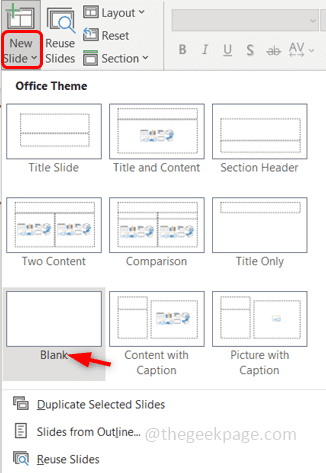
Step 1: Open the Microsoft PowerPoint and open a blank slide. To do so, click on the dropdown icon which is on the New slide then select blank.
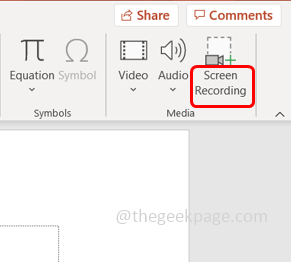
Step 2: Click on the Insert tab which is on the top, and at right most corner click on Screen recording.
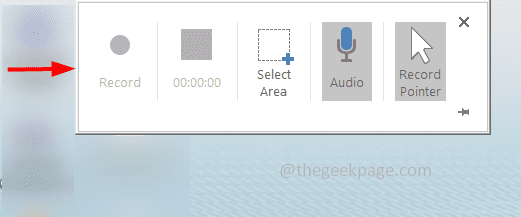
Step 3: There appears a dialog box that has a few options like the record, select area, audio, etc. You can either record full screen or even select a particular area on the screen to be recorded. Using the audio option you can capture the audio by clicking on it when you do not want the audio you can again click on it to disable it. There is a record pointer option by which you can record the mouse pointer as well.
Step 4: Now to record, click on the select area button and select the area on the screen which you want to capture. Or you can also use the shortcut key Windows key + Shift + A
Step 5: Hit the record button from the pop-up window or use the shortcut key Windows key + Shift + R. The recording will be started.
Step 6: There appears a count down which tells you to press Windows + Shift + Q keys together if you want to stop the recording.
Alternatinatively you can hover the pointer to the top middle of the screen to get the control window back and then click on Stop to stop the recording. But note that the control window will get captured in the recording. If you do not want this to be recorded you can use the above-mentioned shortcut key.
If you want to keep the control window throughout the recording, click on the pin bar present at the right corner of the control window.
Step 7: When the recording is stopped, it appears in the PowerPoint presentation slide.
Step 8: To play the recording, click on the play button which is at the bottom of the slide. A simple video recording is done, and you can save the video. If you want to apply a few effects to make it look better then follow the below steps.
How To Apply Effects For Video In Powerpoint
One can change a few settings of the captured video, like background changes, color variations, etc.
Step 1: Click on the slide which has the screen recording, then you will see the Video Format tab from the top ribbon click on it. You can select any video style to apply.
Step 2: Go to the Corrections dropdown under Video format and select the needed one. Here you can make the video look brighter, lighter, etc.
Step 3: You can do the color variations by clicking on the color option which is beside the corrections option and selecting the color of your choice.
Step 4: There is one more interesting modification you can do to the video is the poster frame. Click on the poster frame dropdown then select Image from File
Step 5: Click on Stock images.
Step 6: Select the image of your choice and click on insert.
Step 7: Now you can see the poster image on the video until you press the play button, once the video is started it disappears. The poster frame generally represents what is the video all about.
Step 8: You can also reset the design by clicking on the Reset Design drop-down and selecting the Reset Design option or if you want the size to be reset along with the design, select Reset Design & Size.
Step 9: The options are not restricted till here, you can also change the shape of the video by clicking on the Video Shape which is under the video format tab, and selecting the required shape from the list.
Step 10: Select the border for the video by clicking on the Video Border option and selecting the color and other options of your choice.
Step 11: You can give a very good effect using the Video Effects option.
Step 12: If the video needs to be cropped then click on the crop button and there appears a dark line that you can drag to crop the video.
Step 13: After the changes, it’s now time to see what the recording looks like. So click on the slide which has screen recording, at the top there appears a Playback option click on it.
Step 14: To play the video, you can click on the play button from the top as well.
Step 15: In case you want to add a bookmark in any part of the video, go to the particular section of the video and click on Add Bookmark option from the top. There appears a small yellow circle which indicates the bookmark.
By doing so, you can revisit that particular section of the video easily at any point of time by clicking on the bookmark (small circle)
Step 16: If you want to remove the bookmark, click on it (small circle) and then click on the Remove Bookmark option at the top.
Step 17: Suppose you want to cut short the video you can do it with the help of the Trim Video option. Click on the trim video option and drag the bars (red and green) to the desired point till where you have to trim it. Then click on OK
Step 18: Many more options are available like you can control the volume, loop, rewind, insert captions, etc. Give it a try by yourself and experience the fun.
Step 19: Let us save the presentation. Go to the File option and click on Save as.
Step 20: Browse the path where you want to save the file and click on save.
Step 21: There is the other way, if you want to upload the video on social media then click on the File tab, then click on Export.
Step 22: Select Create a video from the right and then click on create video.
Step 23: Browse the path where you want to save it and it is good to save it as a .mp4 file type. Click on Save
Step 24: It will take a few minutes, then you can browse to the location where you saved the file and play it. And it’s Done!
I hope this article is helpful and your video turned out to be awesome! Thank you!!


