Are you tired of seeing the conventional black borders on your Word documents all the time? Are you looking for ways how you can add some colorful and artistic borders to your documents to make them more appealing and fun? How about you add a different art border to a different page in your Word document? Or have a single art border applied to all the pages in your document at once? I know you are as excited as we are about this whole art border thing!
Dive straight into the article to learn all about how you can successfully apply art borders to your Word documents.
Section 1: How to Apply the Same Artistic Page Border to All the Pages in a Word Document
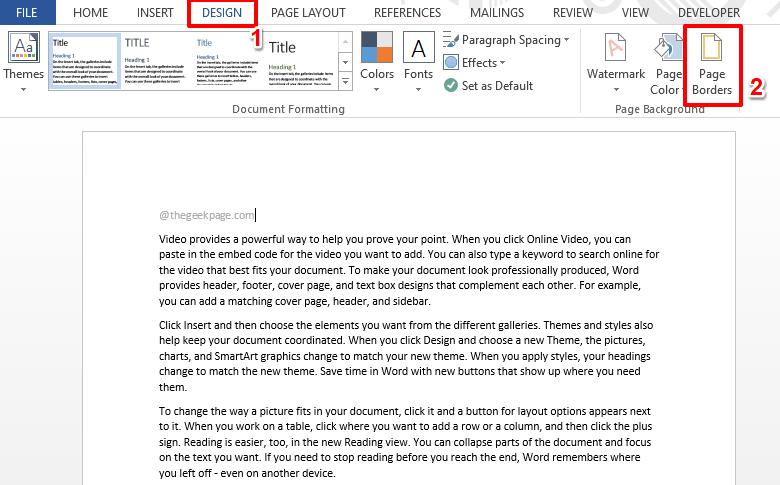
Step 1: Open the Word document and click on the DESIGN tab from the top ribbon. Under the DESIGN tab, click on the button named Page Borders.
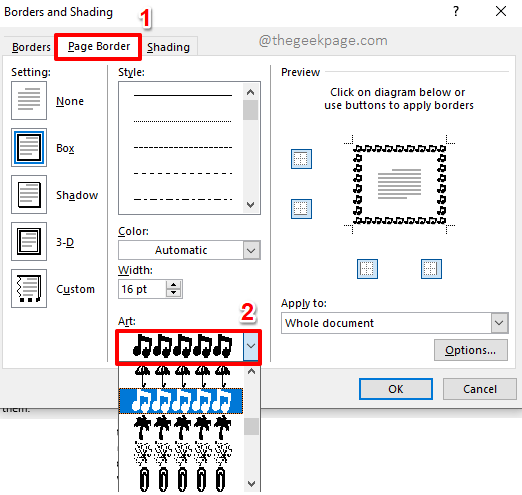
Step 2: When the Borders and Shadowing window opens before you, make sure you are at the Page Border tab first.
As next, in the middle section, right at the bottom, click on the dropdown menu named Art and then choose an art of your choice, which will be applied as your document border.
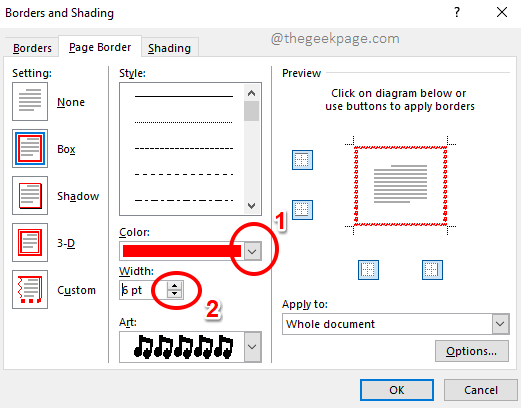
Step 3: You can change the color of the art using the Color dropdown menu. Please note that Color can be changed only for some art, and not for all.
You can change the thickness of the art using the Width dropdown menu.
Step 4: Also, if you want the border to be applied only for some sides and not all, you can use the border icons under the Preview section. Once you are all done, hit the OK button.
Step 5: There you go! In the following screenshot, you can see that I have chosen not to display the border on the right side.
Step 6: The screenshot below shows another example where I have tweaked the width settings a bit and also have gone with the full border view. Isn’t it pretty?
Section 2: How to Apply Different Artistic Page Borders to Different Pages in a Word Document
Well, let’s say you have a Word document and each section of the Word document tells you a different story, say music in one, dance in another, and so on. So wouldn’t it be cool if the border also matched with the content inside a page? That is, to put it simply, have different artistic borders for different pages in your Word document. Sounds interesting? Read on then!
Step 1: Firstly, we need to isolate the page that we need to apply a particular artistic border to. For that, we need to section the page. That is, we need to create a section before and after the target page and then apply the artistic border.
Let’s say we want the artistic border to be applied to page number 2. In that case, 2 breaks should be created, before and after page 2, so that page 2 comes within a section and the rest of the document is isolated from it. Let’s see how this can be done in the coming steps.
Click on the very end point of page 1. As next, click on the PAGE LAYOUT tab at the top ribbon.
Step 2: Now, click on the dropdown menu that says Breaks. From the menu options, click on the one that says Next Page.
Step 3: Let’s create one more break to isolate page 2. For that, click on the very last point on page 2. Then click on the PAGE LAYOUT tab at the top of the page.
Step 4: Once again, click on the Breaks dropdown menu and choose the Next Page option from the list of options available.
Step 5: That’s it. Page 2 is now sectioned and thus is isolated from the rest of the document. Let’s now apply an artistic border to this page.
For that, click anywhere on the sectioned page. Then click on the DESIGN tab at the top and under the DESIGN tab options, click on the button Page Borders.
Step 6: Now, just like in the previous section, you can choose an art from the Art dropdown menu, and adjust its width and border settings.
As next, click on the Apply to dropdown menu and choose the option This section from it.
Hit the OK button once you are all done to apply the artistic border to only the particular page that is selected.
Step 7: That’s it. You can now see that the artistic border is applied to only one particular page.
Likewise, you can apply different artistic borders to different pages of your Word document.
Please drop a comment if you found the article useful. Also, stay tuned for more amazing and super cool Word tricks.


