If you do not lock and protect a Word document, the probability of someone else opening your Word document and overwriting it is very high. Well, one way to ensure that no one else edits your Word document is by taking a printout of it. But definitely, this option is not always practical as this involves a physical copy. Another option would be to convert your Word document into a PDF and then share the PDF. But indeed there are PDF editors available and it’s very easy to edit PDFs too.
So is there any other solution? How about you lock your document and set a password so that anyone who wants to edit your document has to enter this password? Sounds cool? Well, read on then.
How to Lock and Protect a Microsoft Word Document
Step 1: Firstly, open the Word document that you want to lock and protect, in Microsoft Word.
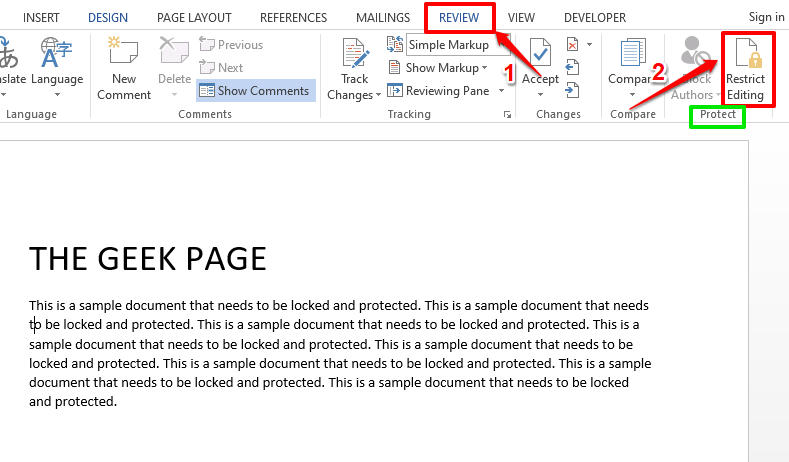
Now, click on the REVIEW tab at the top. Then click on the Restrict Editing button available in the section named Protect.
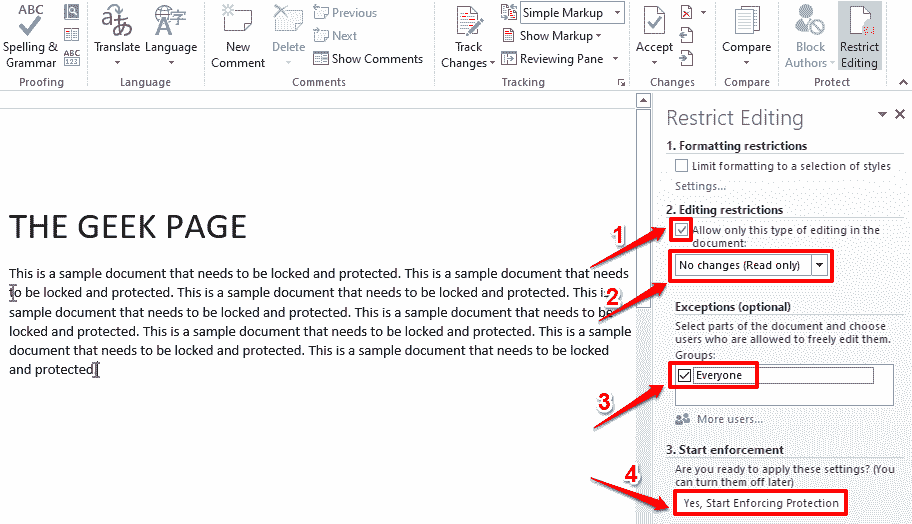
Step 2: When the Restrict Editing options open up, do the following:
- Under the Editing restrictions section, check the checkbox corresponding to Allow only this type of editing in the document.
- Under the same section itself, choose No changes (Read only) from the dropdown menu associated.
- Now, under the Exceptions (optional) header, check the checkbox corresponding to Everyone.
- Finally, under the section Start enforcement, click on the button Yes, Start Enforcing Protection.
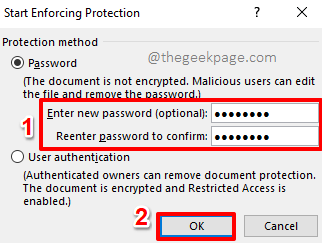
Step 3: You will now be able to see a window named Start Enforcing Protection. Under the Password section, you have to give a password to protect your document and then confirm the password by retyping it. This password will be required if you would like to unlock your document sometime later. Write the password down somewhere, if you think you’ll forget it.
Once you have typed in the password, hit the OK button.
Step 4: That’s it. Your document is now protected. If you try to edit your document now, at the bottom part of the window, you will get a message saying This modification is not allowed because the selection is locked.
How to Unlock Protected Microsoft Word Document
So, no one can edit your document anymore. But what if you yourself want to edit the document sometime in the future? Well, let’s see how that can be done.
Step 1: Open the protected document and click on the REVIEW tab at the top. As next, click on the Restrict Editing button.
Under Restrict Editing options, you will be able to see a button named Stop Protection. Click on it.
Step 2: You will now be prompted to enter the password using which you locked your document in Section 1. Enter the password and hit the OK button.
Step 3: There you go! Your document is no longer protected. You can make as many edits as you want and lock it again. Enjoy!
Please tell us in the comments section whether you found the article useful.


