Microsoft Word provides Content Controls that help to automate the document creation as well as organize the content in a structured format. Content Controls are entities that can be inserted and customized for creating templates, forms, and structured documents. These content controls can contain drop-down lists, formatted text, dates, pictures, or checkboxes. They provide flexibility in the placement of content in documents and also permissions can be set to restrict them from being edited or deleted by users.
Rich Text Content Control is one such content control that can consist of text that can be formatted or other entities like pictures, tables, and other content controls. Read this article if you want to know how to insert and modify a Rich Text Content Control in MS Word on your Windows PC.
Add Developer Tab to Ribbon Menu in Word
Before you can add and modify Content Controls in MS Word you need to add the Developer tab to the Ribbon using the steps mentioned below.
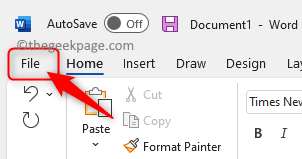
Step 1. Click on File in the Ribbon menu at the top.
Then, select the Options tab to open the Word Options window.
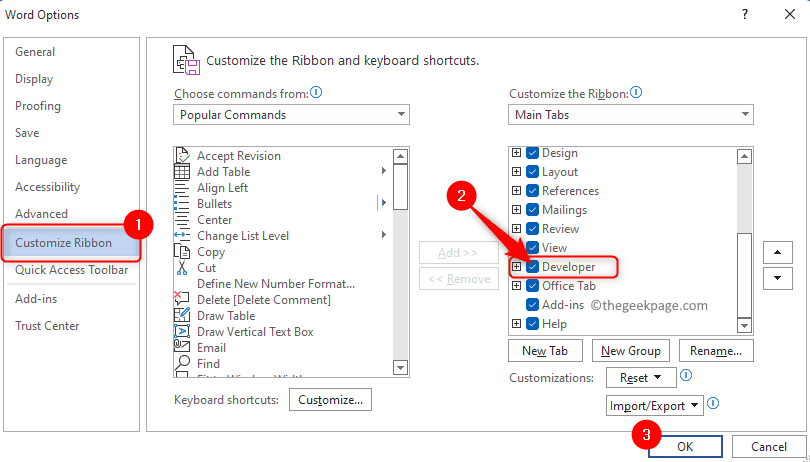
Step 2. Once the Word Options window is open, go to the Customize Ribbon tab in the left pane.
On the right side, in the box below Customize the Ribbon, locate the Developer tab in the list of tabs displayed.
Check the box next to Developer to enable the Developer tab.
Lastly, click on OK to save the changes.
Step 3. Close the Word Options window.
When you go back to Word you will see the Developer tab enabled in the Ribbon menu.
Insert and Change Rich Text Content Control
Step 1. Click on a location in the document where you want to add a control.
Then, select the Developer tab in the Ribbon menu.
Next, click on the Rich Text Content Control box in the Controls group to add rich text content control.
This inserts a new field with a bounding box.
Step 2. To modify the design of the content control, click on the Design Mode button in the Controls group to turn on the Design mode.
The bounding box will have changed and you can now change the text within it to whatever you want.
Next, click on the Design Mode button again to turn off the Design mode.
Step 3. With the rich text content control selected, click on the Properties button to open the Content Control Properties window.
You can now give a title in the textbox next to Title.
Using the dropdown list next to Show as you can either choose Bounding Box, Start/End Tag, or None to control the appearance of the content control in the document.
You can change the color to any color of your choice or keep it Automatic.
Check the box next to Use a style to format text typed into the empty control and choose a style from the dropdown box next to Style.
There are content control options available in the Locking section that prevent them from being deleted or edited.
If you want users to modify the content control but not delete it then check the box next to Content Control cannot be deleted.
Once you are done changing the properties, click on OK to save these changes.
If you want to lock permissions for deleting and editing then you need to check both the boxes next to Content Control cannot be deleted and Contents cannot be edited.
In case you want to allow deleting and editing, leave these boxes unchecked.
That’s it!
Thanks for reading. The steps mentioned in this article must have helped you to insert and modify a rich text content control in your Microsoft Word document on Windows.


