Virtual Machines on VMWare require a substantial amount of physical memory to run and operate properly. RAM is the essential part of a virtual machine and if not enough amount of physical RAM is available, it won’t even boot up and throw up a long error message “Not enough physical memory to power on this virtual machine“. This, as the error message suggests, is a result of an insufficient amount of physical memory in your system.
Workarounds –
1. The first and foremost thing you should do is to restart the system. This will obviously clear out some additional memory for the host computer. After restarting, directly launch VMWare and start up the virtual machine.
2. If you have another virtual machine, try running it and test.
Fix 1 – Edit the config.ini file
You can edit the configuration file so that the virtual machine uses just 75% of the total physical memory available for the system.
1. Open the File Explorer.
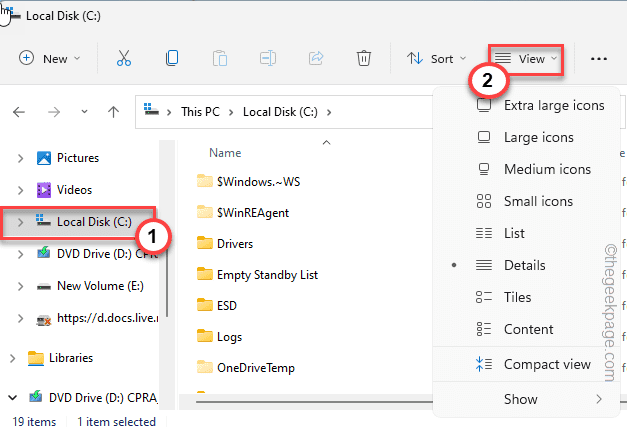
2. Then, click on the “Local Disk (C:)” on the left-hand pane.
3. Now, click on the “View” from the menu bar.
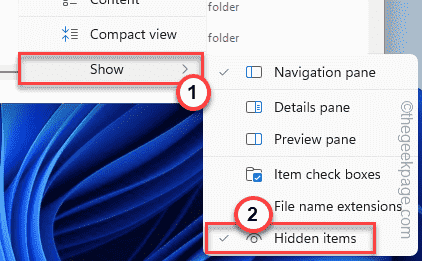
4. After that, tap “Show>” and make sure the “Hidden items” option is checked.
This will show the hidden items on File Explorer.
5. Now, simply navigate to this location-
ProgramData\VMware\VMware Workstation
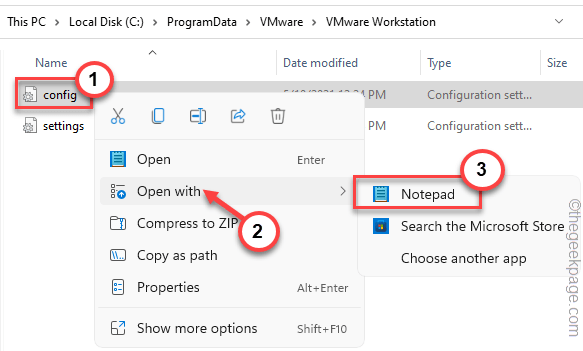
6. Here, you will find the “config.ini” file. Now right-tap the file and click on the “Open with>” option.
7. Now, choose “Notepad” from the context menu.
8. Once the file opens up in Notepad and scroll down to the end of the page.
9. You can paste this line at the bottom.
vmmon.disableHostParameters = "TRUE".
10. You can press the Ctrl+S keys together to save the file.
Once you have saved the file, close the Notepad screen. Restart the system
Test if this has worked out for you.
Fix 2 – Uninstall the recent Windows Update
Some users have pointed out that the recent Windows Update is the culprit.
1. At first, press the Windows key+R keys together.
2. Just input this and tap “OK“.
appwiz.cpl
3. On the extreme left-hand side, click on the second option “View installed updates“.
4. On the list of updates, you can see which update packages are the latest ones.
5. Then, right-tap on the most current update package and click on “Uninstall“.
Windows will uninstall the update package. Once the process is complete and your machine is restarted, go ahead and relaunch the virtual machine again.
Fix 3 – Check the RAM allocation of the VM
Know the amount of physical RAM this system has and then, rectify the RAM allocation for the virtual machine.
Before you do anything, close any open instance of VMWare running on your system.
Step 1
1. If you don’t know the actual amount of RAM on your system, press the Win key+R keys together.
2. Then, type this word and click “OK“.
msinfo32
3. Just scroll down through the right-hand pane until you see the “Total Physical Memory“.
Notice the amount of RAM you currently have.
If you look carefully, you can also see the ‘Available Physical Memory‘. This should always be greater than the RAM that you have allocated to the VM.
You may close this window.
Step 2
Now you can easily adjust the allocated memory for the virtual machine.
1. Launch the VMWare WorkStation on your system.
2. Now, right-click on the virtual machine and tap “Settings“.
3. Now, tap on the “Memory” from the left-hand pane.
4. You can adjust the allocated memory accordingly to the total physical memory and total available memory. Adjust it to around 3-4 GB as usually all the OS perform sustainably in that RAM range.
5. Now, click “OK” to save.
After this, launch the virtual machine from the same window. Check if this works out.
Fix 4 – Kill RAM-hungry processes
There are some apps that tend to eat up a huge chunk of the system RAM behind your back.
1. Turn off any virtual machines that you have started/tried to start.
2. At first, click on the Windows icon on your taskbar and tap “Task Manager“.
3. In the Task Manager you will find all the apps that are running on your system.
4. Look at the “RAM” tab to look which apps are consuming the maximum amount of RAM. Once you have found such apps, right-tap it and tap “End task” to kill it.
End all the RAM-hungry apps and close the Task Manager.
Now, you can relaunch the virtual machines again.
Fix 5 – Run VMWare as an administrator
If none of the other methods have worked out, run the VMWare as an administrator.
1. Go to your desktop and look for the vmplayer icon. If you can’t find it there, you can just search for it using the search box.
2. Now, right-click on the “vmplayer” app and tap “Properties“.
3. On the vmplayer Properties window, go to the “Compatibility” section.
4. Just, tick the “Run this program as an administrator” box.
5. Then, click on the “Apply” at the bottom of the screen and click on “OK“.
Now, just relaunch VMplayer and start up a virtual machine. It should work out just fine.
Tips –
1. If a particular virtual machine is throwing this error message, it may be that virtual machine that has some issues. So, try creating another virtual machine and check.
2. The amount of physical RAM your system has, plays a vital role for a virtual machine. Usually, 8 GB RAM is enough for a system to run VM. But if you are running multiple VMs properly, more RAM is needed.


