You might be required to insert horizontal lines to your Word documents every now and then for various purposes. You might need to separate a section, you might need to add a long underline to a heading, and so on. You might also already know that typing in 3 hyphens (- – -) and hitting the Enter key would insert a standard horizontal line to your document. But if you are tired of having the same old horizontal line all the time in your document, you might want to try a horizontal line custom-made by you. Or even simpler, insert an inbuilt horizontal line that Excel already has.
Whatever be your requirement, we have covered it all. If you have to insert horizontal lines frequently to your document, we have detailed how you can assign a keyword shortcut to your horizontal line too! So, let’s dive straight into the article, shall we?
Section 1: How to Insert Inbuilt Horizontal Lines Using Borders Options
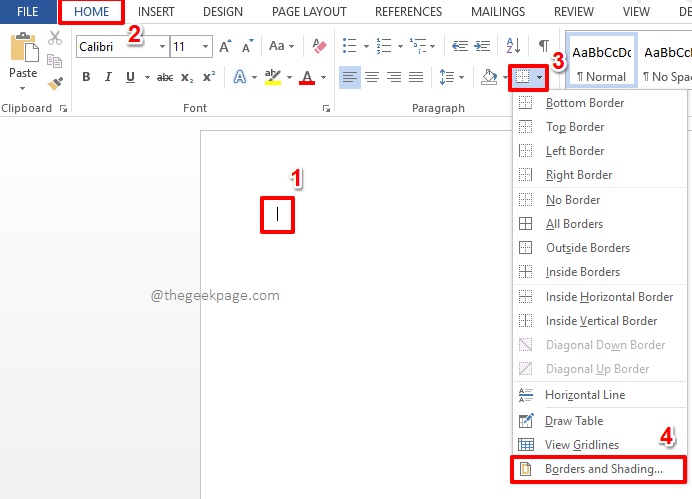
Step 1: Firstly, click on the point where you want a horizontal line to be inserted.
Now click on the HOME tab at the top.
As next, under the Paragraph section, click on the Borders icon and then choose the Borders and Shading option.
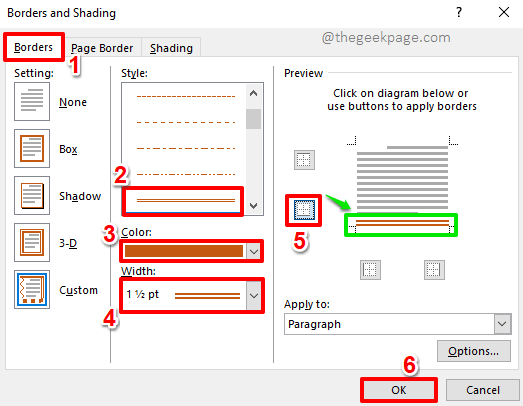
Step 2: On the Borders and Shading window, make sure you are at the Borders tab.
From the list of Style options, choose the inbuilt border of your choice.
You can change the color of the border using the Color dropdown menu.
Now from the Width dropdown menu, choose a width of your choice.
In the right window pane, under the Preview section, make sure the icon for the bottom border is the only one activated.
Once you are all done, hit the OK button at the bottom.
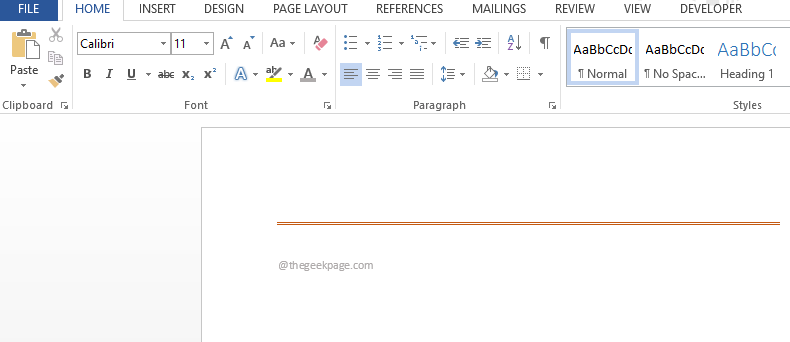
Step 3: That’s it. Your inbuilt border is now successfully inserted.
Note: The inbuilt border is easy to insert, but difficult to remove as the delete key won’t delete the borders inserted using this method. If you’re wondering how you can delete the border that you inserted using this method, you can read our article on the topic How to Insert and Remove Horizontal Lines in Microsoft Word.
Section 2: How to Insert Custom Horizontal Lines Using Symbols and Characters
In the section above, it was detailed how we can insert inbuilt horizontal lines in our Word document. But if you want to insert your own custom-made horizontal line, there’s a way for that too. Following steps pave the way to that way!
Step 1: Click on anywhere on the Word document where you want to insert the custom horizontal line.
Now, click on the INSERT tab at the top ribbon.
Under the INSERT tab options, click on the dropdown menu named Symbols and then click on the Symbol dropdown menu.
Under the list of symbols available, at the bottom, click on the option More Symbols.
Step 2: From the list of symbols available, click on the one that you want to create your horizontal line with and then hit the Insert button.
Note: By default, the font type is set to normal text. But you can change the Font type to Webdings or Wingdings or any other font, to view many other symbols and characters.
Step 3: You can insert as many symbols as you want in a similar fashion.
Every time you select a symbol, don’t forget to hit the Insert button. Also, once you are all done, hit the Close button.
Step 4: In the following example, I have created a pattern using the symbols which I inserted in the previous step. I’ll copy and paste this pattern now, to form a complete horizontal line. To copy and paste the pattern you created, press the keys CTRL + C together and then press CTRL + V keys together.
Note: Remember, you can type in characters from your keyboard as well, in between the inserted symbols. Also, you can choose the Font styling options available under the HOME tab. You can change the width of the pattern, you can change the color, etc.
Step 5: Once the pattern is repeated, it will be a complete line as shown in the screenshot below.
Section 3: How to Insert Horizontal Lines By Assigning a Shortcut
Surely, inserting a horizontal line every single time following all the steps detailed in the above 2 sections is going to be time-consuming and definitely not preferred, if multiple lines are to be inserted in a Word document. But what if you can use a keyword and press the Enter key to insert a horizontal line, be it an inbuilt one or a custom-made one? Yes, more like assigning a shortcut key to each horizontal line. Sounds cool? Read on then.
Step 1: Firstly insert the line once, using either of the methods detailed in the sections above.
If the line you want to assign a shortcut key for is an inbuilt horizontal line that you inserted using Section 1, then select the line by just clicking on its initial part as shown in the screenshot below. Hit the FILE tab at the top next.
Or if you inserted a custom-made line following the steps detailed in Section 2, click and drag to select the entire horizontal line as shown below.
Once you have selected the line, hit the FILE tab from the top ribbon.
Step 2: Now, on the left pane of the window, click on Options.
Step 3: On the left pane of the Word Options window, click on Proofing.
On the right window pane, click on the AutoCorrect Options button under the section with the same name.
Step 4: Make sure you are at the AutoCorrect tab first.
Now, at the bottom part of the AutoCorrect options, type in a keyword of your preference for your selected horizontal line under the Replace section, as shown in the screenshot below. In the example below, I have given the shortcut keyword for my horizontal line as theGeekPage1. Once done, hit the Add button.
Click on the OK button at the bottom to proceed.
When you are back at the Word Options window, hit the OK button.
Step 5: Now you will be at the Word document once again. Type in the keyword that you assigned for your horizontal line and then hit the Enter key.
Note: The keyword is not case-sensitive. This means thegeekpage1 and theGeekPage1 are treated the same by Word.
Step 6: Viola! The horizontal line is now magically inserted, replacing your shortcut keyword.
Step 7: Similarly, you can choose any horizontal line and assign any keyword as per your choice, except the reserved keywords.
In the example screenshot below, I have given the keyword line1 for another line.
Step 8: Now, try typing in Line1 and hitting the Enter key.
Step 9: Of course, the assigned line gets inserted! Enjoy!
Please tell us in the comments section if you are stuck at any of the steps, we are always happy to help.
Stay tuned for more amazing Word hacks!


