Google Drive can be used to upload the files and if you want to share it with anyone you know it is the best way. The files can be kept private that means you can give access to only those you trust and want to share it with. So until you share them no one else can view the files. You can also hide or mask the files in the shared folder. Thinking how? then this article will help you to find the answer. In this article let us see how to hide the file in Google drive. But note that the below mentioned steps works only with the files that are uploaded to Google drive and not the ones that are directly created in the drive like Sheets, docs etc.
How To Hide Files In Google Drive
Step 1: Open the Google drive in the web
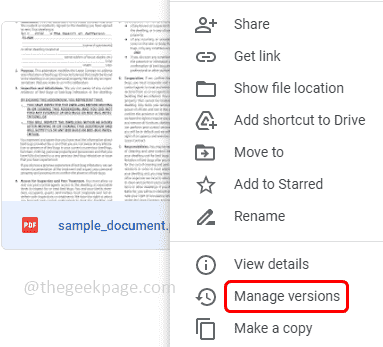
Step 2: Right click on the file that you want to hide.
Step 3: From the appeared list click on manage versions
Note: This can be successfully done only if you have editor permissions for that particular file
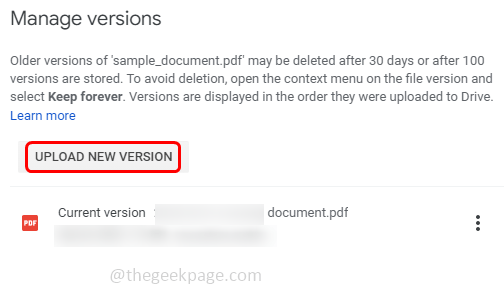
Step 4: Now in the manage versions window click on upload new version button
Step 5: Browse the file from your computer that you want to upload select it and click on open
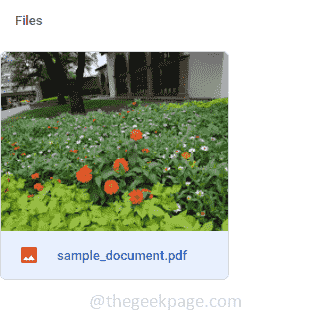
Step 6: You can upload any type of file in front of the original document.This newly uploaded file will be a dummy file , which will be viewable , once anyone click the old file.
Step 7: Check if the thumbnail of the later uploaded file is seen in the Google drive
Step 8: You can also rename the file by right clicking on the file and clicking on rename
Step 9: Give a name to the file and click on ok. So those who have access to the folder can see the thumbnail renamed
Step 10: If you want to access or view the full hidden file then right click on the file and click on manage versions
Step 11: Click on the three dots present beside the original document and from the list click on download
Step 12: Incase you want to unhide the file and see the original file back then right click on the file
Step 13: Click on manage versions
Step 14: Click on the three dots beside the masked file and then select delete to remove the file
Step 15: Another important thing is the original file will be deleted after 30 days so make sure you retain it
Step 16: To keep the file forever, click on the three dots beside the original file and tick the checkbox beside keep forever option.
Step 17: Close the window by clicking on close button
That’s it! I hope this article is helpful. Thank you!!


