So you have a huge table on one of the pages of your Word document and you don’t want the page number to be displayed on that page. At the same time, you want the page to be counted and the next page number should be 8 if the hidden page number was 7. Well, you might already have lost a lot of time looking for a solution. Even if you have found a solution, you might have felt lost thinking it’s too complex to implement. Well, Geek Page is here to make complex things simpler for you.
In this article, we explain in very simple steps how you can easily omit a certain page number from your Word document, that you in terms that you understand easily. Hope you find the article helpful.
How to Omit a single page Number
Step 1: Firstly, let’s insert normal page numbers in your footer.
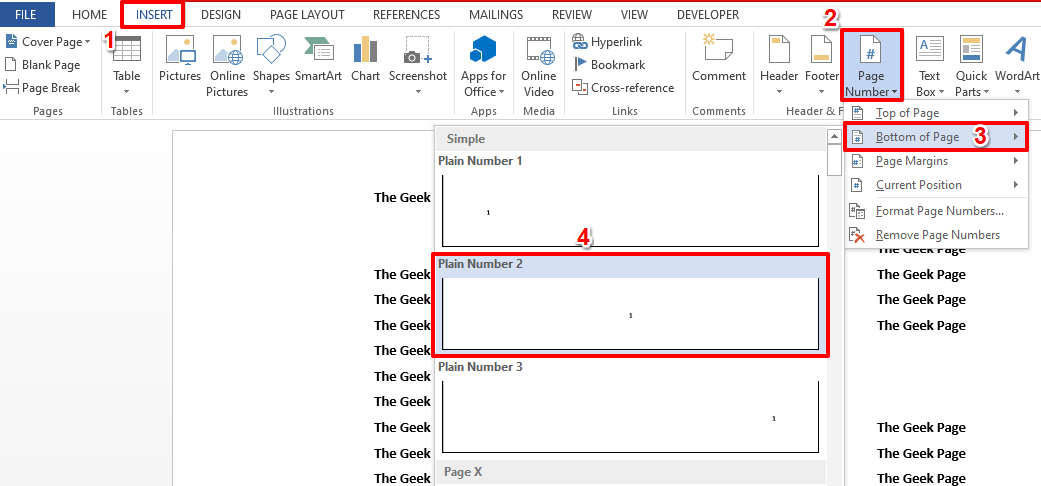
For that, open the document and hit the INSERT tab at the top ribbon.
From the INSERT tab options, click on the dropdown named Page Number and choose an option of your choice, as to where you want the page number to appear. We have chosen the Bottom of Page option, also, we have chosen the Plain Number 2 formatting as our sub-option.
Step 2: If you now look at your document, you can see that page numbers are successfully added to your footer.
Step 3: As next, double click on any of the page numbers and hit the delete key to delete the page number.
Step 4: Now type the keys CTRL + F9 to insert curly braces. Remember, typing won’t work, you have to press the CTRL + F9 keys itself.
Step 5: As next, you have to get the following code in place. We will explain how you can get this done.
{ IF { PAGE } <> "page_num_to_omit" { PAGE }}
It’s simple, nothing fancy.
- Hit the CTRL + F9 keys together to get the very first curly brace set. This step would give you the result { }.
- As next, type in IF. So at the end of this step, your code would be { IF }.
- Now hit CTRL + F9 again to insert another set of curly braces and your code should be { IF { } }.
- Now, inside the curly braces of IF, type in PAGE. PAGE is a field. So your code should be { IF { PAGE } }.
- As next, get out of the curly braces and type in <>. Here <> stands for not equal to operator. At the end of this step, your code should look like { IF { PAGE } <> }.
- Now you are going to specify the page number that you want to omit. You can specify any page number in double-quotes. In the example below, we are omitting page number 4. So the code should look like { IF { PAGE } <> “4” } at the end of this step.
- We are nearly there. Hit CTRL + F9 one last time to insert another set of curly braces. And this would give you the code as { IF { PAGE } <> “4” { } }.
- Finally type in PAGE inside the new set of curly braces and your conditional footer is ready, { IF { PAGE } <> “4” { PAGE } }.
The code simply says to include the PAGE only if the page number is not equal to 4. So, all the page numbers except page number 4 would be visible.
Step 6: You can now select and right click on the conditional footer you inserted and click on the Update Field option to instantly view the results.
Step 7: Viola! Yes, only page number 4 is hidden, and all the other page numbers are visible, exactly as you wanted!
Step 8: If you would like to revert hiding the specific page number and want all the page numbers to be visible again, you just need to double click on a page number, hit the Delete option, and insert the following code in place just like how it was done in Step 5.
{ PAGE }
To insert the above code, you need to press the keys CTRL + F9 together first, and then type in PAGE in between them. The code simply says to display all the page numbers.
The footer will now display all the page numbers without any conditions. So, none of the page numbers would be hidden.
Please tell us in the comments section if you are stuck at any of the steps. We are happy to help. Stay tuned!


