One of the features that come with Windows File Explorer is the Preview Pane, which shows a preview of the file that is selected by you. It means that you can have a look at the contents of the files before opening them. File Explorer’s Preview Pane provides a preview for the different kinds of files like Office-related documents, PDFs, text files, images, and videos. It often works without issues, but there are times when the preview of files is not available. Recently, many Windows 11 users have raised an issue where the File Explorer’s Preview Pane is not working and they are not able to view the preview of the files.
Are you facing the problem of Preview Pane not working on your Windows computer? Then, go ahead and read this article. Here, we have compiled a list of troubleshooting methods that can help you fix the Preview Pane on your PC.
Fix 1 – Ensure that Preview Pane is Enabled
1. Press the Windows + E key combination to open File Explorer.
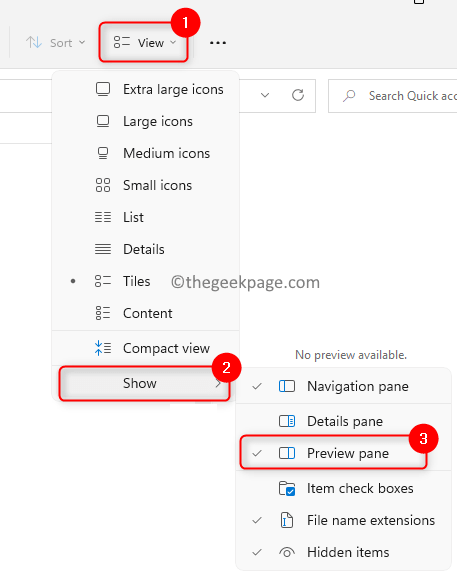
2. Click on the View menu at the top.
3. Choose the option Show to open a new sub-menu.
4. In the sub-menu that opens, make sure that the option Preview Pane is checked.
5. Once you select this option, you will be able to see the Preview pane on the Explorer’s right side.
Note: Maximize the File Explorer so that the Preview pane is visible.
Fix 2 – Enable Preview Handlers
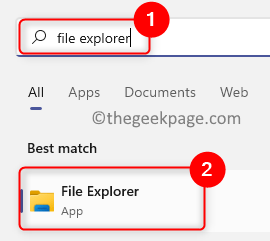
1. Hit the Windows key and type file explorer in the Windows search box.
2. Select the option File Explorer.
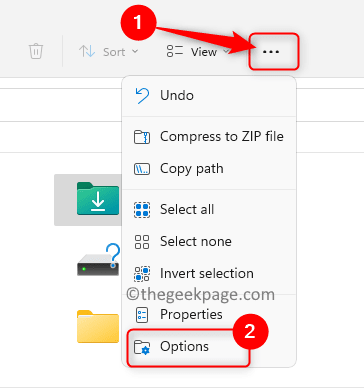
3. Tap on the three horizontal dots at the top next to View to see more options.
4. In the menu that opens, select Options to see the Folder Options window.
5. Choose the View tab.
6. In the Advanced settings section, under the heading Files and Folders, check the option Show preview handlers in preview pane.
7. Click on Apply and then on OK to save the changes.
8. Restart the File Explorer to check if the preview pane is working or not.
Fix 3 – Turn Off Show Icon Settings
1. Hit the Windows key and type Folder Options in the Windows search bar.
2. Click on File Explorer Options in the search result to open the Folder Options window.
3. Go to the View tab.
4. In the Advanced settings section, check the box associated with the option Always show icons, never thumbnails under Files and Folders.
5. Click on Apply and then on OK.
6. Close and open File Explorer to check if you are able to see a preview of the selected files.
Fix 4 – Modify Startup Mode For File Explorer
1. Open the Folder Options for the File Explorer as mentioned above.
2. Select the General tab in the Folder Options window.
3. Use the dropdown box associated with ‘Open File Explorer to:’ and select the option This PC.
4. Click on Apply and then on OK to confirm the changes.
5. Relaunch the File Explorer and check if the problem is resolved.
Fix 5 – Change System Performance Mode in Advanced System Settings
1. Press Windows + R to open the Run dialog.
2. Type sysdm.cpl and hit the Enter key to open System Properties.
3. In the System Properties window, choose the Advanced tab.
4. Now, click on the Settings button in the Performance section.
5. In the Performance Options window, make sure that you are in the Visual Effects tab.
6. Here, select the option Adjust for best appearance.
7. Click on Apply and then on OK.
8. Restart File Explorer to check if a preview of the files is visible.
Fix 6 – Perform a System File Checker (SFC) Scan
1. Open Run using the Windows and R key combination.
2. Type cmd and press Ctrl + Shift + Enter to run the Command Prompt as an administrator.
3. Type the command mentioned below and hit Enter to execute it.
sfc /scannow
4. Wait for some time until the scan completes. It will check for any corrupt files and repair them.
5. Reboot your system after the scan. Check if the problem is fixed after the system startup.
Fix 7 – Reset File Explorer Settings
1. Press Windows + R to open Run.
2. Type control folders and hit Enter to open the Folder Options.
3. In the General tab, click on the Restore Defaults button to reset the general settings.
4. Select the View tab. Here, click on Restore Defaults to reset the File Explorer Advanced settings.
5. Click on Apply and then OK.
6. Relaunch File Explorer and check if the issue is fixed.
If none of the fixes mentioned in the article worked and you are still unable to view the preview pane, then try some alternative third-party apps from the Store like QuickLook. Such applications will allow you to have a preview of the files.
Thanks for reading.
Did you find this article informative enough in resolving the Preview Pane Not Working issue? We hope you must now be able to see a preview of your files in File Explorer. Please let us know the fix that worked for you in the comments section below.


