A port is the medium of communication in computer networking. Each port is meant for a specific service. Though the traffic is received over the same internet connection, it will be distributed among different ports for various purposes. The most commonly used ports are TCP and UDP. Each port has its own port number as well. There might be situations where two applications use the same port, which means suppose an application is set to listen to traffic on the same port that another application already is associated with that port. In this case, there might occur errors, so identifying the in-use port and taking appropriate actions will help to achieve the end result. Let us see how to identify the open ports or the ports that are in use on the windows machines.
Method 1: Check For Ports In Use Along With Their Process Names
The below steps results in the ports that are being used currently and also display the name of the process it is using.
Step 1: Open the Command Prompt by typing cmd in the windows search option. Right-click on the command prompt and click on Run as Administrator.
Step 2: In the command prompt window execute the below command.
netstat -ab
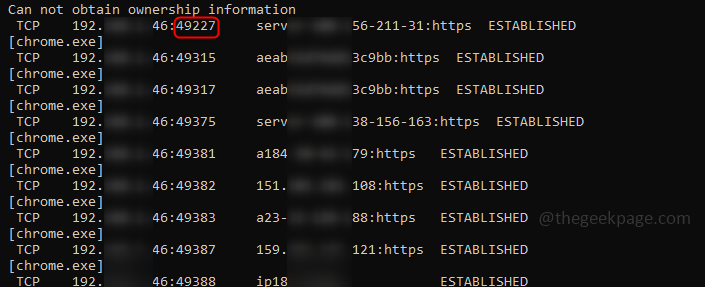
Step 3: To complete the execution and display the result, may take a minute or so. The result has 4 columns Proto, Local Address, Foreign Address, and State. The digits present on the right side of the Local Address after the colon are the Port Numbers and their status can be seen under the State column. The Established state means the connection is done and the port is in use.
Method 2: Check For Ports In Use Along With The Process Identifiers
Sometimes only ports with process names will not be sufficient, you will also need to dig for more information. In this case, you can find the process identifier numbers(PID) along with the port and then check those processes in Task Manager.
Step 1: Execute the below command as an Administrator User in the command prompt.
netstat -aon
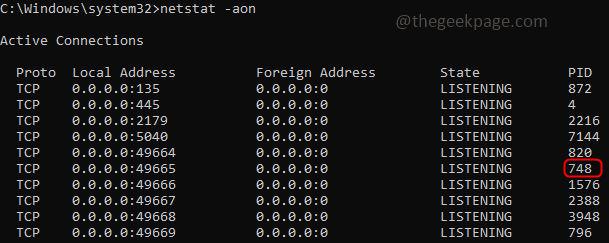
Step 2: The result has 5 columns in it and the last column is the PID. Check for the port number and its associated PID you want to investigate. Here I have chosen PID 748 as an example.
Step 3: Right-click on the taskbar and go to the Task Manager, click on the Details tab. Search for the Port and the PID you are investigating, you can get more information by looking at the description column.
Step 4: Once you got to know which application is causing the problem, you can either stop it by clicking on End Task or if you want to further investigate click on Open File Location, Go To services, etc. These do not have auto-refresh options so you need to execute the command again if you need the latest updates.
Method 3: Using Nirsoft CurrPorts Check For Ports In Use
Let us find out which ports are listening on Windows by using a simple tool called CurrPorts provided by Nirsoft.
It is a freeware tool so you can download it according to your compatible version (32-bit or 64-bit)
Step 1: Currport is also an excellent portable application so you need not install it, just unzip the folder and click on the .exe file to execute the application.
Step 2: The result has many columns like Process Name, Process ID, Protocol, Local Port, etc. The port numbers are listed under the Local Port column. This window has the details of ports being used, closed by an application under the State column. It also has much more information regarding the port and its associated processes.
Step 3: For making the vision easy you can also see the details of a particular port by double-clicking it.
Step 4: It also has various process-related options. If at all you want to kill the process running on a particular port or close the connections for it, you can do so by right-clicking on the particular row and selecting appropriate options from the list.
Step 5: For easy and clear understanding, you can also change the view of the result window by clicking on the view tab present at the top and choosing related options from the list.
Step 6: You can also apply the filters by clicking on the options tab present at the top, suppose you need to display only TCP, UDP ports, or any specific filters present in the list you can click on them, a checkmark will appear beside it. You can also remove the filter by again clicking on it.
Method 4: Using TCPView Check The Ports In Use
TCPView is also a freeware tool developed by Sysinternals which gives detailed information about the TCP and UDP connections on your system.
Step 1: Download the TCPView tool and installation is not required. Just unzip the folder and run the executable tcpview.exe file.
Step 2: The window appears with the details of Process Name, PID, etc. The port is listed under Local Port. You can find highlighted colors in the window. Green indicates the connection opened. Yellow indicates ready to open, Orange for ready to close.
Step 3: Check for the needed port and you can right-click on it and select appropriate actions from the list like close the connection, kill the process, etc.
That’s it! I am sure that you got it done. Please do comment on which method was helpful to you. Thank you and happy reading !!!


