Windows Update is an important process for the Windows OS to keep your system up-to-date and performing at its best at all times. If you miss updates on a regular basis, your computer may slow down or even crash, Therefore, it’s important for your Windows Update system to work properly at all times. However, sometimes, the Windows Update component may not work properly and you may error messages while downloading or installing updates, thus resulting in failed update installation. The good news is, the Windows update components error in your Windows 10 PC can be fixed. Let’s see how.
Method 1: Using Command Prompt
Step 1: Press the Win + R keys together to launch the Run command box.
Step 2: In the Run command search field, write cmd and press the Ctrl + Shift + Enter shortcut keys to open Command Prompt with administrator rights.
Step 3: In the Command Prompt window, run the below command one after another and press Enter after each one:
net stop wuauserv
net stop cryptsvc
net stop bits
net stop msiserver
net stop appidsvc
Ren %systemroot%\SoftwareDistribution SoftwareDistribution.bak
Ren %systemroot%\system32\catroot2 catroot2.bak
net start wuauserv
net start cryptsvc
net start bits
net start msiserver
net start appidsvc
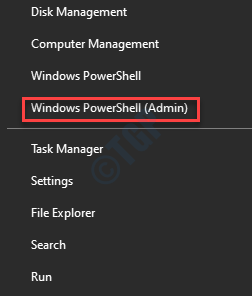
Step 4: Now, right-click on Start menu and select Windows PowerShell (Admin).

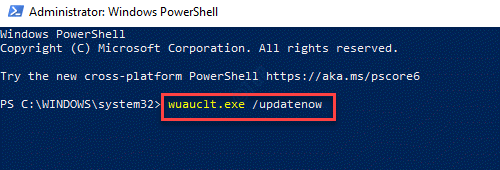
Step 5: In the Windows Powershell (Admin) window, type the below command and press Enter:
wuauclt.exe /updatenow

Once done, restart your PC and try updating your Windows. It should be working fine now.
Method 2: Run the Windows Troubleshooter
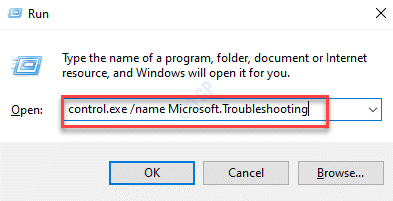
Step 1: Press the Win + R shortcut key on your keyboard to open the Run command.
Step 2: Write control.exe /name Microsoft.Troubleshooting in the Run command search box and hit Enter to open the Troubleshoot pane in the Settings window.

Step 3: In the Troubleshoot page in the Settings window, go to the right side, scroll down and select Additional troubleshooters.

Step 4: In the next window, under the Get up and running section, click on Windows Update and select Run the troubleshooter.

Now, Windows will start looking for any issues, and if any found, will be repaired automatically.
Reboot your PC and try installing updates.
Method 3: Run Windows Update Troubleshooter in Clean Boot State
In this method, you would firstly need to boot the PC in Clean Boot State.
Step 1: Right-click on Start and select Run to open the Run command window.

Step 2: In the Run command window, type msconfig in the search field and hit Enter to open the System Configuration utility.

Step 3: In the System Configuration window, select the General tab.
Select the radio button next to Selective startup and uncheck the box next to Load Startup Items.
Now, check the box next to Load system services and Use original boot configuration.

Step 4: Now, go to the Services tab and check the box next to Hide all Microsoft services.
Then, click on Disable all.
Press Apply and then OK to save the changes and exit.

Step 5: Restart your PC and download the Windows Update Troubleshooter from the below link:
Step 6: Click on the download file to open the Windows Update utility.
Select Windows Update from the list and click Next to run it in the clean boot state.

It will now start detecting any issues with the Windows Update and if any issues found, it will fix it automatically.
Restart your PC and try checking for Windows Update. It should be working now.
Method 4: Run a System File Checker
Step 1: Press the Win + X hotkey and select Run. This will open the Run command box.
Step 2: In the Run command window, write cmd in the search field and press Ctrl + Shift + Enter shortcut keys to open Command Prompt in elevated mode.

Step 3: In the Command Prompt (admin) window, run the below command and hit Enter:
sfc /scannow

The process takes a while, so wait for sometime till it’s over. It will scan your system files and if any issues found, will repair them on the spot.
Once done, restart your PC and your Windows Update should be working now.
Method 5: Use DISM to repair any damaged files
Step 1: Right-click on Start menu and select Run to open the Run command box.

Step 2: In the search field, type cmd and press Ctrl + Shift + Enter keys together on your keyboard.

Step 3: It opens the Command Prompt in the admin mode. Execute the below command in the Command Prompt window:
DISM /Online /Cleanup-Image /RestoreHealth

Let the scan complete. It will detect and repair any issues found with the system.
Now, reboot your PC and check if the Windows Update issue is resolved.
Method 6: Recovery options
Step 1: Press the Win + I keys together on your keyboard to open the Settings window.
Step 2: In the Settings window, click on the Update & Security options.

Step 3: In the next window, go to the left side of the pane and select Recovery.

Step 4: Now, go to the right side of the window, scroll down and under the Advanced start-up section, click on Restart now.

Step 5: It will take you to Advanced startup options screen. Here, in the Choose an option screen, click on Troubleshoot.

Step 6: Next, click on Advanced options.

Step 7: From the Advanced options, select Startup settings.

Step 8: In the Startup Settings screen, click on the Restart button at the bottom.

Step 9: Now, press the F4 key on your keyboard and your Windows will restart in safe mode.
Now, press the Win + E shortcut key to open the File Explorer.
Step 10: In the File Explorer window, navigate to the below path:
C:\Windows\SoftwareDistribution
Now, select all the contents of this folder and hit Delete.

Now, reboot your PC and the Windows Update problem should be resolved.
Method 8: Install latest updates manually (Using Update History)
Step 1: Click on the below link to open the Windows update history website:
Step 2: In the Windows update history page, on the left side of the pane, click on your Windows 10 version.

*Note – To know how to check your Windows version and OS build, refer to this article.
Step 3: In the next window, again go to the left side of the pane, look for the latest update based on your Windows version and OS build and note down the KB number of the latest update.

Step 4: Now, click on the below link to open the Microsoft Update Catalog website.
https://www.catalog.update.microsoft.com/Search.aspx?q=KB4601319
Search for the KB number you noted in Step 3 and download the update based on whether you have 32-bit (x86) or 64-bit (x64) system architecture.
*Note – Refer to this article to know how to check if your Windows 10 PC is 32-bit or 64-bit.

Once the update is completed, restart your PC for the changes to be effective. This should also fix the problem with the Windows update.
Method 9: Install Latest Servicing Stack Update
Step 1: Once you have checked in the Settings window if your system is 32-bit or 64-bit version of Windows 10, click on the below link to open the Microsoft Update Catalog website:
https://www.catalog.update.microsoft.com/Search.aspx?q=KB4090914
From the list, download the latest Servicing Stack Update for the system architecture you have (32-bit (x86) or 64-bit (x64)).
Step 2: Click to download the update.
Restart your PC. Now, while the latest update is downloaded, the Windows Update service in your system is also fixed.
Method 10: Delete Downloaded Windows Update Files Using Services
Step 1: Right-click on Start and select Run to open the Run command box.

Step 2: In the Run command search field, type services.msc and press OK to open the Services window.

Step 3: In the Service manager window, go to the right side of the pane and look for Windows Update service.
Right-click on it and select Stop.

Step 4: Once the service is stopped, press the Win + E keys together on your keyboard to open the File Explorer window.
Now, in the File Explorer window, navigate to the below path:
C:\WINDOWS\SoftwareDistribution\Download
Select all the contents in this folder and hit Delete.

Step 5: Go back to the Services window, navigate to the right side of the pane and look for Windows Update service.
Right-click on it and select Start.

Now, go back to the Windows Update section in Settings and check for updates. It should be working now.
Method 11: Pause Updates
Step 1: Right-click on the Start menu and select Settings.

Step 2: In the Settings window, go to Update & Security.

Step 3: It takes you straight to the Windows Update section. On the right side of the window, click on Pause updates for 7 days.

Step 4: Now, exit the Settings window, restart your system and again open the Settings window (as shown in Step 1).
Now, click on the Resume updates button.

Once it’s done, you can now check if the Windows update service is back up and running.
Method 12: Check internet connection using cmd
Step 1: Press the Win + R hotkey to open Run command.
Step 2: Type cmd in the Run command window and press Ctrl + Shift + Enter keys together on your keyboard to launch Command Prompt in elevated mode.

Step 3: In the Command Prompt (admin) window, run the below command and hit Enter:
ping google.com
*Note – The above command is just an example.

Check if you are getting a response, which means your internet is working properly.
Method 13: Free up space using Settings
Step 1: Press the Win + I shortcut key to open the Settings window.
Step 2: In the Settings window, click on System.

Step 3: In the next window, on the left side of the pane, select Storage.

Step 4: Now, go to the right side of the pane and under the Local Disk (C:) section, click on Temporary files.

Step 5: Next, wait for the scan to get over.
Once done, select the items that you want to remove and free up space.

Once completed, you will now have more space to check for Windows Update. You should not see any errors anymore.
Method 14: Restore Windows Update components to their Default settings
Step 1: Press the Win + X keys together on your keyboard and select Run.
Step 2: In the Run command window that opens, write cmd and press the Ctrl + Shift + Enter keys together to open Command Prompt in admin mode.
Step 3: Copy and paste the below commands one by one in the Command Prompt (admin) window and hit Enter after each command:
net stop bits
net stop wuauserv

Del "%ALLUSERSPROFILE%Application DataMicrosoftNetworkDownloaderqmgr*.dat"
These first two commands will stop the BITS service and the Windows Update service respectively. The third command will delete the qmgr*.dat files.
Step 4: Now, perform this step if the above steps did not work.
Run the below command in the Command Prompt (admin) window one after another and hit Enter after each command:
Ren %systemroot%SoftwareDistributionDataStore *.bak
Ren %systemroot%SoftwareDistributionDownload *.bak
Ren %systemroot%system32catroot2 *.bak
This will rename the above folders to *.BAK.
Step 5: Now, execute the below two commands one by one and hit Enter each time:
sc.exe sdset bits D:(A;;CCLCSWRPWPDTLOCRRC;;;SY)(A;;CCDCLCSWRPWPDTLOCRSDRCWDWO;;;BA)(A;;CCLCSWLOCRRC;;;AU)(A;;CCLCSWRPWPDTLOCRRC;;;PU)

sc.exe sdset wuauserv D:(A;;CCLCSWRPWPDTLOCRRC;;;SY)(A;;CCDCLCSWRPWPDTLOCRSDRCWDWO;;;BA)(A;;CCLCSWLOCRRC;;;AU)(A;;CCLCSWRPWPDTLOCRRC;;;PU)
These two command will reset the BITS service and the Windows Update service respectively.
Step 6: Copy and paste the below command in the Command Prompt (admin) window and press Enter:
cd /d %windir%system32
Step 7: Now, type the below commands one by one and press Enter after each command:
regsvr32.exe atl.dll
regsvr32.exe urlmon.dll
regsvr32.exe mshtml.dll
regsvr32.exe shdocvw.dll
regsvr32.exe browseui.dll
regsvr32.exe jscript.dll
regsvr32.exe vbscript.dll
regsvr32.exe scrrun.dll
regsvr32.exe msxml.dll
regsvr32.exe msxml3.dll
regsvr32.exe msxml6.dll
regsvr32.exe actxprxy.dll
regsvr32.exe softpub.dll
regsvr32.exe wintrust.dll
regsvr32.exe dssenh.dll
regsvr32.exe rsaenh.dll
regsvr32.exe gpkcsp.dll
regsvr32.exe sccbase.dll
regsvr32.exe slbcsp.dll
regsvr32.exe cryptdlg.dll
regsvr32.exe oleaut32.dll
regsvr32.exe ole32.dll
regsvr32.exe shell32.dll
regsvr32.exe initpki.dll
regsvr32.exe wuapi.dll
regsvr32.exe wuaueng.dll
regsvr32.exe wuaueng1.dll
regsvr32.exe wucltui.dll
regsvr32.exe wups.dll
regsvr32.exe wups2.dll
regsvr32.exe wuweb.dll
regsvr32.exe qmgr.dll
regsvr32.exe qmgrprxy.dll
regsvr32.exe wucltux.dll
regsvr32.exe muweb.dll
regsvr32.exe wuwebv.dll
These command will re-register the files for the BITS service and the Windows Update service.
Step 8: Now, execute the below command and press Enter:
netsh winsock reset
This will reset Winsock.
Step 9: Now, run the below commands and hit Enter:
net start bits
net start wuauserv
These two commands will restart the BITS service and the Windows Update service respectively.
If none of the above method works, you may perform a clean installation. For this, you would need a Windows installation media for Windows 10. It can be a USB flash drive, DVD, or ISO file. Once the Windows 10 is freshly set up, the Windows Update service should be working properly.