If you are an avid gamer, you may often come across an error “Failed to create D3D9 device” on your Windows 10 PC while trying to launch a game. This can happen with any game and usually occurs if the desktop is locked on your screen while trying to play a game straight away or using the Steam app. The primary reason behind this error is due to incompatibility between the game resolution and the monitor resolution. It can also be due to missing or inaccurate d3d9.dll registry entries, a virus attack, hardware failure, or outdated graphics driver. Fortunately, there are a couple of methods that may help you fix the game error “Failed to create D3D9 device” on your Windows 10 PC. While rebooting your PC may help resolve the issue sometimes, not always it may. That’s when you can move n to try the below methods.
Method 1: Change your Game Resolution
Before you proceed with the method, you must check the current resolution of your system. Let’s see how:
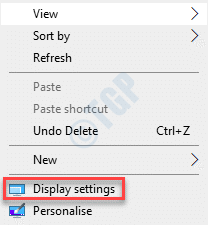
Step 1: Right-click anywhere on the desktop (empty area) and select Display settings.

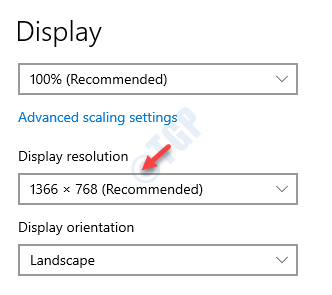
Step 2: In the Settings window, on the right side of the pane, scroll down and you can find the Display resolution.

Now, note down the resolution.
Step 1: Launch the Steam app and go to Library.

Step 2: Right-click on the game and select Properties.

Step 3: Now, go to the General tab and click inside LAUNCH OPTIONS.
Step 4: Now, type -w 1366 -h 768 in Launch options and close the window
Note that here we have used 1366 and 768 as this is what our resolution is. Put down your resolution which you noted.
For example if your resolution is 1278 and 720 then type -w 1278 -h 720

Now, close the window and try again.
If this does not work you can also change it to windowed mode. Here is how to do it.
Go to Launch Options again and type -windowed and close the window.

Exit the window and you can now open the game.
Method 2: Change the Resolution in Game Files Manually
Step 1: Press Win + E keys together on your keyboard to open the File Explorer window.
Step 2: In the File Explorer window, navigate to the folder where the game is located.
The path should be somewhat like this:
C:\Program Files (x86)\Steam\steamapps\common\Age of Chivalry Dedicated Server\ageofchivalry\cfg
*Note – the above path is an example.
The Steam game could also be located in any other directory for you.
Step 3: Now right-click on Machineoptions.ini by, and from How do you want to open this file prompt, select Notepad. You can also directly open the file by clicking it and when Windows prompts you, select Notepad.
*Note – Make sure the configuration file ends with .ini extension as shown above.
Step 4: Now, remove the “;” from the resolution code and let the value remain the same. So, the string looks like this initially:
;ResX=1024

;ResY=768
After removing the “;“, the resolution code should look like this now:
ResX=1024

ResY=768
Save the changes and close File Explorer.
Now, reboot your PC and you should be able to launch your game now
You can now open the game and the “Failed to create D3D9 device” should be gone.
Method 3: Reinstall DirectX Runtimes
There’s a possibility that the DirectX Runtimes is not functioning properly on your computer and hence, re-installing it may fix the issue. Let’s see how:
Step 1: Visit the below Microsoft’s official DirectX End-User Runtime website:
https://www.microsoft.com/en-us/download/details.aspx?id=8109
Step 2: Once on the download page, click on the Download button.

Step 3: Click to open the downloaded file to complete the set up.
Follow the on-screen instructions to complete the installation.
Method 4: Verify the Integrity of Steam Game Files
Step 1: Open the Steam client and go to Library.

Step 2: Now, right-click on the problem game and select Properties.

Step 3: In the next window, click on Local Files on the left.
Now, go to the right side of the pane and click on Verify Integrity of game files.

This is helpful especially when a 3rd party antivirus software is blocking your file. This feature also detects any damage in the game files, or if if the game installation directory is missing something.
You can now try opening your game and it should work fine.
Method 5: Update or Re-install the Graphics Driver
Step 1: Right-click on Start menu and select Run to open the Run command.

Step 2: In the Run command window, type devmgmt.msc in the search box and hit Enter to open the Device Manager window.

Step 3: In the Device Manager window, expand the Display Adapter section.
Right-click on the graphics device and select Update driver.

Step 4: Now, you have two options.
Select Search automatically for drivers and Windows can automatically detect any latest drivers, download and install them automatically.

Step 5: Or, you manually download it from the graphics card manufacturer’s website and save it in your preferred location.
Then follow the Steps 1 to 3 and select Browse my computers for drivers.

Step 6: Next, go to the Search for drivers in this location field and click on Browse.

Step 7: Now, go to the location where you saved the file in Step 5 and install the update.
You can now try opening the game that was showing the error and you should be able to play the game now.
Method 6: Run Game in Compatibility Mode
Step 1: Open the Steam app and go to Library.

Step 2: Right-click on the problem game, select Manage and then click on Browse local files.

Step 3: It opens the game file location in the File Explorer.
Now, right-click on the .exe file and select Properties.

Step 4: In the Properties window, select the Compatibility tab.
Now, either click on the Run compatibility troubleshooter button or go to the Compatibility mode section and check the box next to Run this program in compatibility mode for.
Now, select an older Windows version from the drop-down to run the game.
Press Apply and then OK to save changes and exit.

Method 7: Enable All Services in System Configuration
Step 1: Right-click on Start menu and select Run to open the Run command box.

Step 2: In the Run command search box, type msconfig and hit Enter to open the System Configuration window.

Step 3: In the System Configuration window, click on the Services tab.
Now, check the boxes next to all AMD or nVidia services.
*Note – If you are not sure of the services, then simply click on Enable All.
Press Apply and then OK to save the changes and exit.

Now, restart your PC and open the game. The error should be gone now.
If none of the above method works, you can try updating your Windows to the latest version through Settings > Update & Security > Check for updates. Sometimes, errors can arise because the Windows is not up-to-date. Once updated to the latest version, you should be able to launch the game and play. Alternatively, you can try using a trusted 3rd party registry cleaner to repair your Windows registry. This helps fix any fragmentation issues or removes any invalid entries leading to the dll error.