Blue Screen of Death or BSODs is often witnessed by Windows users. So, if you have noticed the BSOD error message along with the “WHEA INTERNAL ERROR” error code, there is some problem with the computer hardware. WHEA stands for Windows Hardware Error Architecture, the error mechanism is triggered by a hardware fault. So, follow these fixes to find a quick resolution for the problem.
Fix 1 – Run the hardware troubleshooter
There is a hidden hardware troubleshooter that can scan and fix any hardware issues.
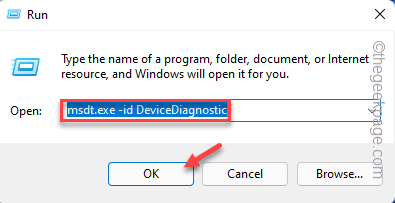
1. Running the hardware troubleshooter is quite easy. But, you have to press the Win key and the R key to open the Run terminal.
2. Then, paste this and click “OK“.
msdt.exe -id DeviceDiagnostic
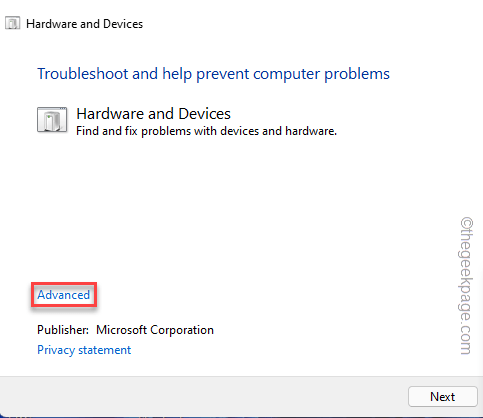
This will open the Hardware and Devices Troubleshooter.
4. You can find the “Advanced” option in the bottom left corner. Click it once.
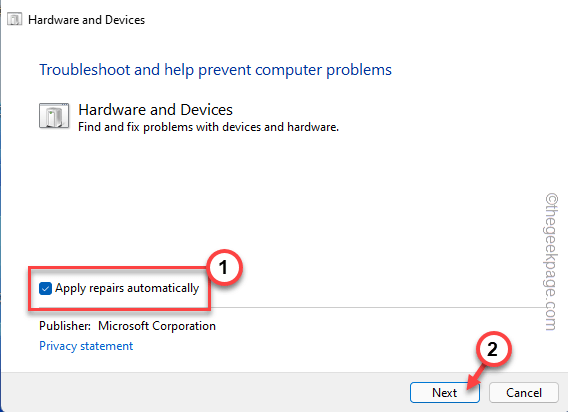
5. Next, you have to check the “Apply repairs automatically” box.
6. Then, you can click “Next” to proceed to the next step.
Now, let Windows go through all the device drivers and reinstall it. Restart your system and check if this solution works in your favor.
Fix 2 – Update driver softwares
WHEA error is associated directly with hardware driver faults. Use the Device Manager to update the driver that you think is responsible for this problem.
1. You can press the Win key+X keys together to bring up the context menu.
2. Then, tap “Device Manager” on that context menu to bring up Device Manager.
3. Coming to the Device Manager page, all the devices and drivers present on your device should be visible to you.
4. Look for any device with an exclamation mark or downward arrow sign. These drivers are either disabled or do have device driver incompatibility issues.
If you have installed a recent device driver or using a device with an old driver, look for them also.
5. Once you have found such a device, right-click that and tap “Update driver“.
6. Now, tap the “Search automatically for drivers” option on the next page.
This will make sure Windows does search for the latest drivers for your device.
7. Following this procedure, make sure that you have updated all the faulty drivers on the Device Manager.
After updating the drivers, you can exit the Device Manager page.
Once you are on your Desktop, reboot the machine. After restarting the system, WHEA INTERNAL ERROR won’t be appearing on your system.
Fix 3 – Uninstall & Reinstall Device Drivers
If updating the faulty drivers doesn’t work, you can uninstall and reinstall the device driver.
1. You have to go to the Device Manager. To do that, press the Windows key+R keys together.
2. Then, write down this and click “OK“.
devmgmt.msc
3. When you appear on the Device Manager utility, again look for any driver that you have updated recently.
Additionally, you should also check if there are any devices with an exclamation mark or downward arrow sign.
4. Just right-tap that driver and tap “Uninstall device“.
5. You are one step away from uninstalling the device driver. So, tap “Uninstall“.
Once you have uninstalled the device, close the Device Manager page.
After closing the Device Manager, don’t forget to restart your system.
Fix 4 – Use the Automatic Repair in RE
There is a tool called ‘Automatic Repair’ that you can use to check and fix the Automatic Repair tool.
Step 1
1. Open the Settings.
2. Once it opens up, visit the “System” settings from the left-hand pane.
3. Then, tap the “Recovery” option to check for more recovery tools.
4. On the right-hand side of the same window, look for the “Advanced startup” item.
5. So, click “Restart now” to restart the system.
Now, wait patiently for Windows to boot into Recovery Environment.
Step 2
1. Once the Windows Recovery environment boots up, tap on the “Troubleshoot” option to open it.
2. After that, you have to click on the “Advanced options“.

5. Coming to the Advanced options page, click on “Startup Repair” to access it.
Windows will automatically boot your system into the Startup Repair mode and check what’s wrong. It will try to repair the issue and finally boot you into Windows.
Fix 4 – Turn off the fast startup
Fast startup sometimes leads to this error.
1. Pressing the Win key+R keys does open the Run terminal.
2. Write down this item in it and click “OK“.
powercfg.cpl
3. Click on “Choose what the power buttons do” on the left part of the Power Options screen.
4. Now, click on “Change settings that are currently unavailable” so that you can perform this change.
5. Now, just uncheck the “Turn on Fast Startup” box.
6. Finally, tap “Save changes” to save this alteration.

After disabling the fast startup feature, restart your computer. This way, you won’t see the WHEA INTERNAL ERROR again.
Fix 5 – Run scans in Safe Mode
STEP 1 – BOOT IN SAFE MODE
1. Open Settings.
2. In the Settings window, go to the “System” settings.
3. Just scroll down t the right-hand pane, and tap the “Recovery” option.
4. Now, to start up the Recovery process, tap “Restart now“.
Your system will be restarted into Windows Recovery mode.
5. Once you reach there, tap the “Troubleshoot” to troubleshoot this issue.
6. Just, click on “Advanced options” on the screen to access it.
7. There will be various options here. You have to click on the “Startup Settings” to access it.
8. Choosing a particular startup setting restarts your computer. Tap “Restart” to restart the system.
9. Once your system restarts, press the F4 from your keyboard to choose the “Enable Safe Mode” option.
STEP 2 – RUN THE SFC SCANS
When your system restarts, you may run the SFC, and DISM scans.
1. You have to press the Win key+R keys together to invoke the Run terminal.
2. When the little box appears, write “cmd“. Then, press the Ctrl+Shift+Esc keys together to open the CMD terminal as an administrator.
2. Then, type this SFC scanning command and hit Enter to run the SFC scan.
sfc /scannow
3. Wait until Windows completes the SFC scan. Then, copy this code from here, paste it into the terminal, and hit the Enter key.
dism online cleanup-image restorehealth
After that, close the Command Prompt screen. After that, restart the system.
Fix 6 – Refresh the Windows
Refresh the Windows to fix the problem without touching your files.
1. Open the Settings window.
2. Now, tap the “System” settings on the left-hand pane.
2. Once you do that, go downwards on your right-hand pane until you can find the “Recovery” option. Open it.
4. You can find a number of recovery tools here. You have to look for the “Reset this PC” option.
5. Then, tap “Reset PC“.
6. A new ‘Choose an option’ page will open up. Here, select “Keep my files“.
7. Next, you have two options.
Cloud download – Choosing this option will download and reinstall the Windows. Clearly, this option requires an internet connection and may take a while longer than the next option.
Local reinstall – Windows will be reinstalled from the drive.
You can choose any option.
Just wait till Windows resets the computer. This should fix the system once and for all.


