If you are a frequent MS Word user, chances are definitely high that you might be using a command or a specific set of commands every single time you use your Word. For obvious reasons, going all the way through all the steps to get your frequent commands executed, is a headache indeed. So, it would be really amazing if you can create your own custom keyboard shortcuts for the frequent commands that you work on. Well, that’s exactly what this article is all about. Read on, to learn how you can easily assign custom keyboard shortcuts to all the commands you want.
Solution
In this article, we will describe in detail how you can assign a keyboard shortcut for the Strikethrough font styling. Following the same steps, you can assign a shortcut to any command you prefer.
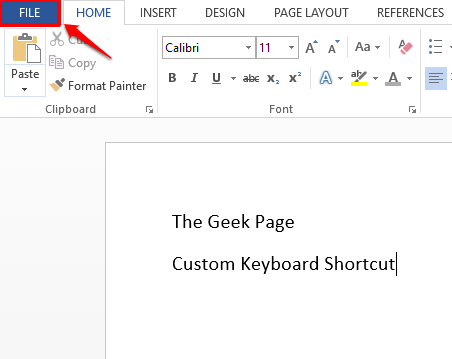
Step 1: Firstly, click on the FILE tab from the top ribbon.
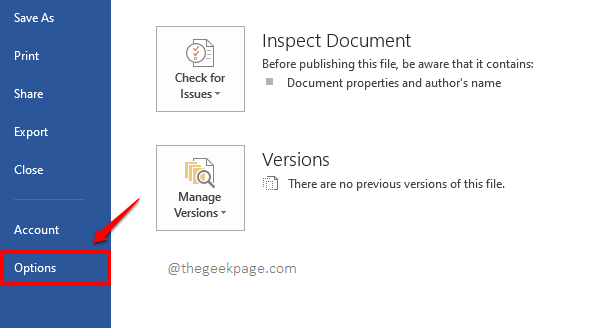
Step 2: From the list of FILE options, on the left window pane, click on Options.
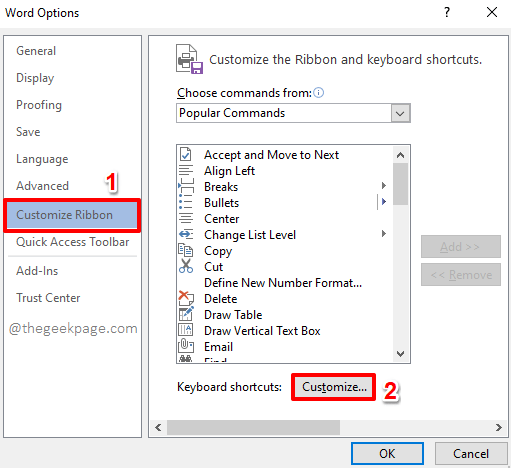
Step 3: Now on the Word Options window, on the left window pane, click on the option that says Customize Ribbon.
Now on the right side of the window, under the bottom of the Choose commands from section, you will see a button named Customize against the option Keyboard shortcuts. Click on it.
Step 4: On the Customize Keyboard window, under the section Categories, you will be able to see different categories of commands. You can select the category of your choice.
I have scrolled down and clicked on the All Commands category.
Now on the right, under the section Commands, you can choose any command of your choice to assign a shortcut to. I have scrolled down and clicked on the Strikethrough command.
Once you have selected the command, right under this section, you will see a field named Press new shortcut key. Click on the text field associated with it. As next, type in any keyboard shortcut as per your preference. Just remember that the shortcut has to start with CTRL. I have typed in CTRL + SHIFT + Q keys as my shortcut for the command Strikethrough.
Once the shortcut key is assigned, click on the Assign button at the bottom, as shown in the screenshot below.
Step 5: That’s it. You can now see that your shortcut key is under the Current keys section. That’s it. Hit the Close button.
Step 6: When you are back at the Word Options window, simply press the OK button to proceed.
Step 7: Let’s now test our changes. For that select the text that you want to apply the shortcut to, in our case, the Strikethrough styling.
Once the text is selected, press the keys CTRL + SHIFT + Q simultaneously.
Step 8: There you go! You can now see that your text is successfully struck off, just with the press of some keys! Enjoy!
Note: Strikethrough is just an example. Similarly, you can create custom keyboard shortcuts for any of the commands you want.
Stay tuned for more mind-boggling tricks, tips, how-tos, and hacks.


