Microsoft’s Windows operating system has a technology called Side by Side, which is nothing but executable files standard component introduced during Windows 98 and on the versions later. This protects the system from the problems caused by the DLLs (Dynamic Link Libraries) that are essential part of the system software. In the Side by Side, the windows saves the different versions of DLLs and retrieves the needed DLL when in demand so that it is free from dependency problems for all of the applications installed on the system. Recently many windows users reported that applications on their system has been crashed many times and when they checked their event logs, they found SideBySide Error 59 which means activation content generation failed.
Possible reasons for this error might be one of the following :
- Corrupted system file.
- Missing/Corrupted Microsoft Visual C++ Redistributable Package.
- Corrupted OS dependencies.
- Lastly, Corrupted DLL file
If you are also encountering this error, then do not panic because we have found a few solutions which might help you. Please continue reading.
source:- https://www.thewindowsclub.com/sidebyside-error-59-on-windows-computers
Fix 1: Perform SCM and DISM Scan
Step 1: Press Windows + R keys together on your keyboard to open Run dialog box.
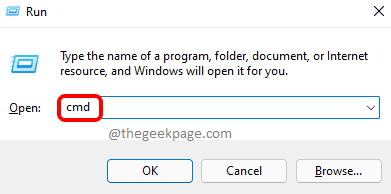
Step 2: Type cmd in the run dialog box and hit the CTRL + SHIFT + Enter keys together to open Command prompt as admin.
Step 3: Then, Click Yes on the UAC prompt to proceed.

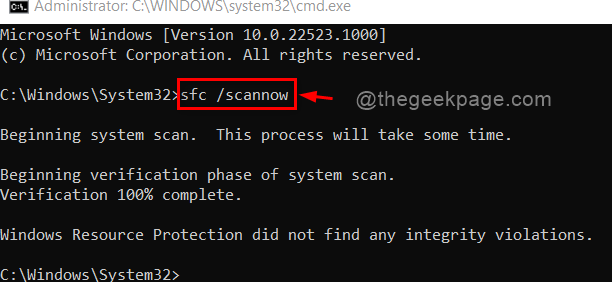
Step 4: Then, Type sfc /scannow and hit the Enter key on your keyboard.
Step 5: This might take some time so please wait till it finishes.

Step 6: After finishing SFC scan, Type the following command given below and press the Enter key to execute the command as shown.
DISM /Online /Cleanup-Image /RestoreHealth
NOTE: DISM command also might take several minutes for scanning and fixing the errors if any.

Now try and check if the problem still occurs. If not, then try our other solutions given below.
Fix 2: Run Windows Store Apps Troubleshooter
Step 1: Press Windows + I keys together to open the Settings app directly.
Step 2: Then, Click System on the left side of the menu.
Step 3: Now Scroll the page and Select Troubleshoot on the right side of the window as shown below.

Step 4: Then, Click Other troubleshooters option in the Troubleshoot page as shown below.

Step 5: Scroll down and Click Run button in the Windows Store Apps option located at the bottom of the page as shown below.

Step 6: It will immediately start detecting problems and tries to fix it so please wait till it finishes.

Step 7: The Troubleshooter has completed the task and fixed the problem. Now Click Close button.

Now Try and check if the issue is resolved.
Hope it has solved your problem.
Fix 3: Re-Install Microsoft Visual C++ Redistributable Packages
Step 1: Press Windows + R keys together on your keyboard to open Run dialog box.
Step 2: Type appwiz.cpl and hit the Enter key to reach Installed Apps page.

Step 3: In the Installed apps page, Type Microsoft Visual in the search bar at the top as shown.
Step 4: Then, Click show more options (Three vertical dots) int he Microsoft Visual C++ application.
Step 5: Select Uninstall button from the list as shown below.

Step 6: A small popup appears on the screen. Click Uninstall button to proceed.

Step 7: Click Yes on the UAC prompt to continue.

Step 8: It will start uninstalling and you will get successful message window. Click Close button.

Step 9: Click the below link to open the latest Microsoft Visual C++ downloads page.
https://www.microsoft.com/en-us/download/details.aspx?id=48145
Step 10: Select the language and Click Download button as shown below.

Step 11: Then, Check both the checkboxes and click Next button to continue as shown below.

Step 12: It will start downloading two executable files ( vsredist.x64 and vsredist.x86 ).
Step 13: Once it finishes, Open vsredist.x64.exe if you are using 64 bit system. Otherwise, run vsredist.x86.exe file.
Step 14: Then, Check the I agree to the license terms and conditions checkbox and click Install button as shown below.

Step 15: Then, Click Yes on the UAC prompt as shown below.

Step 16: Then, It will start installing the Microsoft Visual C++ latest version and you will find successful message after the installation.
Step 17: Click Close to close the installation window.

Step 18: Now restart your system once.
Now try and check if the problem still persists.
Hope this has solved the issue.
Fix 4: Re-Install the Application that is throwing this error
Step 1: Press Windows + R keys together on your keyboard to open Run dialog box.
Step 2: Type appwiz.cpl and hit the Enter key to reach Installed Apps page.

Step 3: Now search for the application to uninstall in the list of installed apps.
Step 4: Click on the three vertical dots (Show more options) and select Uninstall button.
NOTE: I have take Office as an example to show uninstallation process. You have to choose the application that is causing the issue.

Step 5: Follow the on screen instructions to uninstall the application successfully on your system.
Step 6: Then, Restart your system once.
Step 7: After the system is booted up, if you have the executable file, then straight away try to install the application again.
Step 8: Otherwise download the application and then, install it on your system.
Step 9: Once it is installed, try and check if the application is working fine.
Hope this solved the issue.
Fix 5: Try to Reset Windows Operating System
Step 1: Press Windows + I keys together to open the Settings app directly.
Step 2: Then, Click Windows Update on the left menu of the Settings app.
Step 3: Select Advanced options on the right side of the window as shown below.

Step 4: Then, Scroll down the page and Click Recovery option under Additional options as shown below.

Step 5: Click Reset PC button in the Recovery page as shown.

Step 6: Then, Select Keep my files option in the popped up window so that no data gets erased while resetting the PC.

Step 7: Then, Select Local reinstall option to proceed.

Step 8: Then, Click Next button in the Additional settings window.

Step 9: If in case you get a message saying “ This PC was recently upgraded to Windows 10. If you Reset this PC, you won’t be able to undo the upgrade and go back to the previous of Windows “, then do not worry just Click Next to continue.
Step 10: Click Reset button to start resetting the windows PC.
NOTE: Make sure your system is connected to charging cable and it is getting charged.

Once the windows PC gets reset and boot up, try and check if the application works fine.
That’s it guys.
Hope this article was informative and helpful.
Please leave us comments below to let us know which fix worked for you.
Thank you.