Script errors mostly occur when the script does not execute properly in the backend and it commonly occurs in web browsers or in the programming software. It can also occur when the software or application you are using is unable to load the script and complete the validation and execution of the script. Among other browsers, the issue is most commonly seen while using Internet explorer. In this article let us see the various methods to solve script errors in Windows. Try them and get rid of the problem. Let us start!
Method 1 – Disable The Script Debugging Option
Step 1 – Open the run prompt using Windows + R keys together
Step 2 – Type inetcpl.cpl in the run prompt and hit enter. This will open the internet properties window
Step 3 – In the opened window, go to the advanced tab
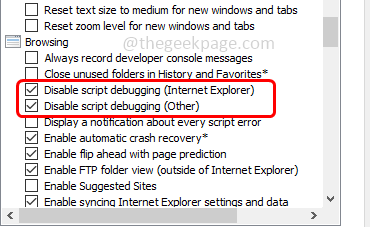
Step 4 – Scroll down to find the browsing section, then enable Disable script debugging (Internet Explorer) and Disable script debugging (Other) options by clicking on the checkbox beside them (a tick mark should be present)
Step 5 – Then click on ok
Step 6 – Restart the computer. Now check if the issue is solved.
Method 2 – Clear The Browser Cache And Reset The Application Causing Error
Clear browser cache
Step 1 – Open the browser that you are using. Here I will take Chrome as an example
Step 2 – At the top right corner of the browser click on three dots
Step 3 – From the list click on More tools and from the fly out option select clear browsing data
Step 4 – Go to the basic tab and select browsing history, cookies and other site data, cached images and files options by clicking on the checkbox beside them (a tick mark should be present)
Step 5 – Also go to the advanced tab and select browsing history, download history, cookies and other site data, cached images and files options by clicking on the checkbox beside them (a tick mark should be present)
Step 6 – Then click on clear data button
Reset the application
Step 6 – Open the windows settings using Windows + I keys together
Step 7 – Click on apps
Step 8 – In the apps & features page, scroll down and find for the app. Click on it
Step 9 – There appears advanced options click on it and scroll down
Step 10 – Then click on reset button. A pop up will appear again click on reset
Step11 – This will reset the application and you may need to sign in again whenever you want to use the app. Now check if the issue is resolved.
Method 3 – Allow Pop-ups In Your Browser
Step 1 – Open the browser that you are using. Here I will take Chrome as an example
Step 2 – At the top right corner of the browser click on three dots
Step 3 – From the list click on Settings
Step 4 – At the left side, click on privacy and security
Step 5 – Then at the right side, click on site settings
Step 6 – Scroll down and click on pop-ups and redirects
Step 7 – Enable sites can send pop-ups and redirects option by clicking on the radio button beside it.
Method 4 – Check And Install Windows Update
Step 1 – Open the windows settings using Windows + I keys together
Step 2 – Click on update & security
Step 3 – On the left side, click on Windows update
Step 4 – And at the right, click on check for updates button
Step 5 – If there are any updates install them, else if there are no updates available it will show you’re now up to date
Method 5 – Disable Smooth Scrolling
Step 1 – Open the run prompt using Windows + R keys together
Step 2 – Type inetcpl.cpl in the run prompt and hit enter. It will open the internet properties window
Step 3 – In the opened window go to the advanced tab
Step 4 – Scroll down and find for browsing section
Step 5 – Uncheck the use smooth scrolling option by clicking on the checkbox beside it (a tick mark should not be present)
Step 6 – To save the changes click on ok
Step 7 – Restart your system and then check if the issue is resolved.
Method 6 – Reset The Internet Explorer’s Settings To Its Default
Step 1 – Open the run prompt using Windows + R keys together
Step 2 – Type inetcpl.cpl in the run prompt and hit enter. It will open the internet properties window
Step 3 – In the opened window go to the advanced tab
Step 4 – At the bottom in the reset internet explorer settings section, click on reset button.
Step 5 – Click on ok and restart your system. See if the error is gone.
That’s it! I hope the above provided information is useful and easy to understand. Let us know which of the above method you applied and made it work. Thank you and happy reading!!

