Is there a message on your screen saying “Can not find script file. Loader.vbs” appearing again and again? This Loader.vbs file actually provides the RE to various scripts. So, whenever a Loader script fails or gets stuck, this message appears on the user screen. Several solutions are available addressing this issue and you can fix it on your own.
Fix 1 – Check the exact location of the Loader.vbs
Verify whether the Loader.vbs file is located in this designated folder.
Step 1 – Open the File Explorer.
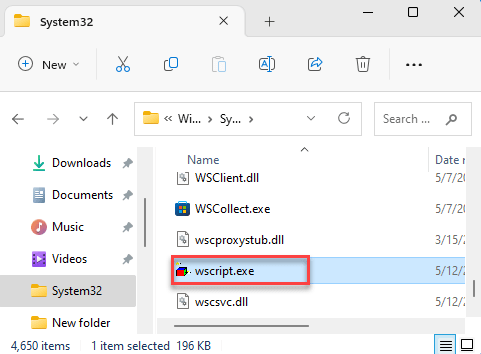
Step 2 – Go to the actual location of the System32 folder –
C:\Windows\System32
Step 3 – Check whether you can find the wscript.exe file here.
Verify whether the files are there are not.
Fix 2 – Use AutoRuns to clear scripts
You can use AutoRuns to filter out the scripts associated with the “Loader.vbs” file and delete it from your system.
Step 1 – Download the AutoRuns.
Step 2 – Extract the zip file into a folder of your choice.
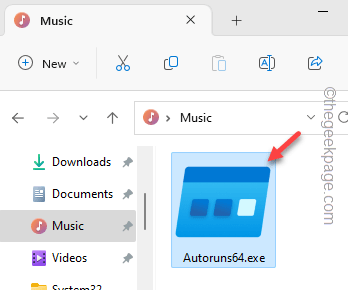
Step 3 – Run the “AutoRuns64” executable file on your device.
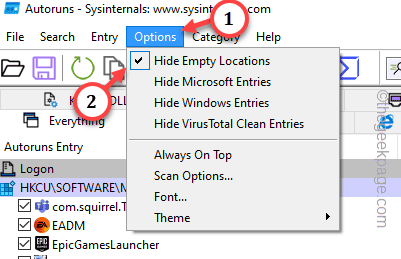
Step 4 – Go to the “Options“.
Step 5 – Uncheck these two options one by one –
Hide Windows Entries
Hide Microsoft Entries
Step 6 – Make sure that this option is checked –
Hide Empty locations
Step 6 – Now, input “loader.vbs” in the Quick Filter tab.
Wait for AutoRuns to scan for any script files associated with the Loader.vbs.
Step 7 – If you can locate any such entry, right-click that and tap “Delete” to remove it.
Make sure to delete all entries in the list before closing the AutoRuns screen.
Then, restart your computer. The “Can not find script file. Loader.vbs” won’t disturb you anymore.
Fix 3 – Enable the Windows Script Host using regedit
The problem is appearing may be due to the lack of the Windows Script Host service. You can fix it from the Registry Editor.
Step 1 – Call a Run box using the Win+R keys together.
Step 2 – Hit the Enter button after writing “regedit” in that blank box.
Step 3 – Get to this exact location of the Windows Script Host Settings key –
HKEY_CURRENT_USER\SOFTWARE\Microsoft\Windows Script Host\Settings
Step 4 – Look for the “Enabled” value and double-tap to edit that.
[
A small percentage of users may not find this “Enabled” value. In that case, they have to manually create such value.
1. Go to the blank portion of the Settings key.
2. There, right-click on that space and tap “New>” and further tap “Value” to create a new value.
3. Name this value “Enabled“.
4. Double-tap to change the value.
]
Step 4 – Double-tap to change the value.
Step 5 – Switch the value to “1“. Just, tap “OK” to save that change.
Registry edits don’t come into effect until you restart the system. So, do reboot the computer.
Check if this works.
Fix 4 – Add Quit Script to main code
There is another manual method that you can use to include quit script code.
Step 1 – Go to the folder where the problematic script is located.
Step 2 – Then, right-click on the space and subsequently tap “New>” and “Text Document“.
Step 3 – Open this new text file.
Step 4 – Paste this line in the blank text page.
WScript.Quit
Step 5 – Press the Ctrl+Shift+S to save the file.
Step 6 – Subsequently, on the Save As page, set the File Type to “All files”.
Step 7 – Name the file “Loader.vbs” and tap “Save“.
After renaming the file, close every window and restart your computer.
When you are done restarting the system, do check the condition of the issue.
Fix 5 – Change the value of the VBS key
The VBS key needs to be configured correctly in your system registry.
Step 1 – Open the Registry Editor on your system. Just press the Win+S keys together.
Step 2 – Directly type “regedit” in the search box. Finally, open the “Registry Editor“.
Step 3 – Get to the location of the VBS key –
HKEY_CLASSES_ROOT\.vbs
Step 4 – On the right-hand portion of the screen, if you look, you can see the “Default” value there.
Step 5 – Then, right-click that and click “Modify“.
Step 6 – Ensure that the Value data corresponds to this –
VBSFile
Step 7 – Save this change with a tap on “OK“.
After quitting the Registry Editor, restart the system. When the system gets back, test if this actually works.
Fix 6 – Ensure Script Host is associated with Loader.vbs
Make sure the .vbs extension is correctly associated with the Windows Script Host program.
Step 1 – Find a .vbs file.
Step 2 – Just right-click that file, and tap “Open with>” in the context menu. You can choose the “Microsoft Windows Based Script Host” in the context.
Otherwise, hit the “Choose another app” option.
Step 3 – Choose “Windows Script Host” from the list.
Step 4 – If you can’t see that in the list, tap “Choose an app on your PC“.
Step 5 – Get down to this location –
C:\Windows\System32\
Step 6 – Choose the “wscript.exe” and click “OK“.
Step 7 – Coming back to the app selection tab, tap “Always” to set the file association.
This way, you have to ensure the VBS is associated with the Windows Script Host.
Fix 7 – Repair the Windows Script Host
Repairing the Windows Script Host app on your computer from the terminal.
Step 1 – Open the Start menu. Then, input “command“.
Step 2 – As soon as you see the “Command Prompt” and click “Run as administrator” on the context tab.
Step 3 – Next, put this code in the terminal. Use the Enter key from the keyboard to repair the Windows Script Host.
regsvr32 %systemroot%\system32\vbscript.dll
You will see the indication the VBScript dll has been successfully registered.
A system reboot is recommended after this. Check if this helps.
Fix 8 – Run a full device scan
Lastly, this can be caused by malware. So, try running the full device scan to fix the issue.
Step 1 – Start to write “security” in the search bar.
Step 2 – Now, tap the “Windows Security” tool.
Step 3 – Open the “Virus & threat protection” tool to open it.
Step 4 – You can directly either start a scan using the “Quick Scan” option.
Or, you can just use the “Scan options” to explore a list of possible scanning options.
Step 5 – If you go that way, choose “Full scan“.
Step 6 – Click the “Scan now” to scan it.
The full system scan may take some time and can take more than an hour.
You can just minimize and let it run in the backside.
Fix 9 – Fix the system with an SFC scan
The last solution you can try is to use the System File Checking scan to fix the wscript issue.
Step 1 – You can run this tool only from a terminal with administrative rights. So, start to type “cmd“.
Step 2 – Next, right-tap the “Command Prompt” and quickly click the “Run as administrator“.
Step 3 – Subsequently, paste this line in there. Use the Enter key to run this SFC tool.
sfc /scannow
Wait till the file verification process has reached 100%. Then, you can quit the CMD screen and restart your computer.
You won’t read the “Can not find script file. Loader.vbs” error message again.


