If the number keys on your keyboard is not working in Windows 11 then you are the right place.
If your Windows 11 PC keyboard is not functioning properly, the going can be tough, especially if it’s the only keyboard you prefer to use. Sometimes, some of the keys may stop functioning, for instance, the number keys and that can be a trouble if you are not comfortable using an external keyboard. There are many instances when you need to use the number keys, for example, while typing emails, passwords, website url and so on. Therefore, it needs to be fixed urgently.
Let’s see how to fix the issue when the number keys stop working on your Windows 11 PC.
Method 1: Through Mouse Settings
Sometimes the issue could be simply due to unexpected changes in the mouse settings. A slight tweak in the settings can help you fix the number keys not working issue. Let’s see how to possibly fix it:
Step 1: Press the Win + I keys together on your keyboard to launch the Settings app.
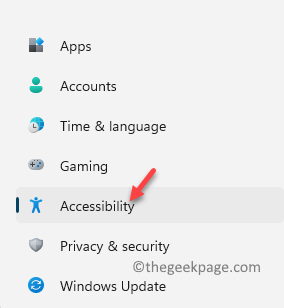
Step 2: In the Settings window, click on the Accessibility option on the left.
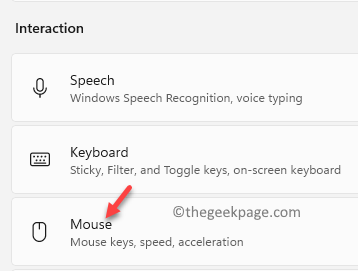
Step 3: Now, navigate to the right side, scroll down and under the Interaction section, click on Mouse.
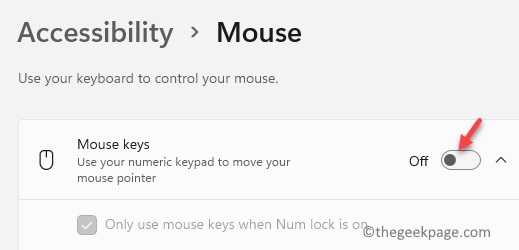
Step 4: Next, in the Mouse settings screen, turn off the Mouse keys option.
Now, check your keyboard and the number keys should be working now.
Method 2: By Long Pressing the Num Lock Key
This method includes simply pressing the Num Lock for 5 seconds and it should help fix the issue. All you need to do is to firstly press the Num Lock key once to turn it off. Now, again press the Num Lock key and hold it like that for a count of 5 seconds. As soon as 5 seconds are over, you will hear a beep sound and this is the time you should release the key.
*Note – Simply close (click on the cross) the Toggle Keys prompt that opens.
This method activates the number keypad and helps fix the number lock not working issue for most of the Windows 11 PC users.
Method 3: Using the On-Screen Keyboard
When you are unable to use the number keys on your system keyboard despite all efforts, you can try using the on-screen keyboard. Here’s how:
Step 1: Go to Start and type On Screen Keyboard in the Windows search bar.
Now, click on the result (On-Screen Keyboard) under the Best match section.
Step 2: In the On-Screen Keyboard that opens, click on the Options key located at the bottom right side (under PrtScrn key and next to Help key).
Step 3: In the Options dialogue box, check the box next to Turn on numeric keypad and press OK to save the changes.
Now, you can use the number keypad on the on-screen keyboard and this should help you navigate on your PC.
Method 4: Update your Device Drivers
A lot of times, many system issue may arise simply due to outdated drivers, hence, check for updates ad if available, make sure you update the driver to the latest version and this may help fix the issue. Let’s see how:
Step 1: Press the Win + R keys simultaneously on your PC to open the Run command box.
Step 2: In the search bar, type devmgmt.msc and hit Enter to open Device Manger.
Step 3: In the Device Manager window, expand the Keyboards section.
Here, right-click on your keyboard driver and select Update driver.
Step 4: In the Update Drivers window, click on Search automatically for drivers.
Now, wait till Widows looks up for any latest drivers. If available, it will automatically update the driver to the latest version.
*Note – Alternatively, you can also download the latest driver straight from the manufacturer’s website and install it manually.
Now, go back and check if the number keys on your system keyboard is working fine.
Method 5: Install the Driver in Compatibility Mode
There are chances that the updated driver may not be compatible with the system and hence, you may continue to face the issue with the number keys on your keyboard. In such a case, you can download the latest driver from the manufacturer website and then install this driver in the compatibility mode. Here’s how to do it:
Step 1: Right-click on the setup file of the driver and select Properties.
Step 2: In the Properties window, select the Compatibility tab and go to the Compatibility mode section.
Here, check the box next to Run this program in Compatibility mode for option.
Step 3: Now, go to the Previous Versions tab and wait till it pulls up the previous versions of the device.
Select a previous version that’s supported by the keyboard.
Press Apply and then OK to save the changes and exit.
Now, install the driver normally and once the installation is complete and reboot your PC. Now, the number keys not working on your Windows 11 issue should be resolved.
Method 6: Troubleshoot in Clean Boot State
When most of he methods fail to work, you may also try running your system in the clean boot state and then troubleshoot the issue. The Clean Boot State is useful for identifying and troubleshooting many issues, as it boots your system with minimal drivers and startup programs, thus, helping you to find out which program is causing the issue:
Step 1: Right-click on Start and select Run and the Run command will open.
Step 2: In the Run command window, type msconfig and press OK to open the System Configuration window.
Step 3: In the System Configuration window, go to the General tab and navigate towards the Selective startup field.
Here, check the boxes next to Load System Services and Use Original boot configuration.
Make sure to uncheck the box next to Load startup items.
Step 4: Now, go to the Services tab and navigate to the bottom.
Here, check the box next to Hide all Microsoft Services.
Next, press the Disable all button.
Now, click on Apply and then OK to save the changes and exit.
Restart your PC and your PC will start into the Clean Boot Mode. Now, troubleshoot the number key not working issue.
*Note – Once your troubleshooting is over, you can revert your PC to normal startup by following the Step 1 and 2, and then under the General tab, select Normal startup.
Method 7: Disable the Mouse Key in Control Panel
Sometimes, it could be possible that there has been some changes to the keyboard settings and hence, you come across the issue with the number keys on your keyboard. Therefore, you can simply make a few changes in the keyboard settings in the control panel and the issue may get resolved. Here’s how:
Step 1: Press the Win + R shortcut keys on your keyboard to open Run command.
Step 2: In the Run command search box, type control and hit Enter to open the Control Panel window.
Step 3: In the Control Panel window, go to the View by field and select Large icons from the drop-down next to it.
Now, select Ease of Access Centre from the list.
Step 4: In the next screen, on the right side, scroll down and under the Explore all settings section, click on Make the keyboard easier to use.
Step 5: Now, in the next window, go to Control the mouse with the keyboard option and remove the tick from the box next to Turn On Mouse Keys.
Press Apply and then OK to save the changes and exit.
Now, check if the number keys on your keyboard is working normally.
Method 8: Edit the Registry Editor
Editing the registry keys can sometimes prove to be a great solution if none of the above method works. However, before you proceed to make any changes to the registry editor, make sure that you create a backup of the registry data, so that, in case any data is lost accidentally, it can be recovered,
Step 1: Go to the Start menu and select Run to launch the Run command.
Step 2: In the Run command search bar, type regedit and hit Enter to open the Registry Editor window.
Step 3: In the Registry Editor window, navigate to the below path:
HKEY_CURRENT_USER\Control Panel\Keyboard
Now, go to the right side and double-click on the string value – InitialKeyboardIndicators.
Step 4: This will open the Edit String dialogue box.
Here, set the Value data field to 2 and press OK for the changes to be applied.
The number keys on your keyboard not working issue in your Windows 11 PC should be resolved now.


