Browser add-ons or extensions are modules that allow the customization of browsers, add functionality, and help improve the browsing experience of users. Nowadays, all the major browsers like Chrome, Firefox, and Microsoft Edge provide support for add-ons or extensions.
However, many users have reported an issue wherein the add-ons in Firefox have stopped working once they launch the browser. For a few users, the problem is seen with only some of the add-ons in the browser whereas for others either the add-ons are not seen at all or all the add-ons are not working. This issue can happen if your Firefox browser is outdated, the system date/time settings are not correct, or the user profile in Firefox is corrupted. If you are facing this problem with your Firefox browser add-ons, then go ahead and read this article to find some troubleshooting solutions that can help you fix this issue on your Windows PC.
Method 1 – Manually Re-enable the Add-ons
Step 1. Open the Mozilla Firefox browser.
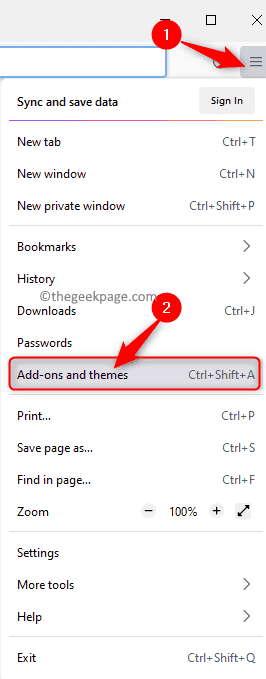
Step 2. Go to the upper right corner of the window and click on the three horizontal lines button to open the menu.
Step 3. In the menu, click on Add-ons and themes.
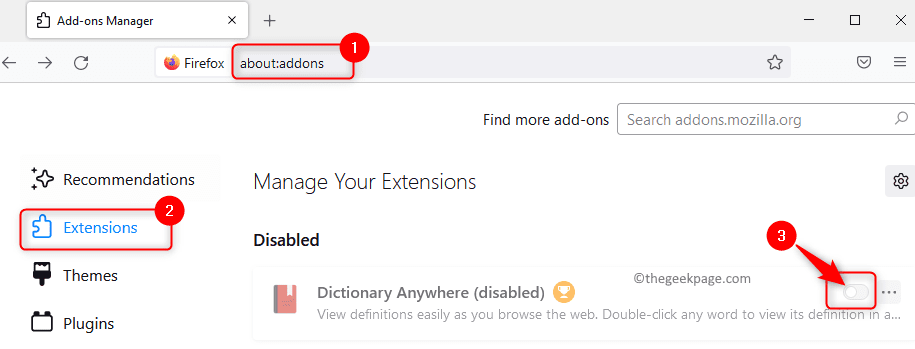
Step 4. On the Add ons page, click on the Extensions tab in the left panel.
Step 5. Firstly, disable all the add-ons in the list by turning off the toggle associated with each.
Step 6. Then, enable the add-ons by toggling on the switch next to the add-ons.
After all the add-ons have been re-enabled, check if the add-ons are working.
Step 7. If the issue still persists, you can add another extension in Firefox and check if the problem is fixed.
Step 8. If the problem is not yet resolved, then you can remove the add-ons and check if it was causing the issue.
To remove an add-on, on the Add-ons page, click on the three-dot menu next to the extension and choose Remove.
Click on Remove again to confirm the add-on removal.
Check if the problem is resolved after removing the add-on.
Method 2 – Change the System Date and Time Settings
Step 1. Right-click on the clock at the right end of your taskbar and select Adjust date and time.
Step 2. On the Date & Time Settings page, toggle off the switch associated with the options Set time automatically and Set time zone automatically.
Step 3. Next, click on the Change button next to Set date and time manually.
Step 4. In the Change date and time window that pops open, set the correct date and time.
Then, click on Change.
Step 5. Use the dropdown in the Time zone section, and choose the correct time zone from the list.
Step 6. Relaunch Firefox and check if the add-ons are working without any issues.
Method 3 – Disable Extension Preference in Firefox
If the extension preference in Firefox is enabled, then Firefox can disable all the extensions assuming them all to be out-of-process extensions. So, you can disable this extension preference and check if the problem is fixed.
Step 1. Open Firefox.
In the address bar at the top, type about:config and hit Enter to go to the Advanced Preferences page.
Step 2. Click on Accept the Risk and Continue in the warning regarding changing the advanced configuration preferences.
Step 3. In the search box at the top, type extensions.webextensions.remote to look for the Extensions preference.
Step 4. Use the toggle switch associated with this preference and change it to False.
Step 5. Close and reopen the browser.
Check if the add-ons are working without creating any problems while launching the browser.
Method 4 – Remove Toolbars and Buttons Customization
Step 1. Open Firefox.
Click on the Menu button at the top right corner.
Step 2. In the menu that opens, click on More tools.
Now, click on Customize toolbar… in the sub menu that opens.
Step 3. In the Customize Firefox page, click on the button Restore Defaults at the bottom right corner.
Then, click on Done.
Step 4. Once the default settings are restored, check if the issue with add-ons is resolved in Firefox.
Method 5 – Disable DOM Storage in Firefox
Like browser cookies, DOM Storage in Firefox is used to store per-session or domain-specific information on the browser. Any errors in the DOM storage can affect the normal working of the Firefox add-ons. So, you can disable the DOM Storage and see if the issue gets fixed.
Step 1. In the address bar of Firefox, type about:config and hit Enter.
Step 2. Click on Accept the Risk and Continue on the warning page that opens.
Step 3. In the search box at the top, type the text below
dom.quotaManager.useDOSDevicePathSyntax
Step 4. Change the value of this preference to False (if set to True) by using the toggle next to it.
Step 5. Close and reopen Firefox and check if the add-ons problem is resolved.
Method 6 – Enable Firefox History
Step 1. Launch the Firefox browser.
Step 2. In the address bar, type about:preferences#privacy to go to the Privacy & Security Settings page of the browser.
Step 3. Scroll down to the History section.
Step 4. In this section, click on the dropdown list next to Firefox will and choose the option Remember history from the list.
Step 5. Relaunch the browser and check if the add-ons are working without creating any issues.
Method 7 – Modify the Extensions.json File
Step 1. In the address bar of the Firefox browser, type about:support and press Enter.
Step 2. Locate the Profile Folder row in the table with the title Application Basics.
Step 3. Here, click on the Open Folder button next to Profile Folder.
This opens the File Explorer with Firefox Profile Folder that is being used.
Step 4. Minimize the File Explorer and close the Firefox window.
Open the Task Manager (Ctrl + Shift + Esc) and end all the running processes that are related to Firefox.
Step 5. Go back to Profile Folder in File Explorer.
Look for the extensions.json file and open it using Notepad or any preferred text editor.
Step 6. Now, press Ctrl + F to open the Find box.
Type appDisabled in the search box and hit Enter to look for the text in the file.
Change the value to false (if set to true) for all the occurrences of appDisabled.
Step 7. Next, perform a search as stated in Step 6 for signedState entry.
Change the value for all occurrences of signedState to 2 (if set to 1).
Step 8. Press Ctrl + S to save the file.
Exit the extensions.json file.
Step 9. Reboot your computer.
Open Firefox and check if the problem with add-ons not working is resolved.
Method 8 – Delete File from Storage Folder of Firefox User Profile
Step 1. Perform Steps 1 – 4 as mentioned in Method 7 above to go to the Profile Folder in the File Explorer.
Step 2. In the Profile Folder, find the folder named storage.
Step 3. Double-click on this storage folder to open it.
Step 4. Press Ctrl + A to select all the files in this folder and press the Delete (bin) icon at the top to delete all the files in this folder.
Step 5. Reboot your computer.
After startup, open Firefox and check if the add-ons are working.
Method 9 – Remove Extension Files from the User Profile
Step 1. Go to Method 7 above and execute Steps 1 – 4 to open the Profile Folder in the File Explorer.
Step 2. Look for extension files in the Profile folder.
Select these extension files and tap on the Delete (bin) icon to delete them.
Step 3. Locate the compatibility.ini file and click on the Delete icon at the top.
Step 4. Reboot your PC.
Check if the problem with add-ons in Firefox is fixed or not.
Method 10 – Create a New User Profile
Step 1. Press Windows + R to open the Run box.
Step 2. Type firefox.exe -p and hit Enter to open the Firefox Profile Manager.
Step 3. In the Profile Manager window, click on Create Profile…
Step 4. Click on Next in the Create Profile Wizard that opens.
Step 5. Give a name for the new user profile in the text box below Enter the new profile name.
For storing this new profile, you can either use the default folder or select a different location by clicking on Choose Folder.
Finally, click on Finish.
Step 6. Back in Choose User Profile, select the new profile name, and click on Start Firefox.
Once Firefox starts, check if the problem with add-ons is overcome.
Method 11 – Refresh the Browser
Step 1. Launch the Firefox browser.
Type about:support in the address bar at the top.
Step 2. This opens the Troubleshooting Information window.
Here, click on Refresh Firefox… button on the right.
Step 3. In the confirmation prompt that pops up, click on Refresh Firefox.
Step 4. Once the browser opens after refreshing, check if the problem with add-ons not working is fixed.
Method 12 – Disable the Add-ons Certificate Requirements
Step 1. In the address bar of Firefox, type the text below
about:config
Step 2. To continue, click on Accept the Risk and Continue on the warning page.
Step 3. In the search box, type the text below to look for the certificate requirements preference.
xpinstall.signatures.required
Step 4. Change the value of this preference to False by using the toggle at the right.
Step 5. Close and reopen Firefox.
Check if the add-ons not working issue is resolved.
If the problem with add-ons still persists after trying the fixes above, then open Firefox in Debug mode.
To open in Debug mode, in the address bar type about:debugging.
Go to This Firefox tab in the left pane.
Now, click on the Load Temporary Add-on… button.
Check if the add-ons are working in the Debug mode.
That’s it!
Thanks for reading.
We hope that you must have resolved the issue with add-ons not working in Firefox using one of the fixes mentioned in this article. Did you find this article useful? Please let us know your thoughts and the method that worked in resolving the issue for you in the comments section below.


