Microsoft OneNote ranks among the popular notetaking applications. It has a variety of valuable points which are useful in day-to-day usage making it a powerful app, especially when combined with other MS Office applications. OneNote allows for a useful feature called Translation of different languages. This helps when users are from different countries and may be working on a common project or a company. Different options are available to the user to use the Translation feature on OneNote. They can use it as a mini translator to just check on a word’s meaning in a different language. Many users will not be native English speakers and this feature can bridge the gap for them. This can also be added as a shortcut to use it quickly or in case of more than one translation if required in the notes.
Using the Translate feature on OneNote
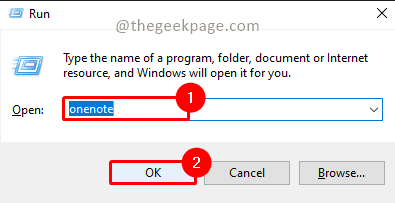
Step 1: Press the Windows+R, type OneNote, and click OK to open the OneNote Application.

Step 2: Go to the Note you want to work with and select the text you want to translate into the preferred language.

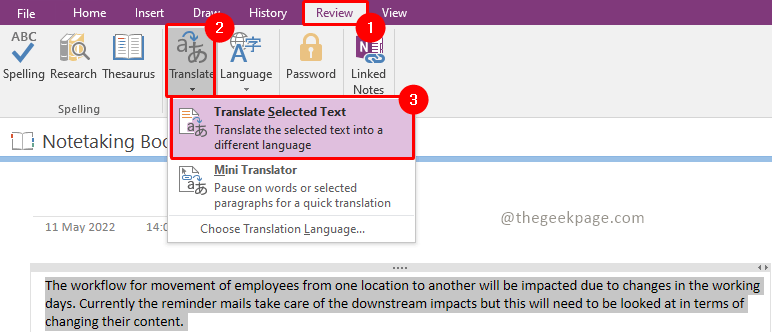
Step 3: Go to the Review tab and choose the Translate option.
Step 4: Select the Translate selected text from the dropdown.

Note: A small window will appear on the side which will help with translating into another language. it has a list of multiple languages.
Step 5: Choose the language of the current text in the From drop-down.

Step 6: Choose the language you want the translation in the To drop-down.

Note: In this example, we will choose German as the language.
Step 7: From Microsoft, Translator clicks on the dropdown and selects Insert.

Now your screen will show the text for the translated version of English to German. If this is the regular feature used by you or your work requires to do multiple translations of texts then it’s better to keep a shortcut key for the same. This will allow you to access the translation feature quickly.

Adding the Translate option to Quick Access Toolbar
Step 1: In the OneNote application, go to the top of the window and select the down arrow icon. Click on the More Commands button. It will open Quick Access Toolbar settings.

Step 2: Select the Review Tab option from the Popular Commands drop-down.

Step 3: Choose the Translate option and click on Add.

Step 4: Click on Ok once you have added the Translate option to the right side.

Step 5: Now for the next set of Translations, choose the option from the Quick Access Toolbar.

Now there will be situations where you will require default translations to another language. OneNote allows such a feature through Mini Translator.
Using the Mini Translator Option on OneNote
Step 1: In the OneNote application go to the top of the window over the Quick Access toolbar and click on the Mini Translator option.

Step 2: In the dialogue box that appears, you need to choose the default language in which you want the text to be translated. Choose the language from the drop-down.

Note: We will use French as the default language for this example.
Step 3: Now hover the mouse over the text and scroll over a particular word. The Mini Translator will open bilingual dictionary and show the French equivalent word and meaning for you from the paragraph.

The above steps show that the translate tool can be a pretty useful feature for users of Onenote which makes this application more than mere notetaking. This feature can better organize the notes taken by the user as it provides the translation and the required meanings as well. Happy notetaking!