Many users reported seeing the Could not create the Java Virtual Machine error. The complete error reads:
Could not create the Java Virtual Machine. A fatal exception occurred.
or
Java virtual machine launcher error
This error is seen when the users try to open the Applications developed in Java.
If you have encountered this error and wondering how to fix it, don’t worry. In this article, let’s discuss a list of fixes to overcome this error.
Fix 1: Increase the RAM allocation for JVM(Java Virtual Machine)
NOTE: You should have admin rights for making these changes.
1. Press the keys Windows and R key button at same time
2- Now, type sysdm.cpl in it and click OK.

3. In the System Properties window that opens up , click on Advanced Tab.
Now, click on the Environment Variables button at the bottom.

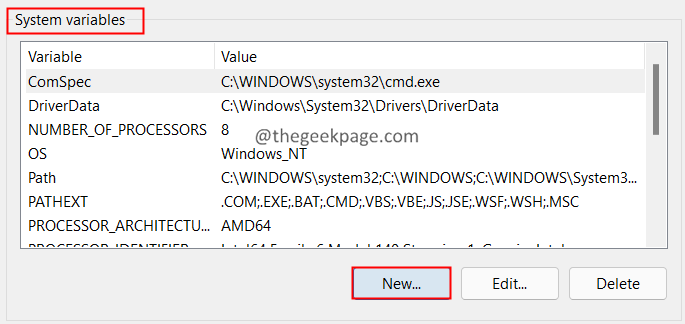
3. The Environment Variables window opens. Under the System Variables section, click on the New button.
4. The New System Variable window opens. Specify the following values
- Variable name: _JAVA_OPTIONS
- Variable value: -Xmx512M
5. Click on OK twice
6. In the Environment Variables click on the Ok button.
Fix 2: Update the Path and Java Home Environment variables
1. Click on the search icon next to the windows icon.
2. Enter java, and click on the top-most result.
3. Click on the Open file location located on the right side.
4. In the appearing window, right-click on the java application and click on Open file location.
5. Now, make a note of this location. We would need this later.
6. Press the keys Windows and R key button at same time
7- Now, type sysdm.cpl in it and click OK.

8- In the System Properties window that opens up , click on Advanced Tab.
Now, click on the Environment Variables button at the bottom.

3. The Environment Variables window opens. Under the System Variables section, locate the variables Path.
4. Click on the Path Variable and then press the Edit button as shown below.
5. In the Edit environment variable window, click on New.
6. Paste the location copied from Step 5.
7. If you see any older entries, click on that entry and press the Delete button.
8. Finally, click on the OK button.
9. Within the System variable section, locate the JAVA_HOME variable.
10. Click on the Edit button.
11. In the Edit window, under the Variable value section, paste the location copied in Step 5.
12. Click on the Ok button.
13. Check if this helps. If not, then restart your system. The Environment variables take effect after restart.
Fix 3: Run the Java with Admin Privileges
1. Click on the Search icon.
2. Type java, and click on the top-most result.
3. Now, click on the Open file location located on the right side.
4. In the appearing window, right-click on the java application and click on Properties.
5. Go to the Compatibility tab.
6. Under the settings section, tick Run this program as an administrator.
7. Click on Apply and then click on OK.
Fix 4: Uninstall & Re-install Java in your System.
1. Open the Run Dialog with the keys Windows+R.
2. Type appwiz.cpl and press Enter.
3. In the window that opens, click on the search bar and type java, and press Enter.
4. Once the Java application is found, click on the three dots next to the application.
5. Select Uninstall.
6. Follow the on-screen instructions to complete the uninstallation process.
7. Now, open the Java Download page in your browser.
8. Download the appropriate version of Java. 32-bit programs would use 32-bit java and 64-bit programs would use 64-bit java applications.
9. Once, the download is complete, run the executable file.
10. Follow the on-screen instructions and complete the installation process.
Check if this helps.
Fix 5: Check Java Installation
1- Search cmd in the search box of Windows taskbar.
2 – Right click on the appearing command prompt icon and click on run as admin.

3 -Now, type java – version in it and click OK.

4 -Now, Go to this link and check whether you have latest version installed. If not install the latgest version on your computer.
That’s all.
We hope this article has been informative. Kindly comment and let us know the fix that helped you overcome the error. Also, let us know if you face any issues, we will be glad to help.
Thank you for reading.
