While creating new partitions on Windows drives, there are many error prompts that can ruin the process. One of these prompts is – the “We couldn’t create a new partition” error message. Now, there is the ultimate trick of formatting the entire drive, followed by a quick few steps for the creation of the new partition in the drive.
Fix 1 – Change the Boot Order
Try to boot from the USB installation media directly. This will definitely let you create a new partition on the system HDD/SSD and complete the Windows installation process.
Step 1 – At first, quit the Windows Setup screen.
Step 2 – This should automatically restart your computer. If it doesn’t do that automatically, restart it manually.
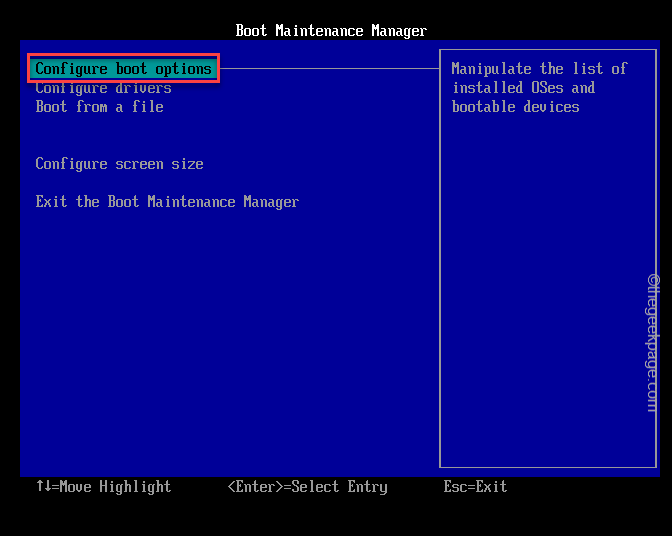
Step 3 – Now, press and hold the Boot Options/BIOS Utility key to go to the Booting Options screen.
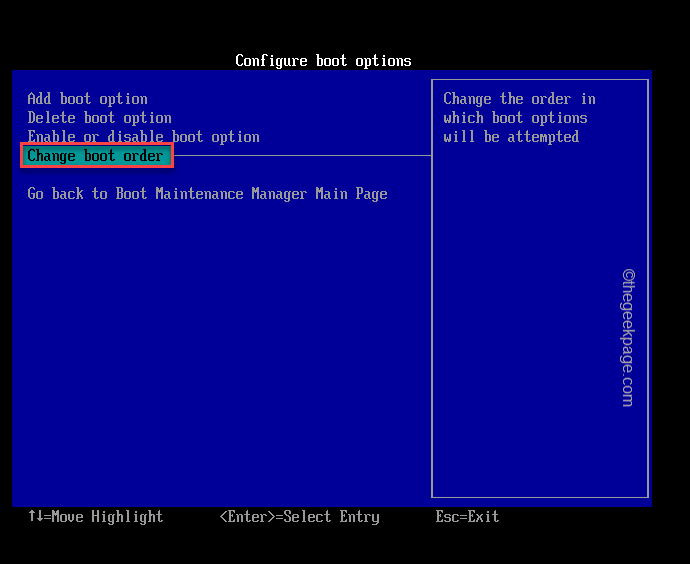
Step 4 – Here, open the Boot Priority (or, ‘Change boot order‘) section.
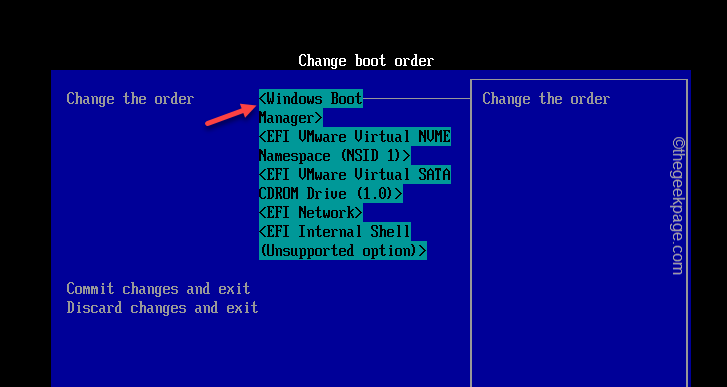
Step 5 – Next, you will find all the booting options that you have on your computer.
Step 6 – Just locate the non-UEFI boot drive (like the name of your USB drive or the Windows installation media). Select that and hit Enter to boot using that.
This will directly start the Windows Setup.
Step 7 – Follow the steps accordingly and create a new partition using the “New” button.
This way, you can complete the Windows installation process without facing that error message.
Fix 2 – Use the Refresh option
There is a refresh option in the Windows Installation module that can be a lifesaver in these kinds of situations. This is how this works –
Step 1 – If you have attached any external media (like HDD, SDD) to your system, detach any or all of those items except the Windows installation drive.
Step 2 – Once you are sure there aren’t any external drives attached to your system, go ahead and start the Windows installation process.
Step 3 – When that same error message appears on the Setup page, just unplug the Windows drive from the PC.
Step 4 – Now, just wait for 10-15 seconds before you plug the Windows installation drive.
Step 5 – Finally, use the “Refresh” button to refresh all the drives.
You can now complete the Windows installation process without seeing any further error messages.
Fix 3 – Switch to the SATA Mode in BIOS settings
The users who are using the HDD Controller in AHCI or RAID mode seem to be affected mostly. So, we recommend you transfer it to the IDE mode.
Step 1 – Close the Setup window and shut down the system.
Step 2 – Restart the system. When you do see the manufacturer’s logo has appeared, just press and hold the key* that is associated with BIOS.
NOTE – Keep in your mind that this button to access the BIOS setting can differ from one OEM to another.
We recommend that you quickly take a look at the bottom of the startup page to know which key actually lets you open the BIOS settings and use that to get to the BIOS screen.

Step 3 – After opening the BIOS settings, look for the “Configure SATA” to “IDE” mode.
Step 4 – Save the settings and quit the BIOS window. Pressing a button does this job. Look for the button that says “Save changes and exit” and press that.
Let the computer restart normally.
Now you can try to install Windows normally using the Windows installation media.
Fix 4 – Create a new partition using Diskpart
NOTE – Perform these steps on an empty drive or if you have a backup of the data stored on the drive. This process involves the creation of a new partition after clearing the disk drive. So, don’t forget to backup the drive.
Format the disk and create a new partition to install Windows in there.
STEP 1 – Open the CMD terminal
Step 1 – Start the Windows installation process using the bootable Windows USB/ DVD drive.
Step 2 – On the Setup page, tap the “Repair your computer” button.

This will load the Windows Recovery Environment on your system.
Step 3 – Then, you have to click on the “Advanced options“.

You can access many Windows recovery tools here.
Step 4 – Just choose the “Command Prompt“ option in there.

Step 5 – Choose your administrative account in that screen and tap on “Continue” to finally get access to the terminal.

Now, your computer should boot to the Command Prompt terminal.
STEP 2 – Run the codes
Step 1 – After reaching the terminal console, copy-paste this code there on the terminal and hit Enter to access the Diskpart utility.
diskpart
Step 2 – After you get into the Diskpart utility, use these commands to list the disks and select the particular disk where you want to install Windows.
list disk
select disk <disk number>
Note – The “disk number” is the disk number where you are going to install Windows. Like, if you want to select the disk number 0, the code should look like –
select disk 0
Step 3 – You have to clean the disk and create a new partition, format it. Simply, copy paste these codes from here one-by-one in the terminal and hit Enter.
disk 0 clean

disk 0 create partition primary

disk 0 active

disk 0 format fs=ntfs quick

disk 0 assign
[Here, the number “0” depicts the disk number on your system. If this disk number is something different on your system, you have to change it accordingly.]
After passing the assign command on that particular partition, quit the terminal.
Get back to the system and commence the Windows installation process using the Windows installation media.
Fix 4 – Activate the Windows partition
Maybe this problem is appearing because the Windows driver is not set as an active portion on the drive.
Step 1 – Follow the steps we have mentioned before to get the system into the Recovery Mode.
Step 2 – Go along the way to use the Command Prompt terminal.
Advanced Options > Command Prompt
Step 3 – Once you are there, type this command and hit Enter.
diskpart
Step 4 – Now, type these commands one by one and hit Enter.
List disk
Select disk 0
NOTE –
Using the list disk command, you can see all the disks on your system.
Next, you have to select the disk where you want to install Windows.
Step 5 – After this, execute these commands one by one and hit Enter to select the partition.
list partition
Select partition 3
NOTE –
The list partition code actually shows all the partitions on your phone.
Choose the Partition number in which partition you want to install Windows. This is the number that you see on the second command.
Like if you choose partition 3, the code shall look like –
Select partition 3
Step 6 – Execute this command to activate the partition from the terminal.
active
Quit the Command Prompt terminal.
Now, as the drive partition is activated, feel free to proceed with the Windows installation process.


