Usually, we take backups of photos, videos, or any kind of data to prevent data loss. Have you thought about backing up emails or the data present in Outlook like calendar events, attachments, etc? This can be helpful to restore your email content when the data is deleted or lost. The Outlook data export or backup can be done easily with a few steps. If you do not want the whole mailbox backup, you can also extract a particular folder’s data or specify certain criteria so that the data which matches the given conditions will only be exported. Apart from these options, you can also extract the data in different formats like .csv or .pst. Follow this article to know how to take email backups from Outlook.
Export The Data From Microsoft Outlook
Step 1: Open Microsoft Outlook and click on the File tab
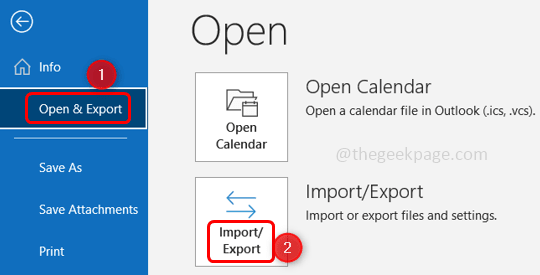
Step 2: In the opened window on the left select Open & Export
Step 3: From the right, click on Import/Export
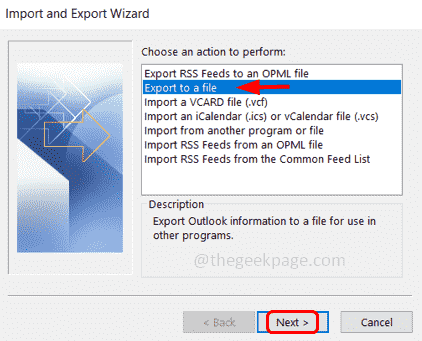
Step 4: Import and Export wizard will open where you have different options to select. Here we will choose Export to a file and click on next
Step 5: Here there are two options to export the data. The comma separated values (.csv) format which makes it easy to import the data and export the data to different applications and another one is the outlook data file (.pst) format by which all the data including calendar entries, and email messages can be exported.
Step 6: Here I will choose the outlook data file (.pst) format and click on next.
Step 7: By default include subfolders checkbox will be enabled at the bottom. If you do not want the backup of subfolders you can uncheck it by clicking on the checkbox beside include subfolders
Step 8: You can choose the folders which you want to export or take a backup of by clicking on that particular folder. Or you can backup the entire mailbox by clicking on the mail id.
Step 9: In case you want to filter the data with specific criteria and export it, you can click on Filters options there appears a window with 3 tabs messages, more choice, advanced. Click on the tabs and specify the requirement like from user to user or only the email which has attachments, etc.
Step 10: Once specified click on OK
Step 11: Click on next and there appear 3 options. Replace duplicates with items exported, allow duplicate items to be created, and do not accept duplicate items. Select anyone as per your need by clicking on the radio button beside it.
Step 12: Click on the browse button to browse the location where you want to save the data.
Step 13: Click on Finish. It will take a few minutes to export the data
Step 14: When it is done, you can use the backup data to import into another application or copy it, etc.
That’s it! I hope this article is helpful. Thank you!!


